set
↧
test
↧
Don’t Step on the Grass
How to design a “don’t step on the grass ” sign that actually makes you want to NOT step on the grass.

↧
↧
Who Moved My Cheese? Summary (5 Min): Dealing With Change Gracefully
Ever felt overwhelmed with the constantly changing world around you? We all get this from time to time. This is one of the reasons why Spencer Johnson’s Who Moved My Cheese? has become such a beloved book by millions of people around the world.
Published in 1998, Johnson’s insightful parable, analyzing how we can cope most effectively with the unexpected changes in our business and our personal lives, was an instant hit. Labeled by Time as “the bestselling business book of all time”, it has sold over 26 million copies, and spent five years on the New York Times business bestseller list. In 2011, it featured on Time Magazine’s list of the Top 25 Most Influential Business Books.
The paperback edition is a pithy 32 pages. Its accessibility is one of its strongest assets: the book’s brevity is coupled with an engaging narrative about how two mice and two “little people”, who live in a maze, set about hunting for cheese. It is a metaphor for finding success and happiness in your life, whether in your work, your community or your relationships.
But as Johnson says in the introduction: “It would all be so easy if you had a map to the maze. If they’d just stop moving the cheese. But things keep changing.” Who Moved My Cheese? encourages readers to analyze their differing reactions to change and uncertainty, overcome their anxieties and make their way into the unknown with efficiency and success.
Johnson has been labeled “the king of parables” by USA Today. The apparent simplicity of Who Moved My Cheese? disguises the complex psychological analysis that follows the four characters, and their different approaches, through the maze. The book is often distributed by managers to employees as a motivational tool, or during times of significant organizational change, designed to help them cope with rapid developments in the business environment. However, its humorous, easy to read approach also explains its appeal among readers seeking self-improvement and help with their day-to-day decisions.
The narrative illustrates our differing responses to unknown and difficult environments, showing that how we cope with changes can have a substantive effect on our success and happiness:
-
Change will happen: anticipate it and monitor the situation. The responses of our mice, Sniff and Scurry, and our “little people”, Hem and Haw, illustrate the differing strategies for surviving and flourishing in uncertain and fluctuating situations. (The names of the little people are taken from the phrase “hem and haw”, a term for indecisiveness.) Both parties eventually manage to locate a supply of cheese in the maze at “Cheese Station C”, although their approaches to the search and their responses to their successes vary significantly.
Hem and Haw (with their “complex” brains) demonstrate the limitations and anxieties that can result from overly analytical strategic planning. They set out to secure success and happiness in the shape of cheese, but instead become depressed during a frustrating, intricately planned search. Once they have managed to locate the cheese, they believe they have worked hard for the victory and earned it. Their fixed preconceptions mean that they begin to take their successes for granted. They fail to identify the changing circumstances that result in the cheese supply eventually disappearing (Hem’s response is: “Who moved my cheese?”), leaving them unprepared and empty handed.
Meanwhile, the more freethinking (“brainless”) mice appear to find the cheese with greater ease, although relying on a degree of luck to do so. They demonstrate that acting without thinking can save time and energy. However, they are able to observe and respond to the changes in their circumstances. Having noticed their dwindling cheese supply, they are better prepared to take constructive action to resume the search and overcome their new difficulties in good time.
-
Adapt to change quickly, change yourself and enjoy it: Sniff and Scurry set out before their supply of cheese runs out, and are rewarded when they find another huge stash of cheese at “Cheese Station N”. However, Hem and Haw demonstrate that a reluctance to respond to change can make life much more painful. The two “little people”, driven by fear, disbelief and a misplaced hope, keep returning to Cheese Station C, growing increasingly hungry, depressed and weak.
Change requires you to cope with a new situation and grapple with a new set of rules, however frightening that may be. Eventually, Haw begins to fantasize about a huge mound of brie, his favourite cheese. The process of visualization helps him to increase his desire, and find the courage and energy to renew his search. After slowly overcoming his fears and growing in confidence, Haw eventually finds Cheese Station N (where Sniff and Scurry have been all along) and his circumstances improve significantly.
Before he re-entered the maze, Haw chiselled on the wall of Cheese Station C: “If you do not change, you can become extinct.” Hem, however, is too afraid to take the advice and search for more cheese. He remains behind, growing increasingly angry and emaciated. While there is a “happy” ending, when Hem eventually manages to follow his friend’s tracks and find both Haw and the cheese, Hem’s long, difficult experience is a clear lesson that we need to be ready to adapt to change and embrace it, if we are to succeed.
The primary takeaway from the book is learning how to overcome fear, handle life changes gracefully and find a path to realize your dream in a less stressful manner. Fear is what makes confronting change so difficult, but as long as you are afraid of leaving your comfort zone, things will never get better. In difficult times, when you do not have everything you need or enjoy happiness, you have to look for something new and be prepared to fill the voids with an alternative. As your environment changes, your responses need to change to – or you will be left behind and empty handed.
Remember, of course, that Who Moved My Cheese? is a parable. Your new “cheese” could be a new job, a new love, a new way of doing business: all you need to do is step outside your comfort zone and begin the search. In short, it offers you a way to find happiness and success by adopting a simple, straightforward approach to overcoming whatever problems life may throw at you.
Read The Full Summary in Blinkist
If you would like to learn more about Who Moved My Cheese?, you can do so at Blinkist. This online service provides clear and accessible summaries, called blinks, of popular non-fiction books. In the blink of Who Moved My Cheese?, you will learn more about how to deal with change, whether in your private or your working life, including:
- how to prepare for a major life change and why thinking like a “simple” mouse may better to help you reach your goals;
- which of the four characters – Sniff, the observer; Scurry, the action taker; Haw, reluctant but encouraged to be brave; or Hem, so frightened of change – best represent you and others in your life and business – and
- how the book can make your team begin to think more favorably and the potential benefits it can bring to an organization in a rapidly changing business environment.
Clink the button below to visit the extended summary of Who Moved My Cheese? by S. Johnsson in the Blinkist online app:
↧
Как создать свой сайт за полчаса: детальное руководство без ерунды
Несколько важных моментов
Здавым смыслом – по мифам о сайтах!
Шаг 1: Зарегистрируй домен и хостинг
Шаг 2: Установи движок для сайта
Шаг 3: Настрой Вордпресс
Шаг 4: Добавь тему и плагины
Полезные советы (Необязательное)
Закругляемся / Вопросы-ответы
Здавым смыслом – по мифам о сайтах!
Шаг 1: Зарегистрируй домен и хостинг
Шаг 2: Установи движок для сайта
Шаг 3: Настрой Вордпресс
Шаг 4: Добавь тему и плагины
Полезные советы (Необязательное)
Закругляемся / Вопросы-ответы
Если ты сейчас смотришь на эти буквы, у тебя скорее всего возникла необходимость создать сайт. Во-первых – мои поздравления! Это означает, что ты делаешь что-то, о чем стоит знать миру. И под “миром” я конечно имею в виду полмира, потому что у остальных полмира пока еще нет интернет-подключения (лишний раз повод порадоваться, что у тебя – есть!).
Так или иначе, в данном пошаговом руководстве я расскажу обо всем, что нужно для создания сайта с нуля. Простым и понятным языком. Без знания кода естественно – я ж не садист какой. Иными словами – меньше чем через 30 минут у тебя будет свой собственный новенький сайт, готовый к употреблению. Я уже упоминал, что в процессе мы сэкономим почти 3000 руб? Так вот, да. В общем, что-то вроде этого:

Знаю, тебе не терпится приступить – и все-таки я советую вначале пройтись по нескольким важным моментам (это займет не более 5 минут, честное слово). Если совсем невмоготу и хочется НАЧАТЬ ПРЯМО СЕЙЧАС, просто проедь два раздела вниз или нажми сюда, чтобы промотать страницу к первому шагу руководства.
Несколько важных моментов
Во-первых, давай сразу уточним: это руководство полностью бесплатно и доступно для всех, но оно НЕ о том, как сделать бесплатный сайт. Да, технически это возможно, однако в таком случае тебе придется либо использовать бесплатный хостинг (если тебе нужен бесперебойно работающий сайт, это не для тебя), либо бесплатную версию строителя сайтов вроде Weebly (которая будет развешивать рекламу по твоему сайту).
Еще одна и пожалуй главная причина в том, что любое доменное имя (то есть адрес сайта) стоит денег – а использование чьего-то поддомена, такого как moisayt.weebly.com, не очень мотивирует посетителей воспринимать сайт всерьез. Резюмируя: немного потратиться все равно придется, если хочешь, чтобы твое творение выглядело профессионально и вызывало уважение. Фокусируясь только на самом важном и используя промо-коды, в данном гиде мы постараемся сократить эту сумму до абсолютного минимума.
Во-вторых, если у тебя вдруг появился вопрос «а вы, собственно, чьих будете, чтобы рассказывать мне как жить?», ниже краткий ответ вперемежку с плохо скрытым хвастовством: меня зовут Андрей Шехирев, являюсь основателем Веб-академии Satori, то есть данного портала. Создаю сайты с 2007 года, как для собственных проектов, так и для чужих. Кроме того, имею статус Elite Author (чесслово, их там так называют) на платформе ThemeForest – самом большом международном рынке «запчастей» для сайтов. Только через ThemeForest мои разработки уже помогли более чем 2000 людям и организациям создать более функциональные и профессиональные вебсайты (и нет, здесь я не собираюсь их рекламировать).
За последние десять лет мне довелось испробовать массу способов создания сайтов и протестировать массу смежных услуг вроде хостингов, сайтостроителей, систем управления содержимым и тд и тп. Руководство, которое ты сейчас читаешь – обобщение всех накопленных мною знаний.
Фух, с этим разобрались. В-третьих и в-последних, еще одна вещь, о которой считаю порядочным сказать сразу и открыто: некоторые ссылки на внешние ресурсы в данной статье являются партнерскими. Это подразумевает, что я получаю вознаграждение за сделанные через них покупки – в первую очередь это относится к хостингу.
Хорошие новости в том, что такая ссылка не влияет на то, сколько ты платишь за расположенную по ней услугу: моя комиссия платится из маркетинг-бюджета компании, которая предоставляет услугу – то есть вместо размещения бестолковых баннеров они направляют средства на поощрение валидных и продуманных рекомендаций (а рекомендую я только самые стОящие компании, репутация мне важнее лишней пары процентов).
Так что если найдешь этот гид полезным и воспользуешься упомянутыми в нем продуктами, я буду только рад – а заплатит за всё это большая международная корпорация, муахахах!
Гхм, окей. Назад к насущному. Напоследок перед тем, как приступить, очень рекомендую по-быстрому рассмотреть несколько самых распространенных заблуждений, связанных с процессом создания собственного сайта – так ты лучше будешь знать, чего ожидать от данного руководства.
Ударим здавым смыслом по мифам о сайтостроений!
Миф номер раз: для создания сайта нужно уметь писать код. Конечно нужно. ЕСЛИ НА ДВОРЕ 1994! А серьезнее – технические решения проделали немалый путь со всемен юности Интернета, и большинство вещей давно автоматизировано. В том числе написание кода, да. Тебе нужно только выбрать самые подходящие инструменты и знать о нескольких важных вещах (в чем, собственно, и есть суть данного руководства).
Миф номер два: создание собственного сайта обойдется тебе в кучу денег. Обойдется, еще как – в случае если решишь делегировать работу стороннему агентству (которое всё равно пройдет примерно по тем же шагам, что описаны здесь, только выпишет тебе толстый счет под конец).
Миф номер три: на создание сайта нужно потратить вагон и тележку времени. Ну, кстати, иногда и приходится – особенно если начинаешь с нуля. Тем не менее, если подходить к вопросу с умом и фокусироваться только на самом важном, можно сваять собственный сайт менее чем за полчаса. Так что давай приступим, наконец!
Шаг 1 из 4: Зарегистрируй домен и хостинг
Первое, что тебе обязательно понадобится, это «место жительства» для твоего нового сайта. Такое место называется веб-хостинг – по сути это специальный, постоянно включенный компьютер, который хранит твой сайт у себя в памяти и показывает его каждому желающему в любое время суток.
Для того, чтобы зайти на твой сайт, эти «желающие» будут набирать уникальный адрес, например moysayt.ru. Это называется доменным именем или просто доменом. К счастью, хостинг и домен можно зарегистрировать в один заход, ибо в наше время многие компании-провайдеры предлагают их в одном пакете.
Подобных компаний – навалом, но с небольшими обычно мало смысла работать: когда речь идет о стабильной, бесперебойной работе твоего сайта, разумнее сразу полагаться на крупные и проверенные временем имена. Переезжать на новый хостинг после того, как твой текущий закроется – та еще волокита.
Из всех хостингов, с которыми мне довелось работать за последние годы, наиболее положительное впечатление оставил Reg.ru (в настоящий момент сам пользуюсь их услугами для онлайн-проектов с многотысячной ежедневной аудиторией). Этот провайдер присутствует на рынке более 12 лет; на данный момент является одновременно и крупнейшим хостингом, и крупнейшим регистратором доменных имен в России+СНГ.
Приобретая эти услуги у Reg.ru, можно пойти друмя разными путями: начать с регистрации домена и добавить хостинг со скидкой, либо начать с оформления хостинга и получить в подарок домен. Так вот самое интересное в том, что по итогам получившиеся корзины с абсолютно одинаковыми заказами будут иметь разные цены! Скорее всего это результат разнообразных одновременно действующих систем скидок и подарков в Reg.ru. Сумма выходит небольшая (я подсчитал), но, как говорит свинка Дося, если нет разницы – зачем платить больше?
Здесь я подробно опишу только тот путь, который обеспечивает наиболее низкую сумму, естественно. Как бонус в конце процесса мы в добавок используем промо-код для получения еще большей скидки. Поехали!
Заходим на страницу поиска доменов Reg.ru (для удобства сделал здоровенную кнопку), воттакую:
Перейти на Reg.ru и сэкономить 33% ›
Там всё просто: вводишь искомое слово (латиницей для всех расширений кроме .рф) и смотришь, свободно ли имя. Наиболее презентабельно будет выглядить расширение страны (.ru если ты делаешь сайт для России, .kz если для Казахстана и тд) – однако, как можешь убедиться, незанятых имен там меньше, чем в новых доменных зонах, таких как .su, .online или .ru.com. Так что выбор за тобой – главное, чтобы название было несложным в написании и легко прочитывалось.
Учитывай – если вписывать имя вместе с расширением, например “satoristudio.ru”, и оно окажется незанятым, система автоматически добавит его в корзину – кнопка в конце строки с этим доменом станет серой и поменяется на «выбран». Если захочешь убрать его из корзины, нажми на эту кнопку один раз. Вот как все это выглядит:

Когда домен мечты найден, жмем на большую зеленую кнопку «Зарегистрировать» в правом нижнем углу – и мы попадаем на страницу настройки домена. Здесь оставь включенным автопродление (если не продлить домен вовремя, его сможет выкупить любой желающий, и твой сайт исчезнет с лица интернета) и поставь обе галки в разделе «Бесплатно хостинг на 2 месяца и SSL-сертификат» – первая даст тебе скидку на хостинг и бесплатную почту (тоже пригодится в будущем), а вторая – бесплатный SSL-сертификат.
Отметив галку «Почта и хостинг», ты увидишь список тарифных планов с довольно рандомными названиями, отсортированных по цене. Самый первый план (Host-Lite) не рекомендую, ибо он совсем уж слаб и не поддерживает даже самые популярные системы управления сайтами, такие как WordPress – а вот Host-A для наших текущих нужд вполне подойдет. Если твой сайт разрастётся в будущем, ты сможешь легко перейти на более навороченный план в любой момент.
Что касается SSL, то это особенно важно в настоящее время, потому что все интернет-броузеры уже начали или скоро начнут показывать значок «небезопасно» в адресной строке напротив любого сайта без сертификата SSL, то есть без защиты передачи данных. Сайт с действующим SSL, наоборот, получает успокаивающий зеленый замо́к с надписью «безопасно», что дает ему как минимум +900 к доверию пользователей и +200 к репутации среди поисковых систем.
В сумме вот как должна выглядеть страница настроек домена и дополнительных опций после всех упомянутых манипуляций:

Здесь всё, жмём «Продолжить» и едем дальше! А дальше увидишь форму информации об администраторе домена – да, это нудно, но её нужно заполнить актуальными данными, потому что это позволит закрепить домен за тобой (пока ты за него платишь, конечно). Так что закатываем рукава, заполняем форму и жмём большую зеленую кнопку.
Небольшой лайфхак – в самом низу форму будет галочка «сохранить профиль», убедись, что она активна, и введи в соотв. поле название профиля (например свое имя) – это сэкономит тебе время уже через несколько минут.
На следующей странице просто кликаем на «Продолжить», менять здесь что-либо актуально только в том случае, если ты планируешь использовать другой (мы не планируем).
Следующая страница будет поважнее: здесь нам нужно выбрать изначальный срок действия хостинга и панель управления. Для наших целей лучше всего подойдет 12 месяцев, потому что а) года обычно достаточно, чтобы понять, нужен ли сайт и что с ним делать дальше, и б) продлевать потом удобно будет такими же интервалами, т.е. раз в год.

Что касается панели управления, особо большой разницы между ними, в принципе, нет (если вдруг интересно подробнее, можно почитать на английском скажем здесь, но выбору это сильно не поможет). Так что возьму на себя инициативу и предложу выбрать cPanel – во-первых, она всё-таки самая популярная в мире, с большим отрывом; во-вторых, сам ей пользуюсь почти для всех сайтов, которые создаю.
Выбрав нужные опции, нажимаем на зелёную кнопку «Я принимаю условия ля ля ля» и попадаем на ещё одну страницу с дополнительными функциями (обещаю, они скоро закончатся!), где снова отметим, что хотим бесплатный SSL-сертификат для нашего домена – если честно, не знаю зачем они спрашивают про это ещё раз, но галку поставить всё же нужно. Остальные вещи на этой странице нам сейчас не нужны, так что жмём на «Продолжить».
..и попадаем на еще одну страницу с формой личной информации под названием «Настройка новой услуги». Вот где пригодится наш сохранённый ранее профиль – если покупаешь домен от своего имени, выбери профиль в правом верхнем углу, и все поля заполнятся автоматически. Жмём, как обычно, на большую зелёную кнопку, и попадаем (наконец-то) на страницу корзины покупок.
Йес! Мы на финишной прямой. Как видишь, мы уже сэкономили 588 руб на хостинге за счет покупки одновременно с доменом, а также бесплатно получили SSL-сертификат (который, между прочим, отдельно стоит 2242 руб в год).

Но зачем останавливаться на достигнутом? Видишь справа маленькую синюю надпись «У вас есть промокод?» – как говорят в Одессе, я вас умоляю, конечно их у нас есть! Радостно жмём на надпись, видим новое окно с пустым полем, куда смело вводим следующий код и нажимаем «Применить»:
ACTHOSTING
Бум! Еще минус 144 рубля. Мелочь, а приятно. Вот ТЕПЕРЬ можно нажимать на «Перейти к оплате» и со спокойным сердцем оформлять покупку. Уверен, с этим ты разберёшься и без меня.
Давайте подсчитаем: мы только что сэкономили 588 + 2242 + 144 = 2974 руб (а это, между прочим, 67% от полной цены) и получили у топового провайдера всё необходимое для проживания нового сайта. Скоро тебе на почту еще придет бесплатный ваучер на 3000 руб для рекламы в Google AdWords – дополнительная плюшка, её в калькуляциях учитывать не буду. А знаешь что ещё? Все остальные шаги данного руководства не будут стоить тебе ни копейки.
Да, кстати, мы закончили с первым шагом, пожалуй самым непростым – так что подходящее время потянуться, размяться и взять чаю. Я подожду здесь.
..
..
Разминка окончена? Тогда приступаем ко второй части нашего руководства:
Шаг 2 из 4: Установи движок для сайта
Итак, мы зарегистрировали домен и хостинг, то есть «место жительства» для нашего сайта. Теперь можем приступать к самому сайту – а для этого нам понадобится CMS, или система управления сайтом (Content Management System).
Она будет служить «центром управления полётов», позволяя создавать структуру сайта, наполнять её содержимым, добавлять функции (например, как навигация или форма контаков) и изменять внешний вид (дизайн) сайта. И всё это – без единой строчки кода с твоей стороны, как мы и обещали в самом начале.
Какую CMS выбрать для своего первого сайта? За 10 с чем-то лет онлайн-проектов я вывел для себя простое правило:
если делаешь что-то в первый раз, не мудри и используй самую популярную технологию, которая для этого существует.
Логика проста – таким образом ты автоматически выбираешь самое проверенное и признанное решение, которым пользуется максимум людей, а значит практически любой вопрос, который у тебя появится, скорее всего уже появлялся у кого-то и был отвечен кем-то другим много, много раз.
Что это значит для нас? А что мы, для нас выбор очевиден – конечно же WordPress (или сокращенно WP). На Вордпрессе работает треть всех сайтов в мире и более 40% всех сайтов рунета. Мало того, что сама CMS полностью бесплатна – для нее существуют тысячи бесплатных расширений и визуальных шаблонов, а также огромное сообщество пользователей и масса руководств россыпью по всему интернету.

Кроме текущей инструкции по установке, в конце этого гида ты также найдешь наводки по улучшению безопасности и устойчивости твоего WordPress-сайта, тоже при помощи популярных бесплатных расширений.
Окей, давай к делу: зайди в панель управления хостингом, которую мы получили в первом шаге – для этого воспользуйся прямой ссылкой из полученного от Reg.ru имейла. Либо зайди в свой личный кабинет на Reg.ru, нажми на свое имя в верхнем правом углу экрана, выбери «мой хостинг и услуги» в выпадающем меню, нажми на название хостинг-пакета в таблице, а дальше кликни на большую зелёную кнопку «панель управления хостингом». Ну или лучше добавь адрес панели себе в закладки, всё-таки.
В панели хостинга проедь до самого низа и найди раздел “Softaculous Apps Installer” – а там нажми на пункт с надписью «WordPress» и иконкой в виде «W», такой же как глаз пожирающего мир пакмана на картинке выше.
На странице установщика нажми синюю кнопку «Install Now”, что приведет тебя на страницу настроек, которая выглядит, в заполненном виде, примерно вот так:

Давай вместе пройдемся по тем настройкам, которые нужно использовать, там есть пара важных моментов:
- В первом разделе выбери «https» среди протоколов (это и есть SSL, который мы приобретали ранее – перед тем, как приступать к данным шагам, пройдись по SSL-инструкции, которую тебе выслали на почту после регистрации хостинга).
- Не удивляйся, если установщик начнет ругаться на тебя по-английски после выбора «https»-опции: когда выберешь свой правильный домен в следующем поле, желтое сообщение пропадёт.
- Дальше, в разделе «Site Settings» можешь заполнить имя сайта и описание, но это не обязательно на данном этапе – всегда сможешь поменять оба поля в настройках самого Вордпресса.
- Теперь самая важная часть: введи имя пользователя, пароль и имейл для администратора сайта (то есть себя). И ради всего святого, не оставляй логин “admin” и не ставь пароль “12345” !! Когда запишешь свой пароль, поищи его в этом списке – если найдешь, сразу же смени на что-то более креативное. Если буксуешь, попробуй, например, этот способ от авторов броузера Firefox.
- Проверь, чтобы в поле «Admin Email» был указан твой актуальный почтовый ящик – также можешь сразу промотать до самого низа и указать его же в поле «Отправить детали установки» под синей кнопкой.
- Кроме вышеперечисленного нам осталось поставить только несколько галок: разверни раздел дополнительных настроек, нажав на “Advanced Options”, и пометь все 4, что там есть (см. фото выше). Эти настройки заставят WordPress и все его компоненты автоматически обновляться, что важно для поддержания безопасности сайта – а также избавят тебя от получения имейлов каждый раз, когда это происходит.
Всё, теперь перепроверь все поля и можешь жать на «Установка». Если увидишь красное сообщение про то, что какие-либо файлы уже существуют – отметь галку, чтобы «переписать все файлы и продолжать», и снова нажми на «Установка».
Установщик покумекает несколько секунд, а потом поздравит тебя с успешным завершением процесса. Поздравлю и я – между прочим, у тебя теперь есть собственный сайт!
Кроме того, установщик выдаст тебе два адреса: домашнюю страницу сайта (например, https://satoristudio.ru) и ссылку на панель управления WordPress – она всегда будет иметь дополнение «wp-admin» (например, https://satoristudio.ru/wp-admin).
Мы, в принципе, закончили с трудоёмкой частью. Остальные два шага будут посвящены краткому введению в WordPress – в первую очередь, полезным разделам панели управления и некоторым настройкам, которые стоит поменять сразу:
Шаг 3 из 4: Настрой Вордпресс
Итак, мы в админ-панели WordPress. Перед тем, как начинать заполнять свой новый сайт содержимым, предлагаю пройтись по основным разделам, которыми ты будешь пользоваться чаще всего.
Самыми часто посещаемыми пунктами административного меню WP можно назвать Записи и Страницы, а также Комментарии, где можно модерировать обсуждения (если решишь использовать этот функционал).
В чем разница между записью и страницей? Первое – предназначено больше для периодических материалов, вроде новостей или постов блога; второе – для постоянных материалов, например страницы «О нас» или «Контактная информация». Чтобы слегка усложнить вещи, в Вордпрессе есть еще понятие страницы записей – это та страница, на которой показывается лента записей (чаще всего на сайтах это раздел «Блог» или «Новости»). К этому моменты мы еще вернемся ниже, а пока – двигаем дальше.

Еще один важный раздел админ-меню WP – это Внешний вид, в котором можно выбрать и установить визуальную тему-шаблон для сайта (Внешний вид → Темы), настроить меню навигации (Внешний вид → Меню), а также виджеты – специализированные блоки с определенной функцией, например отображающие список категорий или форму поиска, обычно в боковой панели сайта.
Кроме того, здесь же еще раздел Внешний вид → Настроить, где можно, эмм.. настроить различные.. настройки? В общем, эта зона часто используется авторами тем для дополнительных опций, таких как цвета разных элементов сайта или добавление логотипа. Там же можно в более наглядной форме настроить и все остальные вещи, о которых упоминали выше – меню, виджеты и тд.
За Внешним видом следует раздел Плагины, в котором можно установить пакеты-расширения для дополнительного функционала, например улучшенной безопасности, формы контактов, аналитики и так далее.
Ну, это был, наверное, самый резвый экскурс в Вордпресс в мире! В его завершение стоит рассмотреть последний раздел Настройки, поскольку некоторые вещи ты скорее всего там сразу захочешь поменять:
Настройки → Общие: помнишь, я упоминал при установке WP на хостинге, что название и описание сайта можно будет сменить в любой момент? Так вот, это можно сделать именно здесь. Кроме того, пока ты в данном разделе, проверь, что все остальные настройки тут тоже соответствуют твоим предпочтениям.
Настройки → Чтение: не самое удачное по смыслу название, но всё же очень полезная секция – здесь ты сможешь выбрать, что показывается на главной (домашней) странице твоего сайта – просто страница или страница записей. Е
сли остановишься на опции «статическая страница», тебе также будет предложено выбрать, какую из существующих страниц превратить в страницу записей (то есть раздел с блогом/новостями); ну или ты всегда можешь пойти в раздел Страницы, создать новую пустую страницу (назвать её «Блог» или «Новости», например), вернуться сюдя и объявить её как страницу записей – чаще всего именно так и делают на Вордпрессе.
Настройки → Обсуждение: этот раздел целиком посвящен комментариям и содержит миллион флажков, из которых самым важным является третий по счёту: «Разрешить оставлять комментарии на новые статьи». Если хочешь, чтобы посетители могли комментировать твои записи, поставь там галку. Кстати, сразу можешь убедиться, что первые два флажка пусты – ничего кроме спама в наши дни ты через эти функции не получишь.
Далее, раз уж оставлять комментарии мы разрешаем, советую также активировать опцию «Разрешить древовидные комментарии» – это позволит посетителям отвечать на комментарии друг друга, что приведет к более оживленной дискусии (но и модерировать всё это безобразие придётся активнее, конечно).
Очень рекомендую также поставить галку «Комментарий должен быть одобрен вручную» – в противном случае все спам-комментарии (а их будет много) будут автоматически появляться на сайте, и придётся потом вылавливать их пост-фактум (зачем тебе это?). Ну и, наконец, проверь, чтобы две настройки в подразделе «Отправить мне письмо, когда», соответствуют твоим предпочтениям.
Настройки → Постоянные ссылки: это последняя секция, где мы сразу можем кое-что поменять. Здесь просто выбери «Название записи» если оно еще не выбрано и сохрани изменения – это скажет системе автоматически создавать наиболее читабельные адреса записей и страниц (satoristudio.ru/stranica вместо satoristudio.ru/?p=23528).
Вот и всё! Ничего сложного в Вордпрессе нет, как и обещал (не обещал? Значит, наверное, громко думал про себя). Теперь вполне можно начать добавлять содержимое, но есть еще один шаг, который вроде как факультативный, но вообще-то обязательный:
Шаг 4 из 4: Добавь тему и плагины
В принципе, ты можешь оставить внешний вид сайта как есть и сконцентрироваться всецело на текстах, картинках и тому подобном. Правда, в таком случае твой сайт будет выглядеть точь в точь как мильон других сайтов, хозяева которых поленились поменять шаблон по умолчанию.
К счастью, прямо на сайте Вордпресса бесплатно доступны сотни и тысячи самых разных тем, предлагающих массу возможностей для быстрой и лёгкой персонализации любого сайта.
Или вот, например, бесцеремонная самореклама: раз уж мы заговорили о бесплатных WP-темах, ты можешь попробовать и нашу универсальную тему Bento (как можешь заметить, мы здесь в Satori фанатеем от Японии, да).

Bento даёт возможность менять внешний вид практически любого элемента сайта, легко строить симпатичные страницы с различными разметками (в том числе несколько видов сетки) и делать много других вещей, которые редко встречаются все сразу в одном WP-шаблоне, да еще и бесплатном. Подробнее можно почитать на официальной странице (на нашем же сайте):
Мы сделали для Bento подробную онлайн-документацию (на английском языке) и предоставляем бесплатную техподдержку (на любом языке) через почту и на официальных форумах.
/ конец саморекламы /
Что касается плагинов.. стой, на всякий случай давай убедимся, что тебе понятна разница между темой (шаблоном) и плагином (расширением): первое меняет внешний вид сайта, а второе – его функции. Тема на сайте в любой момент времени может быть активирована только одна, а плагинов – сколько угодно.
Так вот, что касается плагинов, то их тоже существует тьма тьмущая, как бесплатных так и платных, и с помощью них ты сможешь без особого труда добавить к своему сайту практически любую дополнительную функцию, которую только можно представить – от всплывающих окон и контактных форм до форумов и социальных сетей. И нет, плагины мы не строим, так что не жди затычки про «Суши» или «Камикадзе»!
Вместо этого, здесь я просто упомяну несколько наиболее полезных бесплатных расширений, которые пригодятся практически каждому сайту:
- Akismet для автоматического отфильтровывания спама в комментариях. Эта детка сэкономит тебе столько часов жизни (модерирования), что ты захочешь сделать татуировку «Akismet» готическими буквами у себя на спине. Этот плагин, кстати, использует разные шаманские примочки вроде машинного обучения, так что велика вероятность, что со временем он адаптируется к твоим посетителям и будет всё лучше и лучше отлавливать спам.
- All in One SEO для поисковой оптимизации. Это, пожалуй, один из лучших WP-плагинов для заполнения мета-данных страниц, таких как заголовок и описание, отображаемые в результатах поиска Яндекс и Гугл. Яндекс и Гугл любят такое внимание к деталям, очень.
- Google Analytics Dashboard для настройки статистики посещений. Для этого плагина понадобится учётная запись в Google-Аналитике, которая тебе, как обладателю сайта, в любом случае нужна в обязательном порядке.
- Contact Form 7 для создания форм обратной связи. Если хочешь, чтобы при каждом новом сообщении тебе приходил имейл, нужно будет также установить плагин-почтальон WP Mail SMTP (для его настройки тебе пригодятся вот эти сведения от Reg.ru).
Вот, теперь мы официально закончили. Сайт у тебя есть, теперь его можно продолжать заполнять содержимым и приводить в товарный вид. Можешь в принципе закрыть этот гид – ну, или если тебе интересно получить несколько советов по безопасности и устойчивости сайта, смотри следующий раздел, озаглавленный скромно –
Полезные советы (Необязательный шаг)
Многолетний опыт создания сайтов для себя и других подсказывает, что есть пара вещей, о которых их владельцы обычно не задумываемся, пока не произойдет что-то нехорошее (а когда происходит, обычно уже поздно). Я имею в виду, конечно, безопасность и резервное копирование.
Совет №1: Как сделать сайт непривлекательным – для взлома. Именно в такой формулировке – потому что взломать можно любой сайт, если очень захотеть, но ты можешь принять ряд несложных мер, которые сильно уменьшат это «захотеть» и максимально затруднят дело любому, кто захочет попытаться нанести твоему детищу вред. Как учат заморских бойскаутов – для спасения от медведя необязательно бегать быстрее всех, нужно бегать быстрее самых медленных друзей.
Первая и самая простая рекомендация здесь (которой всё равно почему-то не следует 99% сайтовладельцев): не используй в качестве имени пользователя к WordPress-панели стандартное «admin» – иначе злоумышленникам останется только подобрать твой пароль, что сильно облегчит им задачу. Просто используй любое другое слово.
Кстати про пароль. Я уже говорил об этом в шаге про установку Вордпресса, но скажу еще раз: используй сильный пароль, с буквами-цифрами-знаками или состоящий из нескольких редких слов. Уже одно это повысит сложность взлома твоего сайта раз в 10, если не в 100.
Для дополнительной безопасности очень рекомендую также установить плагин для двухступенчатой аутентикации – если человеческим языком, то это расширение, которое будет при входе в админ-панель WP спрашивать у тебя вместе с логином-паролем ещё и уникальный, меняющийся раз в полминуты код, который будешь видеть только ты на своём смартфоне. Такая штука сделает несанкционированное проникновение на твой сайт ещё раз в 100-1000 более сложным.
Ещё одна кажущаяся очевидной привычка, которую многие всё же игнорируют – регулярно проверять, что на твоём сайте установлены последние версии как самого Вордпресса, так и всех тем с плагинами. Во втором шаге мы уже, помнится, выбирали соответствующие опции при установке WP, но упомянуть лишний раз об этом точно не помешает.
Для тех, кому всего этого покажется недостаточно, могу посоветовать бесплатный плагин Wordfence, который содержит массу дополнительных функций по поддержанию безопасности сайта, таких как автоматическое сканирование на предмет вредоносного кода и проверка валидности плагинов. В таком бронепоезде даже самый неспокойный вебмастер сможет крепко спать по ночам.
Совет №2: Как делать резервные копии сайта. Вряд ли кто хочет заниматься этим каждый день вручную; а если возникает непредвиденная ситуация, вебмастер резко становится готов отдать всё что угодно за работающий бекап, поверь моему горькому опыту.
Здесь всё еще проще, чем с безопасностью: достаточно установить плагин вроде UpdraftPlus, который будет сам делать резервные копии всего сайта и сохранять их где пожелаешь (даже на облачном хранилище вроде Google Drive, что, кстати, очень удобно).
Могу сразу сказать, что сам никогда не пользовался платной версией UpdraftPlus Pro – базовая версия содержит всё, что нужно. Так что про Pro сказать ничего не могу, да и не нужно, думаю.
Закругляемся / Вопросы-ответы
Бам! Мы только что научились создавать сайты с нуля, сэкономили почти 3000 руб. в процессе, и может даже интересно провели время.. Хоть чуть-чуть? Можеть быть? Ну ладно, главное что сделали сайт!
Если это руководство показалось тебе полезным, не раздумывая делись им в соцсетях (ладно, твит тоже сойдёт) и может даже расскажи своим друзьям-новичкам, которые ещё не умеют создавать собственные сайты. Во дилетанты!
..Ты еще здесь? Я даже немного удивлён (и польщён), если честно. Не знаю.. ну например – чуть ниже есть еще секция с комментариями, там можешь задать любой вопрос по поводу сайтостроения мне и другим читателям данного пособия. А, и если у тебя появятся предложения по поводу улучшения данного руководства или критика – оставь их при себе! Шучу, конечно же тоже делись всем наболевшим, не зря я у себя в Вордпресс ставил галку в «разрешить комментарии».
В общем – действуй и не теряй жажды к новым знаниям. И удачи в том деле, для которого тебе понадобился сайт, конечно!
↧
Hostinger Review: Is “Almost Free” Better than “Free” for Hosting? + 15% Off Coupon
I know the situation: you want your own website, but there are SO MANY hosting providers with so many options out there that it seems impossible to finally decide: which one to choose?!
If you’re reading this you’ve probably heard of Hostinger, a domain and hosting company that offers significantly lower prices than most competitors. In this detailed review, we will look at Hostinger through a magnifying glass and answer the following questions:
- Should you choose Hostinger over its competitors?
- Which of their hosting plans is the best for you?
- How about their site builder – is it worth trying?
- Can you get a discount on Hostinger services?
First, we will briefly examine the company’s background and history to understand if they can be trusted, after that we will go into more details about their services, and finally we will conclude with a verdict and provide answers to the questions we formulated above.
Oh, yes, and at the end of this review I will reveal an exclusive promo code which will allow you to save 15% from your Hostinger order, on top of all the existing discounts and special deals you can find on their website. Nice!
The Story of Hostinger
Hosting Services – How to Choose?
Using Hostinger: Our Impressions
Hostinger Customer Support
Pros and Cons of Hostinger
BONUS: 15% Off Promo Code
Our Verdict and User Reviews
Hosting Services – How to Choose?
Using Hostinger: Our Impressions
Hostinger Customer Support
Pros and Cons of Hostinger
BONUS: 15% Off Promo Code
Our Verdict and User Reviews
The Story of Hostinger
To give you an idea of just how large Hostinger is, here are some figures: the company currently has almost 30 million customers not only in the US, UK, India and Indonesia, but also in 170+ other countries (this is almost every single country of the world!)
And there are no signs of slowing down – according to their data, Hostinger is still expanding at a rate of 1 client every 5 seconds.
However, as you might expect, Hostinger hasn’t always been the international giant it is today. It started back in 2004 as humble “Hosting Media” in a small but rapidly growing country of Lithuania, located in the north-eastern part of the European Union.
The founders of Hostinger did not intend to follow the crowd and create just another hosting service – they based the new company on an innovative idea:
People don’t want to pay for our marketing – just the hosting: simple, reliable, and as cheap as possible.
After many years, this principle still remains at the core of what Hostinger aims for, namely high-quality services for a close to zero price.
But how does Hostinger achieve such competitiveness? – you might rightfully ask – In other words, how does it manage to keep its prices low while keeping the quality high? I will explain soon – but first, let’s look at the product itself:
Which Hosting Plan Is Right for You?
There are several different types of hosting on the official website of Hostinger, each with multiple pricing plans. This makes it a challenge to choose just one, considering that there are also various additional services and features included free of charge depending on the plan.
Let’s roll up our sleeves and try to understand the essential components of hosting – this will enable us to narrow down our choice and arrive at the final conclusion.
We’ll examine each of the three types of Hostinger’s hosting services, but first, take a look at this little table. It summarizes the most important differences between hosting types and provides the most common use cases:
| Shared hosting | Business hosting | VPS hosting | |
|---|---|---|---|
| Ease of use | Easy | Easy/medium | Medium/hard |
| For whom? | Individuals and small businesses | Medium and large businesses | Developers and programmers |
| Degree of control | Standard features via standard control panel | Extended features via custom control panel | Full control – almost like having your own server |
| Performance | Sufficient for small and medium websites | High performance for larger websites and online projects | Medium to high depending on the plan |
| Room for growth | Rigid – need to upgrade to another hosting plan | Flexible – can add more resources “on the fly” | Very flexible – granular control over resources |
| Price level | Low | Medium | Flexible |
I think that even from this table, the difference between the three hosting types that are offered by Hostinger is quite clear, but we will also give slightly more detailed explanations below.
Before we go into details, though, we need to understand one key concept: the server. Simply put, it’s a specialized computer that stores websites and displays them to your online visitors:
Any hosting is a collection of servers, powerful computers which are optimized to stay online 24/7/365 and show your website to anyone who types in its address into their browser.
So, servers are essentially the main component of any hosting service, and they can be used in different ways depending on the client’s requirements and budget. This is where the three hosting types come in:
-
Shared hosting is a basic version for those who are just starting or want to test their online projects with minimum expenditures. It’s called “shared” because each server holds hundreds or even thousands of websites from various clients.
This implies that a single server’s resources are used simultaneously by many sites – fine for websites which have moderate traffic, but can drastically affect performance for larger websites.
On the positive side, shared hosting is extremely cheap and very easy to use. This makes it ideal for private persons and small enterprises which are just starting their way into the online world.
-
Business hosting is a more advanced type, suitable for larger websites which are expected to have medium to high daily traffic (thousands of users per day and more).
Hostinger’s business hosting uses what’s called cloud technologies – your computing resources are not tied to a specific physical server, but are spread across multiple machines, which guarantees better stability and resilience.
This also means that your hosting resources are isolated from all other websites in this case, which leads to overall higher performance, compared to shared hosting.
All these benefits come at a cost, of course – business hosting is significantly more expensive, with the cheapest plan (“Startup” at $15.90 per month) costing twice as much as the most expensive shared plan (“Business” at $7.95 per month). By the way, the latter naming is quite confusing in my opinion – but now we know what to expect :)
-
VPS hosting is the most flexible and the least user-friendly hosting type offered by Hostinger. It stands for “Virtual Private Server”, because in this case a single physical server runs several individual environments which do not intercept with each other at all. It’s like having your own server, except that it’s a so-called “virtual” machine.
Such setup allows for maximum flexibility – you can do almost anything you want with your virtual server, because you have administrator-level control over the entire system.
Which this sounds like fun, until you realize that you won’t get a convenient control panel with a VPS hosting plan. In other words, it’s up to you to set up every part of your virtual server.
This is why this type of hosting is simultaneously very useful for professionals who know exactly what they’re doing (i.e. programmers and web developers) and next to useless for anyone else.
Given the specific features of each hosting type, I can make a reasonable suggestion that you should probably choose the shared type. Why? Because if you were representing a large business or a web development company, you would already know everything I mentioned in the previous sections.
That case aside, let’s assume you need the basic hosting – and see which of the three Hostinger Shared plans is the most reasonable choice.

On Hostinger’s shared hosting page you can see three offers: the Single plan, priced at $0.88 per month, the Premium plan, priced at $3.49 per month, and the Business plan, priced at $7.95 per month. I believe it is important to understand that these are special promotions:
- You can get these prices if you order a 48-month package, smaller periods cost slightly more (if you ask me, a 12-month package is usually more than enough to understand if you really need a website, and test your online project).
- Such prices are valid for the duration of the package you order, after that your hosting will get prolonged at a normal rate.
Just to be clear – these are both common practices among hosting provides, so nothing sneaky about Hostinger in this regard.
All three shared plans are equipped with everything that is necessary for an easy start, including optimized software and hardware, so we will just focus on the differences:
| Single | Premium | Business | |
|---|---|---|---|
| Number of domains | 1 | ∞ | ∞ |
| Email accounts | 1 | ∞ | ∞ |
| Free SSL included? | – | – | yes |
| Backups | – | weekly | daily |
| Processing power | 1x | 2x | 4x |
| Free domain? | – | yes | yes |
The Single plan has too few features and computing power that is enough only for the smallest of websites, while the Business plan adds very few benefits compared to the Premium plan while being twice as expensive.
In other words, the Premium plan is the most balanced in terms of features, most importantly it is the cheapest plan with a free domain included.
Moreover, it is the cheapest plan to offer automatic backups – and you will definitely feel the usefulness of this feature the first time something happens to your website :)
To conclude, for most individuals and small-medium organizations the Premium Shared Hostinger plan is the most reasonable choice. In the last part of our review I will provide an exclusive promo code for an additional 15% discount for this plan, stay tuned!
Our Impressions from Using Hostinger
For the purpose of this review we have purchased the Premium hosting plan from Hostinger and tested it extensively. Now, we are sharing our experiences with the readers of this guide.
When you complete your order, you get access to the hosting admin panel – this is the place where you will manage your hosting account:

Hostinger offers a custom admin panel, built by the company’s internal developers. We found it quite user-friendly and easy to understand, compared with widely used alternatives such as cPanel or Plesk.
Everything you need is represented by tiles with pictures, and organized neatly into groups to help you find services quicker. You can also use the search bar at the top for easier access to desired items.
If you purchase a domain with your hosting (below I will show you how to get it for free), it will automatically activate after a short while, and you will be able to start creating your website.
For that, you can either use the Auto Installer to set up a content management system such as WordPress – or use Hostinger’s drag-and-drop website builder. Both options can be accessed from the Website section of the hosting admin panel.
After trying out the drag-and-drop builder (which they call Zyro) we can conclude that it’s not worth your time: the templates look outdated and sometimes get messed up when you use them, for example this is what I got right after activating:

Instead, we recommend installing WordPress (also called WP) using the Auto Installer feature mentioned above. Here are just some of the reasons why you should choose WP for your first website:
- WordPress is the most popular website engine in the world, so there are tons of free tutorials, guides and tips about using it – all over the Internet!
- You can get thousands of templates for free from their official catalog (try Bento, for example – it’s multi-functional and easy to personalize).
- There are also thousands of free extensions for WordPress which allow you to add almost any conceivable functionality to your website, from social sharing buttons and contact forms to drag-and-drop layout builders.
Apart from the product itself, another very important part of any offer is the customer support you get. Let’s take a look at how Hostinger performed in this area:
Hostinger Customer Support
You can ask Hostinger team for help at any time of day, 24/7 via the chat that is located in the bottom right corner of the hosting admin panel.
To test the quality of support we have asked them questions via live chat: the response time was super-fast (usually just several seconds), and the Hostinger representative was always friendly, polite and helpful. They sometimes even use cat pictures to brighten your mood while you wait for them to type the reply :)
Apart from live chat, there is a free library of useful articles about all Hostinger products and services. You can find it by clicking the “Help” link in the top menu of the hosting admin panel. It also contains a list of most frequently asked questions – there’s a big chance that your issue can already be fixed there.
Overall, Hostinger has managed to exceed our expectations when it comes to quality of support – especially given that their hosting is very inexpensive. We’ve seen much worse even from competing companies with higher prices.
Pros and Cons of Hostinger
Now that we’ve examined Hostinger’s products and services, as well as customer support – let’s summarize the positive and negative sides. We’ll try to be as objective as possible:
- Great value for money: very competitive prices for all hosting packages – as Hostinger puts it, “you only pay for the hosting, not for the marketing”
- Flexible offers for any kind of client – from individuals and small businesses (shared hosting) to large companies (business hosting) and professional programmers (VPS hosting)
- 99.9% uptime guarantee – in essence, Hostinger promises that your website will be available online all the time. The figure translates into a maximum of 44 minutes of downtime per month, which in practice is close to 0 minutes of downtime according to our tests.
- You can get a free domain name with your hosting purchase if you choose at least a 12-month package
- Easy to use, unique hosting admin panel developed by Hostinger team specifically for the company’s clients
- You can install WordPress in just several clicks using the Auto Installer feature from the hosting admin panel
- Large library of educational resources about using Hostinger’s products, available for free to all clients
- Top-notch support from a friendly, fast, and helpful team that are always ready to solve your problems 24/7
- Mediocre website builder with outdated template designs and occasional errors when switching from one template to another. We recommend using WordPress instead.
- No possibility to get support by phone – you will need to use either live chat, email, or contact form instead
Before we finish this review with a conclusion and a verdict (should you use Hostinger?), here’s a step-by-step guide for getting an additional 15% off your Hostinger purchase:
Bonus: Hostinger Promo Code -15%
We’re very excited to show you how to save even more money by using our exclusive 15% off coupon code. Follow the simple steps below to get a nice additional discount on your Hostinger purchase.
Since we concluded earlier that the 12-month Premium shared plan is the most reasonable choice for most cases, we will be using it as an example for our guide.
- Go to the shared hosting page on Hostinger official website by clicking the button below (it will open in a new window automatically):
- Under the Premium Shared Hosting (i.e. the middle option), click on the large red “Get started” button. This will bring you to the configuration page.
- Click to choose the 12-month package (this is the cheapest plan which gives you a free domain name, so it’s not worth choosing the 3-month plan).
- In the domain section below, input the domain name you want. You might need to try several times before you find one that is available.
- Although this is optional, we also highly recommend ticking the “SSL certificate” checkbox – it doesn’t cost much, but will make your website safer and more trustworthy. Your website will also display a green safety lock in the browser’s address bar if you have SSL.
-
All other things on that page are not essential – you can of course include them as well but you can do just fine without them. At this point this is how your configuration page should look like:
![]()
-
Now look at the right side of the page and find the light grey text which says “Have a coupon Code?”. It should be located right above the total order sum. When you click on the link next to it, at new field will appear in its place. Type in the following code:
SAVE15
-
After inputting the code, click on the plus icon to the right (it should become violet in color). You will see a message saying that the coupon code has been successfully applied, and a new discount will appear in your order:
![]()
- Congratulations! You’ve just saved an additional 15% from your Hostinger purchase, making the final price even more attractive.


Our Verdict and User Reviews
After examining Hostinger from all possible angles and using its services for some time, we can conclude that it is a hosting company worth trusting: value for money, simplicity, ease of use and helpful support is everything that you need to successfully create and manage your website.
We’ve also shown above how to save 15% more on your Hostinger order, using our exclusive promo code. It’s not much, considering that Hostinger is already quite inexpensive – but still a nice bonus, right?
Affiliate disclosure: we believe it is honest to let you know that some links in this review are affiliate links, meaning that we get a small commission whenever someone purchases a Hostinger plan through them. This does not affect the price you get on your Hostinger offer, of course.
Are you planning to use Hostinger but still not sure if you should do it, or which plan to choose? Or are you already using Hostinger and would like to share your experience? In any case, join the discussion in the comments section below, let’s be helpful to each other!
↧
↧
Como Criar um Site do Zero: O Guia Prático para Iniciantes
Antes de mais nada
Alguns equívocos
Passo 1: obtenha um domínio e hospedagem
Passo 2: instale o WordPress
Passo 3: configure o WordPress
Passo 4: adicione o tema e os plugins
Dicas úteis. É claro!
Dúvidas? Pergunte pra gente!
Alguns equívocos
Passo 1: obtenha um domínio e hospedagem
Passo 2: instale o WordPress
Passo 3: configure o WordPress
Passo 4: adicione o tema e os plugins
Dicas úteis. É claro!
Dúvidas? Pergunte pra gente!
Beleza, então você decidiu que precisa criar um site. Antes de mais nada – parabéns! Isso significa que você está realmente fazendo algo que o mundo precisa conhecer. Quando falo mundo eu quero dizer metade do mundo, claro, o resto ainda não tem uma conexão com a internet (então seja grato, pois você já possui!).
De qualquer forma, este guia vai mostrar o passo a passo de todo o processo de construção de um site de uma forma clara, concisa e, mais importante, sem bobagens.
Você terá sua própria página na web completamente nova e pronta em menos de meia hora. E você ainda vai economizar mais de R$600,00 no processo, focando apenas no que é realmente importante e usando nosso código promocional.

Sim, todos nós estamos ansiosos para começar, mas eu sugiro olhar algumas coisas antes (não se preocupe, você não levará mais de 5 minutos).
Entretanto, caso você já esteja tremendo com o desejo de construir um site e quiser COMEÇAR CERTO, basta rolar alguns parágrafos usando este link dentro da página.
Antes de mais nada
Em primeiro lugar, vamos deixar claro desde o início: enquanto este guia é completamente grátis (duu!), ele não é sobre criar um site grátis…
É verdade que, tecnicamente, é possível fazer um site sem gastar um centavo, mas para isso você precisa recorrer ao uso de uma hospedagem grátis (o que pode ser ruim) ou a um plano de assinatura não pago para um construtor de sites como Weebly (que exibirão anúncios e a marca deles em seu site, eca).
O maior motivo, no entanto, é que você não pode obter um nome de domínio de graça nesse caso, e pegar carona no de outro, como meusite.weebly.com.br, simplesmente não motiva seus visitantes a levar você a sério.
Em segundo lugar, para aqueles de vocês perguntando “quem é você para me dizer como fazer as coisas?!”, aqui vai de auto-elogio bem mal disfarçado: meu nome é Andrii Shekhirev, eu sou o fundador da Academia de Webmasters Satori (também conhecida como este site).
Além de construir sites para meus próprios projetos e para outras pessoas desde 2007, sou Autor Elite no ThemeForest, o maior mercado de modelos de sites do mundo – meus produtos ajudaram mais de 2.000 pessoas a construir seus próprios sites (e não, não os publicarei aqui).
Ao longo dos anos, tentei dezenas de formas de criar sites, bem como testei inúmeros criadores de sites, provedores de hospedagem e sistemas de gerenciamento de conteúdo. O guia atual é a essência do que aprendi e estou feliz em compartilhar com você hoje.
Ufa! Que bom que acabou!
Agora, eu acho que seria decente deixar você saber que este guia contém alguns links de afiliados, o que significa que eu vou receber uma comissão fixa do respectivo fornecedor, se você, por exemplo, comprar um plano de hospedagem através do link neste texto.
Aqui está a beleza da coisa: isso não afeta o valor que você paga porque o fornecedor nos compensa com o próprio dinheiro – para eles, é como redirecionar as despesas de publicidade.
Então, sim, se você gosta deste guia, considere comprar uma hospedagem através dos nossos links. Vamos fazer uma multinacional gigante pagar, muahahah!
..Humm, tudo bem. De volta aos negócios. Para a preliminar final antes de começarmos (tenha paciência comigo!), aqui estão alguns dos mitos mais difundidos sobre como construir seu próprio site. Dissipá-los logo no início lhe dará uma melhor compreensão do que é o quê.
Alguns equívocos
Mito número um: você precisa saber como codificar para criar um site. É claro que você sabe. SE VOCÊ VIVE EM 1994! Falando seriamente – como era de se esperar, a tecnologia avançou um pouco desde os primórdios da Web, e a maior parte do processo de criação de sites há muito tempo é automatizada. Incluindo escrever o código real. Você só tem que escolher as ferramentas mais adequadas e estar ciente dos poucos bits importantes (que é o que este guia fala).
Mito número dois: construir seu próprio site custará milhares de reais. Somente se você quiser terceirizá-lo completamente para uma agência – que provavelmente continuará com os mesmos passos descritos neste guia, de qualquer jeito (e ainda enviará uma fatura gorda para isso).
Mito número três: fazer um site requer uma grande quantidade de tempo. Bem, às vezes acontece, especialmente se você é novo e aprende do zero. Mas se você for esperto e se concentrar nas coisas certas, você pode ter uma página funcionando em menos de meia hora. E todo o propósito deste guia é ajudá-lo a fazer exatamente isso, então vamos começar!
Passo 1 de 4: obtenha um domínio e hospedagem
A primeira coisa que você precisa é de um lugar para o seu site viver. Em termos técnicos, esse lugar é chamado de hospedagem web, ou seja, é um computador especializado e sempre ativo que armazena os arquivos do seu site e os serve para qualquer pessoa que digitar o endereço do seu site e apertar o Enter.
Falando nisso: você também precisará reservar o endereço em si (como exemplo.com), que é chamado de nome de domínio. Felizmente, você pode fazer as duas coisas de uma só vez, já que muitos provedores de hospedagem também oferecem domínios como um pacote.
Existem milhares dessas empresas por aí, grandes e pequenas, mas geralmente não faz sentido escolher as pequenas: em vez disso, escolha as hospedagens estáveis e confiáveis com um longo histórico.
Você quer que seu site seja acessível 100% do tempo, e eu nem vou começar a falar sobre o tédio de mudar para um novo provedor se o seu atual quebrar. É um empecilho, acredite em mim.
De todos os provedores de hospedagem que experimentei e testei ao longo dos anos, o mais confiável e fácil de usar ainda é a GoDaddy: ele já existe há mais de 20 anos, tem mais de 17 milhões de clientes em todo o mundo e é fácil de usar para iniciantes.
Atualmente, ela oferece alguns descontos interessantes em hospedagem e domínios, o que será discutido em breve.
Para tornar o processo subsequente de solicitar sua hospedagem o mais rápido e fácil possível, recomendo fazer uma pausa e criar o nome de domínio com antecedência: você pode usar a barra de pesquisa de domínios da GoDaddy se você tem certeza de que seu nome escolhido ainda não existe ou usar uma das ferramentas especializadas para criar uma.
A melhor que eu conheço (e uso muitas vezes eu mesmo) é o Dot-o-Mator grátis, que permite combinar palavras com vários prefixos e sufixos, organizados por tópicos. Se você não conseguir se decidir, considere usar um dos novas extensões de domínio em vez do genérico (e lotado) .com.br ou .com.
Acabou? Tudo bem, agora estamos prontos para começar!
Clique no botão abaixo para visitar a página de ofertas da GoDaddy com descontos especiais em hospedagem. Por falar nisso, lembra-se daquele pacote de hospedagem + domínio que mencionamos anteriormente?
A GoDaddy oferece atualmente um registro de domínio GRATUITO em cada plano de hospedagem, o que economiza R$27 extras (o custo normal de um domínio .com.br):
Obtenha 46% de desconto da GoDaddy ›
Nessa página, você será presenteado com uma escolha de quatro planos de hospedagem: a menos que você precise de vários sites de uma só vez, vá para a Economy (Econômica), pois ela já inclui tudo o que você precisa para começar.
Depois de adicionar o plano ao seu carrinho, você precisará fazer várias opções para personalizar seu pedido: primeiro, escolha quantos meses deseja pagar com antecedência.
Mesmo que você seja capaz de escolher um ciclo de faturamento de 3 anos de cara, 12 meses devem ser mais que suficientes para testar seu esforço online E ganhe o desconto de 46%.
Se você decidir manter seu site depois de um ano (o que esperamos que você faça), não precisará fazer nada – existe um mecanismo de prolongamento automático (apenas lembre-se de que os próximos períodos de faturamento já terão preço normal).
Em seguida, você verá na mesma tela que a GoDaddy adiciona backups de sites ao seu pedido por padrão; desmarque essa opção sem se preocupar, isso não é importante no momento (além disso, você poderá configurar a mesma funcionalidade sem custos adicionais mais tarde, economizando em torno de R$83 por ano).
Você também não precisará da opção “Segurança Essentials”, que também é fácil de obter de graça quando estiver em funcionamento! Mais R$263 economizados).
Finalmente, há a opção do Certificado SSL: é a camada de criptografia extra que torna o tráfego do seu site seguro – e, mais notavelmente para seus visitantes, exibe um cadeado verde reconfortante com um selo “Seguro” na barra de endereços do navegador.
Lembre-se que o Google Chrome começou a exibir um emblema claro “Não seguro” para sites não que não usam SSL desde julho de 2018, como um sinal claro de que não gosta de sites não seguros:

Então, enquanto o seu site será capaz de funcionar sem o SSL, eu recomendo fortemente obtê-lo já (também porque a migração de um site não SSL para um site SSL é problemática).
Apenas para recapitular, esta é a aparência da página de hospedagem da GoDaddy com todas as configurações recomendadas acima:

Estamos prontos para avançar para o domínio (agora gratuito): depois de clicar no botão verde “Continuar”, você verá uma barra de pesquisa para inserir o nome escolhido anteriormente. Depois de realizar a pesquisa, clique no botão azul “Selecionar e continuar” ao lado do nome do domínio, adicionando-o ao seu carrinho.
Agora a etapa final do nosso pedido de hospedagem!
Estou bem animado, já que é um daqueles momentos “mas espere, porque fica melhor”: usando nosso código promocional, você pode reduzir em 20% o preço final.

Basta clicar no botão “Tem um código promocional?” link logo abaixo da seção “Total” no canto inferior direito da página do pedido (sim, a GoDaddy deixou o mais discreto possível), em seguida, insira essa combinação na janela pop-up e clique em Aplicar:
GDD1hos
AGORA você está pronto para continuar com o usual – clique em “Criar uma conta” à esquerda, insira sua conta e informações de faturamento e finalize o pedido. Algo me diz que você fez compras online antes, então vou pular essa parte, se você não se importar.
Acabou?
Vamos fazer as contas: acabamos de economizar R$272 em hospedagem, assim como R$83 + R$263 = R$346 em recursos não essenciais que você pode adicionar gratuitamente mais tarde.
Como se não bastasse, cerca de R$27 também foram economizados, obtendo um domínio de graça. No total R$645 em economias até agora. Bom, muito bom…
Você sabe o que é ainda melhor? Implementar o resto deste guia não lhe custará um centavo!
A propósito, terminamos o passo 1, provavelmente a parte mais complicada do processo – agora é um bom momento para ir dar uma esticada e pegar um café. Eu vou esperar aqui (pois sou um monte de texto em uma página).
..
..
Novo em folha? Agora para o passo 2.
Passo 2 de 4: instale o WordPress
Temos uma boa hospedagem acolhedora para o nosso próximo site, então nada realmente nos impede de configurar o site em si. Vamos fazer, certo?
Caso você esteja se perguntando, “o que diabos é o WordPress”, aqui vai um pequeno resumo: o WordPress, ou WP, é o que eles chamam de sistema de gerenciamento de conteúdo: essencialmente, um software que ajuda você a executar todo o seu site, desde o design e conteúdo até as configurações e a estrutura.
Por que usar o WordPress? Bem simples, porque é o mecanismo de sites preferido da Internet, alimentando cerca de 1/3 dos sites na internet (e isso é um monte de sites).
Ele é grátis para usar ou modificar, facilmente extensível com milhares de plugins gratuitos, e possui uma vasta comunidade de usuários que tendem a apoiar um ao outro. Guias, tutoriais e dicas sobre o uso do WP estão espalhados pela Web, e a maioria deles também é gratuita.

Isso realmente soa como uma escolha lógica para um dono de site pela primeira vez, então vamos ficar com o WordPress em todo o nosso guia.
Além disso, eu tenho algumas dicas extras sobre segurança e desempenho depois que terminarmos com essa configuração de 3 etapas.
Tudo certo, vamos aos negócios! Faça o login na sua recém-criada conta da GoDaddy – você verá uma lista de seus produtos. Clique na linha “Hospedagem Web” para expandi-la, depois clique no botão “Gerenciar” à direita. Na nova página, você verá um grande botão azul que diz “cPanel Admin” – é isso que estamos procurando! (em outras palavras, vá em frente e clique nele)
Você será redirecionado ao seu painel de hospedagem – é um lugar importante que, sem dúvida, você visitará muitas vezes no futuro. Mas, por enquanto, vamos encontrar o “WordPress” em “Aplicativos Web” (ele é um “W” branco em um círculo cinza) e clique nele. Você será levado ao assistente de instalação chamado..

Clique no botão “+ instalar este aplicativo” no canto superior direito para chegar na parte importante: na tela de parâmetros de instalação, vamos em frente e ajuste algumas configurações.
Na aba Domínio, escolha o nome de domínio que você comprou, caso já não tenha sido escolhida por padrão; usar um endereço www ao invés de não-www é uma questão de preferência pessoal, mas se você me perguntar, a versão não-www parece mais moderna e é mais curta (o que é sempre um plus com endereços de sites).
Certifique-se de que o campo Directory (Diretório) seja deixado em branco, para que o WordPress seja instalado como o principal sistema de gerenciamento de conteúdo para o novo site.
Os campos Versão e Idioma podem permanecer como estão, portanto, após o contrato de licença, você verá várias opções de atualizações: certifique-se de escolher atualizações automáticas completas em cada uma delas (as últimas opções) e ative os backups automáticos de atualizações na última.
Isso garantirá que seu site esteja sempre em execução no software mais recente, o que é bom para a segurança. Além disso, removerá a necessidade de monitorar pessoalmente novas versões e executar atualizações manuais.
Apenas para ter certeza de que estamos no caminho certo, a série de escolhas nesta seção deve ser “3-2-2-1”, ou, para visualizar:

Finalmente, existe a seção Preferências onde você precisará preencher os primeiros cinco campos (deixe os dois últimos botões de opção como estão). Primeiro, digite o nome de usuário e a senha do administrador do site.
E, pelo amor de Deus, não use as palavras “admin” e “senha” – pense em algo um pouco mais difícil de adivinhar! Como o WP é muito popular, há muitos hackers que atacam sites WordPress com credenciais de administrador muito fáceis.
Prossiga para inserir seu e-mail, bem como o título e o slogan do site (os dois últimos não são tão importantes no momento, você poderá alterá-los facilmente a qualquer momento por meio do painel de administração do WP).
Terminamos aqui! Clique no botão + instalar na parte inferior e espere as fadas mágicas para configurar o WordPress para você. Quando terminarem, você verá três links sob o nome do seu site: clique no segundo link – aquele que termina em wp-admin, este é o final padrão do painel de controle do WordPress para um determinado site.
Uma nova aba será aberta, com um assistente do WordPress que fará muitas perguntas bobas e instalará plugins desnecessários, então clique em “Não obrigado” e vá até o painel de administração do seu WP.
..já pode sentir sentir? O aroma de um novo site pela manhã! Apenas ame essa sensação de começar algo novo.
Estamos quase prontos, mas há algumas coisas que você pode querer ajustar logo de cara, porque a experiência mostra que nem todas as configurações padrão do WP são as melhores escolhas.
Passo 3 de 4: configure o WordPress
Antes de começar a adicionar conteúdo ao seu novo site, vamos fazer uma viagem rápida pelo sistema, adicionando algumas melhorias para o futuro.
À esquerda do painel de administração do WP, você verá o menu do administrador em um plano de fundo cinza escuro. Nem todos os itens são igualmente importantes, e você estará usando apenas alguns deles na maior parte do tempo. Você pode aprender sobre o resto à medida que avança.
As seções mais usadas são Posts e Páginas, onde você pode criar novos conteúdos, bem como Comentários, onde você pode moderar as discussões em suas postagens, caso decida ativar esse recurso.
A diferença entre uma página e um post é que a primeira é para conteúdo estático que não deve mudar muito ao longo do tempo, como a página “Sobre nós”; por outro lado, os posts são para conteúdo que você adiciona regularmente, como notícias ou posts de blog.
Existe também um conceito especial de página de blog no WordPress, que é uma página gerada automaticamente que exibe todos os seus posts. Nós vamos retornar a essa parte abaixo. Por enquanto, vamos seguindo em frente!
Outra seção importante no menu do administrador do WP é a Aparência, onde você pode instalar o tema visual do site (Aparência → Temas). Ele será útil para adicionar menus de navegação (Aparência → Menus), bem como widgets (Aparência → Widgets) – pequenos blocos que executam funções específicas, como exibir uma lista de categorias ou uma barra de pesquisa, normalmente em uma barra lateral.
A seção Aparência também contém o Personalizar, que é muito usado por muitos temas modernos para permitir que você personalize itens em seu site, como cores e fontes.

E também existe a seção de Plugins onde você será capaz de instalar e configurar várias extensões que adicionam mais recursos como segurança, botões sociais, formulários de contato, etc etc.
Bem, este foi provavelmente o passeio mais rápido que já houve no WP! Para finalizar nossa configuração, vamos ajustar várias configurações na seção de Configurações na parte inferior do menu do administrador:
- Configurações → Geral: lembra-se que eu disse que você pode editar o “Título do Site” e “Descrição” mais tarde? Aqui é onde você pode fazer isso. Além disso, certifique-se de que as opções “Função padrão para novo usuário”, “Fuso horário”, “Formato de data”, “Formato de hora” e “Semana começa em” são definidas de acordo com as suas preferências.
- Configurações → Leitura: apenas tome ciência desta seção por enquanto; aqui você poderá definir a primeira página do seu site para exibir artigos de blog ou uma página estática (depois de decidir qual delas você quer). Se você não definir a página de artigos de blog como sua página inicial, poderá escolher um lugar diferente para ela – basta criar uma nova página vazia na seção de administração de Páginas mencionada anteriormente. Em seguida, volte aqui e use-a como a página de artigos que não são de blog; essa página começará a exibir seus artigos automaticamente assim que você salvar as alterações.
- Configurações → Discussão: Se estiver disposto a permitir que as pessoas comentem os posts no blog/feed de notícias do seu site, marque a caixa de seleção “Permitir que as pessoas publiquem comentários sobre novos artigos” e também “Ativar X níveis de comentários agrupados por conversação” (para que as pessoas possam responder aos comentários uns dos outros) e “O comentário deve ser aprovado manualmente” (você vai ter MUITO SPAM caso contrário). Seja o que fizer, desmarque a opção “Permitir avisos de links de outros blogs”, ela é apenas para permitir muitos spams. Por fim, dê uma olhada rápida na seção “Envie-me um e-mail quando”, certificando-se de que as opções sejam definidas de acordo com suas preferências pessoais.
- Configurações → Links Permanentes: é altamente recomendável escolher a opção Nome do Post, pois ela gera as URLs mais amigáveis para as suas páginas e artigos (não sei bem por que outras opções nesta subseção existem, para ser franco).
Basicamente é isso! Agora você pode brincar com seu novo site e começar a adicionar conteúdo. Há mais um passo, no entanto, que é meio opcional, mas essencial:
Passo 4 de 4: adicione o tema e os plugins
Em princípio, você pode deixar a aparência visual do site como está e se concentrar apenas no conteúdo. No entanto, isso significaria que seu site não só parecerá muito genérico, mas também parecerá exatamente como uma cópia de outros sites que estavam com preguiça de mudar do tema padrão.
Além disso, existem muitos temas WP disponíveis gratuitamente que oferecem muito mais em termos de personalização e customização, permitindo que cada site pareça único.
Aqui vai uma dica: eu sugiro experimentar o nosso próprio tema WP multiuso chamado Bento (você pode notar que gostamos do Japão aqui na Satori :)

O tema permite que você personalize a cor e a aparência de praticamente qualquer elemento em seu site, crie layouts amigáveis com dispositivos móveis em qualquer página, bem como montes de outras coisas úteis listadas aqui na página oficial:
Para reforçar, o Bento é bem documentado (o que não é comum no mundo WordPress) e tem fóruns de suporte dedicados onde respondemos a todas as questões relativas ao tema.
/ fim da autopromoção /
Quanto aos plugins, existem literalmente mais de 50.000 disponíveis a qualquer momento, adicionando várias novas funcionalidades ao seu site como traduções e pop-ups para fóruns e comunidades (e não, nós não criamos plugins, então não espere ver um link para uma extensão “Sushi” ou “Kamikaze”).
Ao invés disso, vou apenas listar alguns dos plugins mais confiáveis e universalmente úteis que quase qualquer dono de site deve considerar instalar baseados na minha própria experiência, opiniões de outras pessoas, bem como estatísticas objetivas. Todos eles são gratuitos, claro:
- Akismet para filtrar automaticamente seus comentários contra spam. Este é um salva-vidas! Ou, pelo menos, uma economia de tempo, pois descarta todos os comentários recebidos com links de spam e texto com spam. O Akismet usa algum tipo de algoritmo excelente de aprendizado de máquina para se tornar melhor com o tempo.
- All in One SEO para otimização de mecanismos de busca (SEO). Este é provavelmente um dos melhores plugins de WP para configurar metadados adequados em seu site, para que seu conteúdo não pareça uma porcaria nos resultados do Google. O Google gosta muito desse tipo de atenção aos detalhes.
- Painel do Google Analytics para manter o controle de seus visitantes. Você também precisará de uma conta real do Google Analytics, que pode ser aberta gratuitamente no site oficial.
- Contact Form 7 para permitir que seus visitantes lhe enviem mensagens. Para receber um e-mail sempre que alguém deixar uma mensagem em seu site, você também precisará instalar um plugin de e-mail, como o WP Mail SMTP (aqui estão alguns links para ajudá-lo a trabalhar com o sistema de e-mail da GoDaddy: 1, 2).
Então, sim, agora oficialmente concluímos. Aproveite o seu novo site brilhante! Caso você queira mais alguns conselhos e práticas recomendadas, continue até a última parte deste guia, apropriadamente intitulado:
Dicas úteis (Opcional)
Eu não esqueci minhas promessas anteriores de discutir métodos gratuitos para melhorar a segurança do site e fazer backups, então aqui estão elas.
Dica #1: Fazer seu site seguro ainda mais seguro. Enquanto seu site ainda é jovem e inocente, você pode querer se concentrar em outras coisas, porque ninguém realmente quer hackeá-lo ainda. Entretanto existem aquelas coisas realmente simples que não tomam quase nada do seu tempo, mas reduzem as chances de se tornar um alvo de um ataque bem-sucedido por um fator de 10.
Primeiro, as recomendações óbvias (que 99% não seguem): não use “admin” para o seu nome de usuário do painel de administração do WP, apenas use qualquer outra palavra. Isso por si só tornará seu site WordPress mil vezes mais difícil de hackear.
E use uma senha forte – com letras maiúsculas, números, símbolos e outras coisas. Para ficar ainda mais seguro, use autenticação de dois fatores (um código adicional gerado pelo seu smartphone durante o login).
Outro hábito óbvio que muitos ignoram: manter o WordPress, assim como os plugins e temas atualizados. Nós já cobrimos isso no Passo 2 (“Instalando o WordPress”), mas também faz sentido prestar atenção a quaisquer avisos de atualização no seu administrador do WP.
Para aqueles mais cuidadosos, posso recomendar a instalação do Plugin Wordfence – ele possui toneladas de opções extras de proteção que ajudarão até mesmo o webmaster mais paranoico a dormir bem à noite.
Dica #2: Faça backups automáticos fáceis. Porque você não quer gastar tempo fazendo isso manualmente todas as vezes. Você tem coisas melhores para fazer, como criar conteúdo para o seu novo site! Uma dica: uso o UpdraftPlus. É grátis, é fácil de configurar e você pode optar por armazenar backups em vários locais, desde o seu próprio servidor (não recomendado) até o armazenamento em nuvem.
Eu pessoalmente uso a opção do Google Drive no Updraft, que ficou ainda mais fácil de configurar depois que eles introduziram sua própria integração. PS. a versão gratuita tem tudo que você precisa para um site normal, eu nunca tentei a versão Pro, apesar de rodar vários projetos online de complexidade variada.
Encerrando / Hora de perguntar
Ótimo! Acabamos de aprender como criar sites, economizamos mais de R$800 no processo e talvez tenhamos até nos divertido.. talvez um pouco?.. Tudo bem, provavelmente foi mais trabalho do que prazer, mas definitivamente valeu a pena.
Se você adorou este guia, que tal compartilhá-lo nas redes sociais (sim, eu sei, ninguém faz mais isso, mas ainda assim, eu tive que dizer isso) e talvez até mesmo contar aos seus amigos? Tudo certo, o Twitter também o fará: /
Você ainda está por aqui? Fiquei um pouco surpreso, para ser bem honesto! Bom, eu não sei.. se você tiver alguma dúvida nas coisas sobre as quais falamos no guia, me diga na seção de comentários abaixo. Eu a verifico de tempos em tempos e sempre respondo. Já se quiser adicionar algo ao guia ou se quer fazer alguma crítica, mantenha-a para você!! Haha! É só uma brincadeira, claro que também será muito bem-vinda!
Seja curioso, vá além e boa sorte em tudo o que você fizer no seu site!
Valeu!
↧
Niagahoster Review: The Best Hosting in Indonesia? + Promo Code 50% Off
If you’re reading this then you’re probably deciding whether to get a hosting account with Niagahoster (sometimes also spelled Niaga Hoster). You might have heard good (or bad) opinions about it, but there are so many other hosting providers out there that it’s hard to make the final choice!
I’m not even speaking about which particular hosting plan to choose (Niagahoster offers 4 of them) and which additional services to buy if you want a stable and effective website.
This is why we’ve created this detailed guide.
Hosting Quality and Why It Is Important
Which Hosting Plan to Choose?
Pros and Cons of Niagahoster
BONUS: 50% Off Secret Code
Our Verdict / Let’s Discuss
Which Hosting Plan to Choose?
Pros and Cons of Niagahoster
BONUS: 50% Off Secret Code
Our Verdict / Let’s Discuss
Over the past 9 years, our team have tried and tested countless hosting providers, including Niagahoster, to be able to tell with confidence whether it is worth your money. By the end of this review, we will answer the following questions together:
- Is Niagahoster better than other hosting companies?
- Which hosting plan should you choose at Niagahoster?
- What is the difference between shared hosting and VPS?
- Niagahoster’s website builder – should you use it?
As an added bonus, at the bottom of this page I will share with you a hidden way to save 50% (that’s right, an entire HALF) on your Niagahoster order, in case you decide to create an account with them. We will use our exclusive promo code to achieve this..
But first, we need to understand the primary factors which influence the quality of hosting and determine whether Niagahost is really worth its reputation.
The Quality of Hosting and Why It Is Important
From the first glance, all hosting providers look the same and offer the same service. What make one great and another less so is the invisible stuff: the hardware, the software, and the support you get.
Let’s look “under the hood” and see if Niagahoster is a Ferrari or more like Opel.
Firstly, let’s ask a more basic question: what is a hosting? In order to answer it, we need to introduce the concept of server:
In essence, a server is a specialized computer managed by the hosting company. It stores your website and shows it to anyone who wants to visit your web address, 24/7.
Simply put, a hosting is simply a collection of servers! This means that to understand if a hosting company is good or bad, we need to look at the quality of its servers and other infrastructure.
Our research suggests that Niagahoster is one of the first in Indonesia to offer Tier-4 datacenter servers to its clients. Previously, such hardware was only available to large corporations and popular web services, but thanks to Niagahoster it became affordable to ordinary people like you and me.
What is a Tier-4 datacenter, you might ask?
The name comes from the international standards developed by the Uptime Institute in the United States: all datacenters are subdivided into four tiers based on their quality, with 4th being the most secure and efficient tier.
Technical jargon aside, the main difference between a Tier-4 datacenter and a lower-rank one is complete redundancy. This means that all systems and networks have spare duplicates, so everything continues to work even if all active components fail.
While this sounds like an overkill at first, when you consider that your website
Thanks to its advanced infrastructure, Niagahoster is able to guarantee 99.9% uptime to its clients. This means that the company is legally obliged to keep your website available for at least 99.9% of the time.
The actual uptime reported by Niagahoster is even higher, closer to 99.999%. How high is that? This figure implies that during a year, your website might be unavailable for no more than 5.3 minutes!
This is quite good even by standards of large multinational companies – and it’s available to anyone for a fraction of the cost at Niagahoster.
How can Niagahoster afford to offer such quality at such low prices? The answer is simple:
It’s the largest hosting company in Indonesia, which allows it to scale its operations while staying profitable, where others would go bankrupt very quickly.
Apart from the datacenter quality, it is important to look at the individual servers. In the case of Niahahoster, each server is a IIX (Indonesian Internet eXchange) compliant machine with 32 Gb or RAM and 1Gbps network speeds. In other words, lots of power!
Each server is protected by BitNinja – an all-in-one security system against spam and malicious attacks, headquartered in Europe.
This combination of power, security and competitive prices is what seems to make Niagahoster so attractive – and has helped the company to gather millions of clients since its start in 2013, becoming the top-1 hosting provider in Indonesia.
Now that we understand the level of quality, let’s examine Niaga Hoster’s offer and see which hosting plan is the most sensible choice:
Niagahoster’s Offer Under a Microscope: Which Plan to Choose?
Essentially there are two different types of hosting offered by Niagahoster – shared hosting and cloud VPS (virtual private hosting), each with several possible configurations which determine the final price.
Before looking at the plans, we need to understand the difference between shared and VPS hosting, and for that let’s recall from earlier that hosting is provided on servers – powerful, always-on computers optimized for storing and serving websites to the public.
There are many ways in which a hosting server can be configured – this is where the various types of hosting come from. We’ve made a table to summarize the key distinguishing features for shared and VPS hosting:
| Shared hosting | Cloud VPS | |
|---|---|---|
| Ease of use | Easy for beginners | Requires technical knowledge |
| Flexibility | Several fixed configurations | Very flexible – can change any detail at any time |
| Resource allocation | Each server shared by many websites | You get a guaranteed resource allocation across several servers |
| Price level | Low-medium | Medium-high |
If we take housing for analogy, a shared hosting is like sharing an apartment with several other people – it’s a bit crowded and sometimes the bathroom can be occupied for too long, but the rent is quite low!
In the same comparison, a VPS hosting can be thought of as having a “golden member” status at a luxury hotel chain: you have an entire suite for yourself, and you can move freely between rooms and even different branches of the hotel chain. But it’s also much more expensive and requires some technical knowledge.
From the above, it should be clear that shared hosting is ideal for beginners who just want to test their online project without spending too much money. A virtual private server is great for developers and programmers who know what they’re doing :)
Armed with this knowledge, let’s now look at the available shared hosting plans to see which one is worth your money.
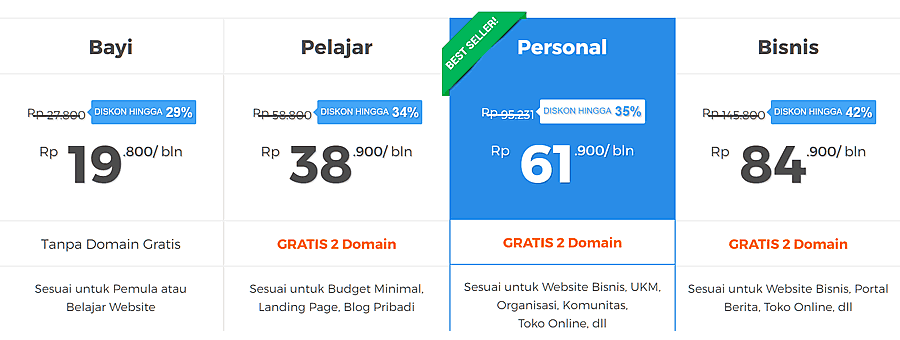
Niagahoster offers four plans for shared hosting clients, differing by the available computing resources and other features. To make things simpler for you, we will look only at the most important differences
- The cheapest plan is called Baby; it does not include domain registration (you will need to pay separately for it, approximately Rp 110,000 per year). It also limits the number of email accounts to 1 and the storage capacity for your website’s files to 500 Mb.
- The Student plan includes a free domain name as well as unlimited disk space and email accounts. It also allows adding more than one domain (purchased separately) if you decide you want to host more than one online project in the future.
- The Personal plan has everything from the Student plan, plus you get automatic spam protection as well as private nameserver, which can be useful if you decide to switch to another hosting in the future (more flexibility for your online project).
- The Business plan is very similar to the Personal plan, with only one major difference: a personal IP address. This can be useful if you are running a large website, but in most cases it’s frankly not worth the extra money.
To summarize, the Student and Personal plans at Niagahoster currently offer the best combination of power and affordability. We recommend one of these to most individuals and small businesses who wish to create their own website.
While the Personal plan costs more than the Student plan, at the end of this review we will show you a secret way to get Personal for almost the same price as Student, i.e. at a big discount.
Before we do that, we will summarize the advantages and disadvantages of using Niagahoster and formulate our verdict: is it worth your money?
Pros and Cons of Niagahoster
The following list has been compiled based on our own experience with Niagahost, following detailed testing and research. We are happy to share it with you today, so that you can make a more informed decision:
- Niagahoster’s servers are located in an Indonesia-based datacenter, which means extra-high loading speed for your website (compared with US or European hosting).
- High service stability (over 99.9%) is guaranteed by advanced equipment used by Niagahoster as well as special anti-failure measures maintained in its datacenter.
- 2 free domains with any Personal or Business hosting purchase, allowing you to save extra money on registering a domain separately (typically costs around Rp 110,000 each).
- Free SSL security forever via Let’s Encrypt, for any shared hosting plan. You can also purchase enterprise-grade SSL certificates by Comodo at additional price.
- Easy setup for your hosting account and fast WordPress installation from within your hosting admin panel.
- Powerful admin panel provided by cPanel, the most widely used hosting management system in the world.
- Instant backups of your entire hosting account for added security – this way you will always have a copy of your data to restore if something bad happens.
- Large knowledgebase with detailed guides on each aspect of hosting – from initial set-up for beginners to VPS management for professional developers.
- Friendly and fast support via live chat, email, contact form, or by phone. The Niagahoster team responds quickly and helps solve any problems you might have.
- Mediocre website builder with a narrow selection of themes that look visually outdated. We recommend installing WordPress and using any of the thousands free templates available on WP official repository, such as the multi-purpose Bento theme.
BONUS: Secret 50% Off Niagahoster Promo Code
Alright, since we’ve already determined that Niagahoster is definitely worth considering as your primary hosting provider, this section will provide an exclusive discount code for a 50% discount on a Personal or Business plan. Please note that that 50% value includes the discount that is already provided by Niagahost itself. Let’s begin!
- Visit the official Niagahoster website by clicking on the red button below. The website will open in a new browser tab so that you can still see this guide.
- Scroll down the Niagahoster website to the table which contains the four hosting plans. Click “Select now” on the “Personal” or “Business” plan (we recommend “Personal”, as it costs less while still containing all essential features.
- On the next page, choose the duration of the hosting package (we recommend 1 year, but you can also use 6 months if you feel it’s enough for you). After that click “Next”.
-
You get a free domain with this plan! On the next page, choose the desired domain name and extension and click “Add to cart”. You can also register a second domain (e.g. you can have the same name with
.co.idand.onlineextensions in order to secure your brand name), or skip this step. - After choosing the domain names you will reach the page with your order details. Just click “Next” – the options offered here are quite useless.
- Click on the button to create a new account, which will finally bring you to the checkout page where you can apply our promo code.
-
Scroll down to the bottom of the checkout page until you see the “Promo Code” section. Enter the following code into the box and click the grey “Apply” button twice (this is important):
SALE50
-
After you click twice you will notice changes on the right side of the page where your order price is being displayed:
![]()
- Congratulations! You’ve just saved some money on your Niagahoster purchase! You can now proceed to fill in the required information on the checkout page and make the payment.
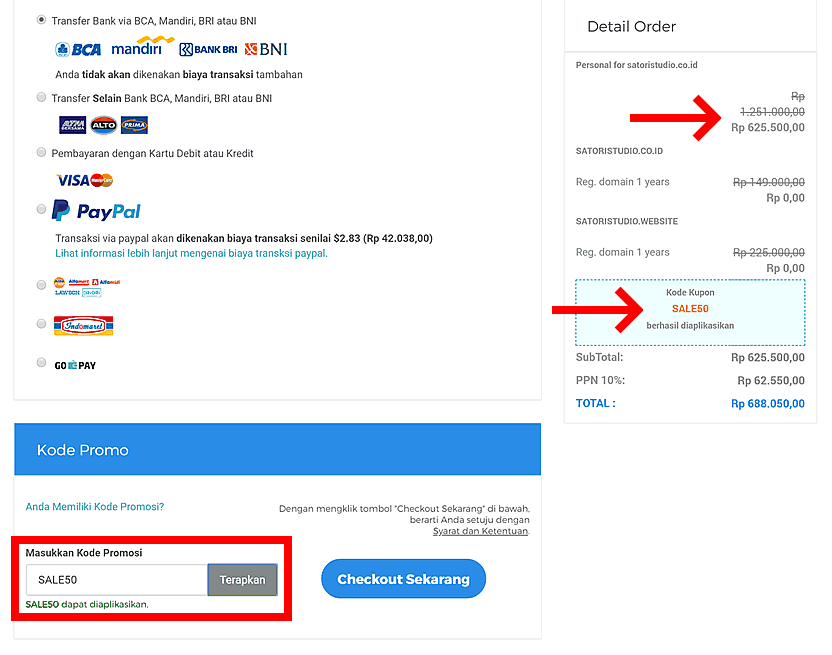
Our Verdict / Let’s Discuss Niagahoster!
To summarize, our research and tests seem to indicate that Niaga Hoster is one of the best (if not the best) hosting companies in Indonesia. This is achieved by using a Tier-4 datacenter with top-quality infrastructure, located in Indonesia instead of overseas.
Add to this professional-grade software, fast support, as well as very reasonable prices (plus our exclusive discount code  ) – and you get a premium hosting service for a fraction of the cost.
Do you still have unanswered questions about Niagahoster? Or maybe you’d like to share your unique experience with this company? In any case, we will be happy to see you join the discussion in the comments section below this text.
↧
Review Niagahoster: Hosting Terbaik di Indonesia? + Kode Promo Potongan 50%
Kalau kamu membaca ini, berarti kamu lagi mempertimbangkan apakah kamu bakal pakai akun hosting Niagahoster (kadang ditulis Niaga Hoster). Mungkin kamu sudah pernah dengar pendapat baik (atau buruk) tentang Niagahoster, tapi ada banyak hosting provider lain yang susah banget untuk dijadikan pilihan!
Ini bukan lagi ngomongin soal paket hosting mana yang sebaiknya dipilih (Niagahoster menawarkan 4 paket hosting) dan layanan tambahan apa yang sebaiknya di beli kalau kamu pengen punya website yang stabil dan efektif.
Inilah alasan kami ngasih petunjuk ini.
Kualitas hosting dan mengapa itu penting
Pilih paket hosting yang mana?
Pro dan kontra Niagahoster
BONUS: Kode rahasia potongan 50%
Kesimpulan kami / mari kita bahas
Pilih paket hosting yang mana?
Pro dan kontra Niagahoster
BONUS: Kode rahasia potongan 50%
Kesimpulan kami / mari kita bahas
Lebih dari 9 tahun yang lalu, tim kami sudah mencoba berbagai macam penyedia layanan hosting, termasuk Niagahoster, agar bisa bedain yang mana yang layak dibeli. Di akhir review ini, kami akan menjawab pertanyaan-pertanyaan berikut sekaligus:
- APAKAH NIAGAHOSTER LEBIH BAIK dari perusahaan hosting lain?
- PAKET HOSTING MANA yang seharusnya kamu pilih?
- APA BEDANYA shared hosting dan VPS?
- WEBSITE BUILDER – apakah kamu harus menggunakannya?
Sebagai bonus tambahan, di akhir halaman ini saya akan bagikan cara rahasia untuk menghemat 50% (yep, setengahnya!) pada pemesanan Niagahoster, jika kamu mendaftar di akun mereka. Kita bakal gunakan kode prome ekslusif.
Tapi kami ingin memahami dahulu faktor-faktor utama yang mempengaruhi kualitas hosting dan menetukan apakan Niagahost betul-betul bereputasi:
Kualitas hosting dan mengapa itu penting
Kalau melihat sekilas, semua hosting providers sama saja dan menawarkan layanan yang sama. Yang membuatnya lebih baik dari yang lainnya adalah hal yang tak terlihat: perangkat keras, perangkat lunak dan dukungan yang kamu dapatkan
Coba kita lihat “bagian dalamnya”. Anggap saja Niagahoster itu sebuah Ferari atau seperti Opel.
Pertama-tama, tanyakan yg mendasar dulu: apa itu hosting? Untuk menjawabnya, kita butuh pengenalan tentang konsep server:
Server merupakan komputer khusus yang dikelola oleh perusahaan hosting. Server menyimpan situs web kamu dan menunjukkannya kepada siapa saja yang ingin mengunjungi alamat webmu, setiap saat.
Sederhananya, hosting hanyalah kumpulan server! Artinya, untuk memahami apakah perusahaan hosting baik atau buruk, kita perlu melihat kualitas server dan infrastruktur lainnya.
Penelitian kami menunjukkan bahwa Niagahoster adalah salah satu yang pertama di Indonesia yang menawarkan server datacenter Tier-4 kepada penggunanya. Sebelumnya, perangkat keras seperti itu hanya tersedia untuk perusahaan besar dan layanan web populer, tetapi berkat Niagahoster, hal tersebut jadi terjangkau bagi orang biasa seperti kamu dan saya.
Mungkin kamu bingung, apa itu datacenter Tier-4?
Nama ini sendiri berasal dari standar internasional yang dikembangkan oleh Uptime Institute di Amerika Serikat: semua datacenter dibagi dalam empat tingkatan (4 tiers) berdasarkan kualitasnya, dan peringkat ke-4 merupakan tingkat yang paling aman dan efisien.
Selain jargon teknis, perbedaan utama antara Tier-4 dan yang berperingkat rendah adalah redudansi yang lengkap. Artinya, semua sistem dan jaringan memiliki duplikat cadangan, sehingga semuanya tetap berfungsi bahkan saat semua komponen aktif tidak berfungsi.
Awalnya emang kedengaran agak berlebihan ketika kamu mempertimbangkannya.
Berkat infrastrukturnya yang canggih, Niagahoster menjamin 99,9% waktu operasional kepada penggunanya, artinya perusahaan secara resmi berkewajiban menjaga situs webmu paling tidak 99,9%.
Waktu operasional Niagahoster yang sebenarnya bahkan hampir 99,999%. Tinggi banget, kan? Angka ini menyiratkan bahwa selama setahun, situs web kamu gak bakal tidak tersedia lebih dari 5,3 menit!
Ini cukup baik loh, bahkan oleh standar perusahaan multinasional besar- tersedia bagi siapa saja dengan harga yang lebih murah dari harga di Niagahoster.
Gimana Niagahoster bisa menawarkan kualitas sebaik itu dengan harga murah? Jawabannya sederhana:
Karena, ini perusahaan hosting terbesar di Indonesia, yang memungkinkannya meningkatkan operasi namun tetap menghasilkan untung, sementara yang lain bisa bangkrut dengan cepat.
Selain kualitas datacenternya, server individualnya juga mesti diperhatikan. Setiap server Niagahoster sendiri merupakan mesin IIX (Indonesia Internet eXchange) berkekuatan atau RAM 32Gb dan kecepatan jaringan 1Gbps. Wow, Kuat bangeettt!
Setiap server juga dilindungi oleh BitNinja – sistem keamanan all-in-one terhadap spam dan serangan jahat, yang bermarkas di Eropa.
Kombinasi kekuatan, keamanan dan harga yang kompetitif membuat Niagahoster sangat menarik – dan sudah membantu banyak perusahan serta jutaan pengguna sejak dimulai di tahun 2013, dan menjadi hosting provider nomor satu di Indonesia.
Setelah tingkat kualitasnya, yuk sekarang kita bahas penawaran dari NiagaHoster dan menentukan pilihan paket yang tepat:
Lebih dekat dengan penawaran Niagahoster: pilih paket yang mana?
Pada dasarnya ada dua jenis hosting yang ditawarkan Niagahoster – shared hosting (hosting berbagi) dan cloud VPS (hosting pribadi virtual), masing-masing dengan kemungkinan konfigurasi yang menentukan harga akhir.
Sebelum melanjutkan, kita mesti paham terlebih dulu bedanya shared hosting dan VPS. Yuk, kita ingat lagi bahwa hosting disediakan di server – komputer yang kuat dan selalu aktif yang dioptimalkan untuk menyimpan dan melayani situs web kepada publik.
Ada banyak cara agar sebuah hosting bisa dikonfigurasi- dari sinilah asalnya jenis-jenis hosting tersebut. Tabel berikut kami buat untuk merangkum fitur-fitur pembeda shared dan VPN hosting:
| Hosting standar (shared) | Cloud VPS hosting | |
|---|---|---|
| Kemudahan penggunaan | Mudah untuk pemula | Memerlukan pengetahuan teknis |
| Fleksibilitas | Beberapa konfigurasi tetap | Sangat fleksibel- dapat mengubah detail apapun, kapan saja |
| Alokasi sumber daya | Setiap server dibagikan oleh banyak situs web | Alokasi sumber daya terjamin di beberapa server |
| Tingkat harga | Rendah-menengah | Menengah-tinggi |
Kalau kita gunakan analogi perumahan, shared hosting itu ibarat sebuah apartemen yang dihuni beberapa orang- agak ramai, kadang kamar mandinya dipakai lama banget, tapi yah sewanya lebih murah!
Nah, sementara VPS hosting itu ibarat kamu punya “gold member” di sebuah hotel mewah: kamu punya kamar suite pribadi, bisa bergerak bebas ke seluruh ruangan, bahkan bisa ke cabang lain hotelnya. Tapi, harganya pasti jauh lebih mahal, dan kamu perlu pengetahuan teknis.
Nah, di sini jelas bahwa shared hosting itu cocok buat pemula yang baru mau coba-coba proyek online tanpa harus bayar mahal. Sebuah server pribadi virtual itu bagus banget untuk para developers dan programmers yang paham apa yang mereka kerjakan :)
Dari penjelasan ini, yuk kita liat paket-paket yang tersedia untuk shared hosting yang layak kamu pilih:

Niagahoster menawarkan empat paket untuk pelanggan shared hosting, yang dibedakan berdasarkan sumber daya komputasi yang ada dan fitur lainnya. Untuk mempermudah, kita lihat perbedaan yang paling penting saja:
- Paket paling murah disebut Bayi; tidak termasuk pendaftaran domain (bayarnya terpisah sekitar Rp. 110.000/tahun). Paket ini juga membatasi jumlah akun email yaitu hanya 1 saja dan kapasitas storage untuk file website kamu hanya 500Mb.
- Paket Pelajar termasuk nama domain gratis serta ruang disk dan akun email tanpa batas (unlimited). Kalau kamu ingin meng-hosting lebih dari satu proyek online di kemudian hari, kamu boleh menambahkan domain (dengan biaya tambahan).
- Paket Personal sama seperti paket Pelajar, dilengkapi tambahan proteksi spam otomatis plus nama server pribadi, yang bisa digunakan untuk beralih ke hosting lain di kemudian hari (lebih fleksibel untuk proyek online kamu)
- Paket Bisnis sangat mirip dengan paket Personal, hanya satu perbedaan utamanya: IP address pribadi yang berguna untuk menjalankan website besar. Tapi, dalam banyak kasus, tambahan biayanya biasanya tidak sepadan.
Paket Pelajar dan Personal di Niagahoster saat ini menawarkan kombinasi kekuatan dan keterjangkauan terbaik. Kami merekomendasikan ini bagi individu dan bisnis kecil yang ingin membuat situs mereka sendiri.
Walaupun paket Personal lebih mahal daripada paket Pelajar, di akhir kami akan bagikan cara rahasia mendapatkan paket Personal dengan harga yang hampir sama dengan Pelajar, yaitu dengan diskon besar.
Tapi sebelumnya, kami akan rangkumkan manfaat dan kerugian menggunakan Niagahoster dan memutuskan: apakah harganya sepadan?
Pro dan kontra Niagahoster
Berikut adalah kumpulan pengalaman pribadi kami dengan Niagahost, setelah pengujian dan penelitian terperinci. Kami bakal bagikan buat kamu agar kamu dapat membuat keutusan yang tepat:
- Server Niagahoster berada di datacenter berbasis Indonesia, yang berarti kecepatan loading extra untuk website kamu (dibandingkan dengan hosting US atau Eropa),
- Stabilitas layanan tinggi (lebih dari 99,9%) dijamin oleh peralatan canggih yang digunakan oleh Niagahoster serta langkah-langkah anti-gagal khusus yang dipelihara di datacenternya.
- Gratis 2 domain pada pembelian hosting Personal dan Bisnis, hemat biaya pendaftaran domain (biasanya sekitar Rp. 110.000/domain)
- Gratis pengamanan SLL selamanya melalui Let’s Encrypt, untuk paket shared hosting. Kamu juga bisa membeli sertifikat SSL grade-enterprise oleh Comodo dengan biaya tambahan.
- Setup yang mudah untuk akun hostingmu dan pemasangan WordPress yang cepat dari panel admin hostingmu
- Admin panel yang kuat yang disediakan oleh cPanel, system managemen hosting yang paling banyak digunakan di dunia.
- Cadangan instan dari seluruh akun hostingmu untuk keamanan tambahan – Ini biar kamu selalu punya salinan data supaya bisa dipulihkan kalau hal buruk terjadi.
- Basis pengetahuan yang luas dengan panduan terperinci tentang setiap aspek hosting – dari pengaturan awal untuk pemula hingga manajemen VPS buat developer profesional.
- Dukungan yang ramah dan cepat via live chat, email, formulir kontak atau telepon. Tim Niagahoster merespon dan menangani masalah dengan cepat.
- Pembuat situs web yang biasa-biasa saja dengan pilihan tema yang ketinggalan jaman. Kami rekomendasi buat install WordPress dan menggunakan salah satu dari ribuan template gratis yang tersedia di repositori resmi WP, seperti tema Bento yang multi-fungsi
BONUS: Kode Promosi Rahasia Niagahoster Potongan 50%
Oke, karena dari awal kami sudah sebutkan bahwa Niagahoster emang layak dipertimbangkan sebagai penyedia hosting utamamu, disini kami akan berikan kode diskon ekslusif 50% untuk paket Personal dan Bisnis. 50% termasuk diskon yang sudah disediakan oleh Niagahost sendiri. Kita mulai, ya!
- Kunjungi website Niagahoster yang resmi dengan meng-klik tombol merah dibawah ini. Websitenya bakal terbuka di new browser jadi kamu masih bisa ikuti petunjuk ini.
- Scroll ke bawah di website Niagahoster pada tabel paket-paket hosting. Klik “Pilih sekarang” pada paket “Personal” atau “Bisnis” (kami merekomendasikan “Personal” karena lebih murah tapi tetap berisi fitur-fitur penting)
- Pada halaman berikutnya, pilih durasi paket hosting (kami rekomendasikan 1 tahun, tapi kamu juga bisa pakai yang 6 bulan kalau kamu rasa itu cukup). Lalu, klik “selanjutnya”.
-
Kamu dapat domain gratis dengan paket ini! Di halaman berikutnya, pilih nama domain dan ekstensien yg diinginkan lalu klik “tambahkan ke keranjang”. Kamu bisa mendaftarkan domain kedua (kamu bisa membuat nama yang sama dengan ekstensien
co.iddan.onlineuntuk mengamankan brand-mu), atau lewati langkah ini. - Klik pada tombol untuk membuat akun baru, dan kamu bakal diarahkan ke halaman checkout dimana kode promo bisa dipakai.
-
Scroll sampai ke bagian bawah halaman cekout sampai kamu melihat bagian “Kode Promo”. Masukkan kode berikut ke dalam kotak lalu klik tombol abu-abu “Gunakan” dua kali (ini penting):
SALE50
-
Setelah meng-klik dua kali, harga pembelianmu akan berubah yang ditampilkan di sebelah kanan halaman:
![]()
- Selamat! Kamu baru saja menghemat pembelian Niagahostermu! Sekarang kamu bisa mengisi informasi yang dibutuhkan untuk proses cekout dan melakukan pembayaran.
Kesimpulan kami / Yuk, bahas Niagahoster!
Kesimpulannya, penelitian dan tes kami menunjukkan bahwa Niaga Hoster memang (kalau bukan yang terbaik) salah satu perusahaan hosting terbaik di Indonesia. Ini diraih karena penggunaan datacenter Tier-4 disertai kualitas infrastruktur yang top, berlokasi di Indonesia bukan di laur negeri.
Tambahkan ke perangkat lunak tingkat profesional ini, dukungan cepat, serta harga yang sangat wajar (plus kode diskon eksklusif kami ) – kamu udah dapatkan layanan hosting premium dengan biaya minim.
Masih punya pertanyaan mengenai Niagahoster? Atau kamu pengen berbagi pengalamanmu dengan perusahaan ini? Apapun itu, kamu boleh gabung dalam diskusi pada bagian komen di bawah.
↧
Ulasan Hostinger: Apakah “Hampir Gratis” Lebih Baik daripada “Gratis” untuk Hosting? + Kupon Diskon 15%
Saya tahu situasinya: Anda iangin punya situs web sendiri, tetapi BANYAK SEKALI opsi hosting sehingga rasanya tidak mungkin bisa memutuskan: mana yang harus dipilih?!
Kalau Anda membaca ulasan ini, mungkin Anda sudah pernah mendengar Hostinger, perusahaan domain dan hosting yang menawarkan harga jauh lebih rendah daripada pesaingnya. Dalam ulasan mendetail ini, kita akan memeriksa Hostinger dengan kacamata pembesar dan menjawab pertanyaan berikut:
- Haruskah Anda memilih Hostinger daripada pesaingnya?
- Paket hosting mana yang terbaik untuk Anda?
- Bagaimana dengan site builder mereka – apa patut dicoba?
- Bisakah Anda mendapatkan diskon untuk Hostinger?
Pertama-tama, kita akan mempelajari latar belakang dan sejarah perusahaan ini dengan singkat untuk mengetahui apakah mereka bisa dipercaya, setelah itu kita akan mempelajari layanan mereka dengan lebih mendetail, dan terakhir mengambil kesimpulan dan menyediakan jawaban atas pertanyaan yang kami susun di atas.
Oh, ya, pada akhir ulasan ini, saya akan memberi tahu kode promo eksklusif yang memungkinkan Anda menghemat 15% dari penawaran Hostinger, sebagai tambahan diskon dan penawaran khusus yang bisa Anda temukan di situs mereka. Bagus!
Kisah Hostinger
Layanan hosting – bagaimana memilihnya?
Menggunakan Hostinger: kesan kami
Dukungan pelanggan Hostinger
Pro dan kontra Hostinger
Bonus: kode promo diskon 15%
Keputusan kami / Ulasan pengguna
Layanan hosting – bagaimana memilihnya?
Menggunakan Hostinger: kesan kami
Dukungan pelanggan Hostinger
Pro dan kontra Hostinger
Bonus: kode promo diskon 15%
Keputusan kami / Ulasan pengguna
Kisah Hostinger
Sebagai gambaran skala Hostinger, berikut angkanya: perusahaan ini memiliki hampir 30 juta pelanggan yang tidak hanya berada di Amerika, Inggris, India, dan Indonesia, tetapi juga di lebih dari 170 negara lain (yang artinya hampir semua negara di dunia!)
Dan mereka tidak menunjukkan tanda-tanda melambat – menurut data mereka, Hostinger masih berkembang dengan laju 1 klien setiap 5 detik.
Akan tetapi, seperti yang mungkin Anda kira, Hostinger tidak langsung menjadi raksasa internasional seperti sekarang. Mereka mulai tahun 2004 sebagai “Media Hosting” sederhana di negara kecil namun berkembang pesat, Lituania, yang terletak di timur laut Uni Eropa.
Pendiri Hostinger tidak berniat mengikuti arus dan membuat layanan hosting biasa seperti yang lain – mereka mendirikan perusahaan baru ini dengan ide inovatif:
Orang tidak mau membayar pemasaran kami – cuma hosting: sederhana, bisa diandalkan, dan semurah mungkin
Setelah bertahun-tahun, prinsip ini masih menjadi inti tujuan Hostinger, yaitu layanan berkualitas tinggi dengan harga nyaris nihil.
Namun, bagaimana Hostinger mampu memiliki daya saing seperti itu? Mungkin Anda bertanya-tanya. Dengan kata lain, bagaimana mereka berhasil menawarkan harga rendah sambil mempertahankan kualitas tinggi? Saya akan segera menjelaskannya, tetapi pertama-tama, ayo kita lihat produknya:
Paket hosting mana yang tepat untuk Anda?
Ada beberapa tipe hosting di situs resmi Hostinger, dengan paket harga berbeda-beda. Itu makin mempersulit pemilihan, mengingat ada beberapa layanan dan fitur tambahan gratis tergantung paketnya.
Ayo kita pelajari komponen hosting yang esensial, dengan demikian kita bisa mempersempit pilihan dan mengambil kesimpulan akhir.
Kita akan memeriksa tiga tipe layanan hosting Hostinger, tetapi lihat tabel di bawah ini terlebih dahulu. Tabel tersebut meringkas perbedaan terpenting antara tipe hosting dan menyediakan contoh penggunaan paling umum:
| Hosting Bersama | Hosting Bisnis | Hosting VPS | |
|---|---|---|---|
| Kemudahan penggunaan | Mudah | Mudah/Sedang | Sedang/Sulit |
| Untuk siapa? | Perorangan dan bisnis kecil | Bisnis sedang dan besar | Pengembang dan pemrogram |
| Tingkat pengontrolan | Fitur standar | Fitur luas | Kontrol penuh |
| Performa | Cukup untuk situs web kecil dan sedang | Performa tinggi untuk situs web lebih besar dan proyek daring | Sedang hingga tinggi tergantung paket |
| Ruang untuk perkembangan | Kaku – harus upgrade ke paket hosting lain | Fleksibel – bisa menambahkan sumber daya lain “sambil jalan” | Sangat fleksibel – kontrol atas sumber daya hingga bagian terkecil |
| Tingkat harga | Murah | Sedang | Fleksibel |
Saya kira dari tabel tersebut perbedaan di antara ketiga tipe hosting yang ditawarkan Hostinger sudah cukup jelas, tetapi kami akan memberi penjelasan yang lebih mendetail di bawah ini.
Sebelum membahas detail, kita perlu memahami satu konsep penting: server. Gampangnya, server adalah komputer khusus yang menyimpan situs web dan menampilkannya pada pengunjung daring:
Hosting adalah koleksi komputer server andal yang dioptimalkan untuk selalu daring 24/7/365 dan menampilkan situs web Anda kepada siapa saja yang memasukkan alamatnya ke peramban mereka.
Jadi, intinya server adalah komponen utama layanan hosting, dan dapat digunakan dalam berbagai cara tergantung permintaan dan anggaran klien. Di sinilah peran ketiga tipe hosting tersebut:
-
Hosting bersama adalah versi dasar untuk orang-orang yang baru mulai atau ingin menguji proyek online daring mereka dengan biaya minimal. Disebut “bersama” karena tiap server menyimpan ratusan atau bahkan ribuan situs web milik berbagai klien.
Ini menyiratkan bahwa satu sumber daya server digunakan secara bersamaan oleh banyak situs – bagus saja untuk situs yang memiliki lalu lintas medium, tetapi sangat memengaruhi performa situs yang lebih besar.
Di sisi lain, hosting bersama sangat murah dan mudah digunakan. Oleh karena itu, pilihan ini ideal untuk perorangan dan perusahaan kecil yang baru mulai mengembangkan sayap ke dunia maya.
-
Hosting bisnis adalah tipe di atasnya, cocok untuk situs yang lebih besar dan memiliki lalu lintas harian sedang hingga tinggi (ribuan pengguna atau lebih per hari).
Hosting bisnis Hostinger menggunakan apa yang disebut teknologi awan, yaitu sumber daya komputer tidak terikat pada server fisik tertentu, tetapi disebarkan ke beberapa mesin, yang menjamin stabilitas dan fleksibilitas yang lebih baik.
Ini juga berarti sumber daya hosting Anda terpisah dari situs lain sehingga performa keseluruhannya lebih tinggi, dibandingkan hosting bersama.
Semua keistimewaan itu ada harganya, tentu saja. Hosting bisnis lebih mahal, dengan paket termurah (“Startup” di harga Rp232.799 per bulan) berkali-kali lipat paket bersama yang termahal (“Bisnis” di Rp33.589 per bulan). Ngomong-ngomong, penamaan pilihan kedua itu menurut saya agak membingungkan, tetapi kita tahu apa maksudnya :)
-
Hosting VPS adalah tipe hosting dari Hostinger yang paling fleksibel dan tidak mudah dipahami. VPS adalah singkatan dari “Virtual Private Server”, karena di sini satu server fisik menjalankan beberapa lingkungan individu yang tidak saling mengganggu. Rasanya seakan Anda memiliki server sendiri, hanya saja namanya mesin “virtual”.
Pengaturan seperti itu menyediakan fleksibilitas maksimal. Anda dapat melakukan hampir apa saja yang diinginkan dengan server virtual karena Anda memiliki kontrol setingkat administrator atas seluruh sistem.
Kedengarannya asyik, sampai Anda menyadari tidak ada panel kontrol yang mudah di paket hosting VPS. Dengan kata lain, Anda bebas mengatur setiap bagian server virtual.
Oleh karena itulah tipe hosting ini sangat berguna untuk profesional yang tahu persis apa yang mereka lakukan (yaitu pemrogram dan pengembang web) dan bisa dibilang tidak ada gunanya untuk orang lain.
Dengan mempertimbangkan fitur tertentu dari setiap tipe hosting, saya bisa menyarankan bahwa Anda mungkin harus memilih tipe bersama. Kenapa? Karena jika Anda dari bisnis besar atau perusahaan pengembang web, Anda pasti sudah mengetahui semua yang saya jelaskan di atas.
Sekarang, kita asumsikan saja bahwa Anda membutuhkan hosting dasar, dan lihat mana dari ketiga paket bersama Hostinger yang merupakan pilihan masuk akal.

Di halaman hosting bersama Hostinger, Anda bisa melihat tiga tawaran: paket Single, seharga Rp9.900 per bulan, paket Premium seharga Rp19.989 per bulan, paket Bisnis seharga Rp33.589 per bulan. Saya rasa penting untuk diketahui bahwa harga ini adalah promosi spesial:
- Anda bisa mendapat harga tersebut jika memesan paket 48 bulan, periode lebih pendek harganya agak lebih tinggi (kalau pendapat saya, paket 12 bulan biasanya lebih dari cukup untuk mengetahui apakah Anda benar-benar membutuhkan situs web, dan untuk menguji proyek daring).
- Harga tersebut valid selama durasi paket yang Anda pesan, setelah itu, hosting akan diperpanjang dengan harga normal.
Sebagai informasi, ini adalah praktik yang umum digunakan oleh penyedia hosting, jadi dalam hal ini tidak ada kelicikan dari Hostinger.
Ketiga paket bersama tersebut disertai dengan semua hal yang Anda butuhkan untuk memulai, termasuk perangkat keras dan perangkat lunak optimasi. Jadi, kita hanya akan berfokus pada perbedaannya:
| Single | Premium | Bisnis | |
|---|---|---|---|
| Jumlah domain | 1 | ∞ | ∞ |
| Akun surel | 1 | ∞ | ∞ |
| Termasuk SSL gratis? | – | – | ya |
| Pencadangan | – | mingguan | harian |
| Processing power | 1x | 2x | 4x |
| Domain gratis? | – | ya | ya |
Paket Single hanya memiliki sedikit fitur dan daya komputasinya hanya cukup untuk situs web paling kecil, sementara paket Bisnis memiliki sedikit keistimewaan saja dibandingkan dengan paket Premium sementara harganya hampir dua kali lebih mahal.
Dengan kata lain, paket Premium adalah opsi paling seimbang dalam hal fitur, dan yang terpenting adalah paling murah karena menyediakan domain gratis.
Selain itu, paket Premium merupakan paket termurah yang menawarkan pencadangan otomatis, dan kegunaan pencadangan bisa dirasakan ketika terjadi sesuatu pada situs Anda :)
Sebagai kesimpulan, untuk kebanyakan individu dan organisasi kecil-menengah, paket Hostinger Bersama Premium adalah pilihan paling masuk akal. Pada bagian terakhir ulasan ini, saya akan menyediakan kode promo eksklusif sebagai tambahan diskon 15%. Jadi, jangan ke mana-mana!
Kesan kami dalam menggunakan Hostinger
Untuk keperluan ulasan ini, kami membeli paket hosting Premium dari Hostinger dan mengujinya secara ekstensif. Sekarang, kami akan membagikan pengalaman tersebut kepada pembaca panduan ini.
Setelah menyelesaikan order, Anda bisa mengakses panel admin hosting. Di sinilah Anda akan mengelola akun hosting:
Hostinger menawarkan panel admin khusus yang dibuat oleh pengembang internal perusahaan tersebut. Menurut kami panel ini ramah pengguna dan mudah dipahami, dibandingkan alternatif yang banyak digunakan seperti cPanel atau Plesk.
Semua yang Anda perlu disajikan dalam petak bergambar, dan ditata dengan rapi ke dalam kelompok-kelompok agar Anda bisa menemukan layanan dengan lebih cepat. Anda juga dapat menggunakan bilah pencari di bagian atas untuk lebih mudah mengakses item yang diinginkan.
Jika membeli domain dengan hosting Anda (di bawah saya akan menunjukkan cara untuk mendapatkannya secara gratis), domain itu otomatis aktif setelah beberapa saat, dan Anda bisa memulai pembuatan situs web.
Untuk itu, Anda bisa menggunakan Auto Installer untuk mengatur sistem manajemen konten seperti WordPress, atau menggunakan website builder seret-dan-lepas dari Hostinger. Kedua opsi tersebut dapat diakses dari bagian Website di cPanel admin hosting.
Setelah mencoba builder seret-dan-lepas (yang mereka namakan Zyro), kami bisa menyimpulkan jangan buang-buang waktu Anda mencobanya: templatnya tampak ketinggalan zaman dan kadang kacau. Sebagai contoh, inilah yang saya dapat begitu mengaktifkannya:
Sebaliknya, kami sarankan Anda menginstal WordPress (disebut juga WP) menggunakan fitur Auto Installer yang disebutkan di atas. Berikut beberapa alasan mengapa Anda sebaiknya memilih WP untuk situs pertama:
- WordPress adalah mesin situs web paling populer di dunia. Jadi, ada banyak tutorial gratis, panduan, dan tip penggunaan yang semua tersedia di internet!
- Anda bisa mendapatkan ribuan templat gratis dari katalog resminya (misalnya, cobalah Bento, yang multifungsi dan mudah dipersonalisasi).
- Ada juga ribuan ekstensi gratis untuk WordPress yang memungkinkan Anda menambahkan fungsionalitas apa pun yang bisa dibuat di situs, dari tombol berbagi ke media sosial dan formulir kontak hingga builder tata letak seret-dan-lepas.
Selain dari produknya, bagian lain yang sangat penting adalah dukungan pelanggan yang ditawarkan. Ayo kita lihat performa Hostinger di area ini:
Dukungan pelanggan Hostinger
nda dapat meminta bantuan tim Hostinger kapan saja, 24/7 via obrolan yang ada di sudut kanan bawah panel admin hosting.
Untuk mengetes kualitas dukungan, kami mengajukan beberapa pertanyaan via obrolan langsung: waktu responsnya sangat cepat (biasanya hanya beberapa detik), dan perwakilan Hostinger selalu ramah, sopan, dan sangat membantu). Mereka kadang menggunakan foto kucing untuk mencerahkan suasana hati Anda sambil menunggu mereka mengetikkan jawaban :)
Selain obrolan langsung, ada pustaka gratis berisi artikel tentang semua produk Hostinger dan layanannya. Anda dapat menemukannya dengan mengeklik tautan “Bantuan” di menu atas panel admin hosting. Di sana juga ada daftar pertanyaan umum, kemungkinan besar masalah Anda sudah terjawab di situ.
Secara keseluruhan, Hostinger berhasil melampaui harapan kami dalam hal kualitas dukungan, khususnya mengingat hosting mereka sangat murah. Kami pernah mendapat pengalaman yang jauh lebih tidak menyenangkan dari perusahaan saingan dengan harga lebih tinggi.
Pro dan kontra Hostinger
Sekarang, setelah mempelajari produk dan layanan, serta dukungan pelanggan Hostinger, mari kita meringkas sisi positif dan negatifnya. Kami berusaha menilai seobjektif mungkin:
- Harga yang bagus: harga semua paket hosting sangat kompetitif. Seperti kata mereka sendiri, “Anda hanya membayar hosting, bukan pemasaran”
- Penawaran fleksibel untuk semua jenis klien, dari perorangan dan bisnis kecil (hosting bersama) hingga perusahaan besar (hosting bisnis) dan pemrogram profesional (hosting VPS)
- 99.9% garansi uptime. Intinya, Hostinger berjanji bahwa situs web Anda akan tersedia sepanjang waktu. Angka itu berarti maksimal 44 menit downtime per bulan, yang pada praktiknya 0 menit downtime menurut pengujian kami.
- Anda bisa mendapatkan nama domain gratis dengan pembelian hosting jika memilih paket 12 bulan paling sedikit
- Panel admin hosting unik dan mudah digunakan yang dikembangkan oleh tim Hostinger secara khusus untuk klien perusahaan tersebut.
- Anda bisa menginstal WordPress hanya dengan beberapa klik menggunakan fitur Auto Installer dari panel admin hosting
- Pustaka besar berisi sumber daya edukasional tentang penggunaan produk Hostinger, gratis untuk semua klien
- Dukungan luar biasa dari tim yang ramah, cepat, dan sangat membantu, yang selalu siap menyelesaikan masalah Anda 24/7
- Website builder biasa-biasa saja dengan desain templat ketinggalan zaman dan beberapa kali eror ketika berganti templat. Kami merekomendasikan WordPress saja.
Sebelum kami menyelesaikan ulasan ini dengan kesimpulan dan keputusan (haruskah Anda menggunakan Hostinger?), berikut panduan langkah demi langkah untuk mendapatkan diskon tambahan 15% dalam pembelian Hostinger:
Bonus: Kode Promo Hostinger -15%
Dengan senang hati kami akan menunjukkan cara menghemat uang dengan menggunakan kode kupon diskon 15% eksklusif dari kami. Ikuti langkah-langkah sederhana di bawah untuk mendapatkan diskon tambahan menyenangkan pada pembelian Hostinger.
Karena tadi kita menyimpulkan bahwa paket berbagi Premium 12 bulan adalah pilihan paling masuk akal untuk sebagian besar situasi, kami akan menggunakannya sebagai contoh panduan.
- Masuklah ke halaman hosting bersama di situs web resmi Hostinger dengan mengeklik tombol di bawah ini (jendela baru otomatis terbuka):
- Di bawah Hosting Premium (opsi di tengah), klik tombol merah besar “Pilih serakang”. Anda akan dibawa ke halaman konfigurasi.
- Klik untuk memilih paket 12 bulan (ini paket paling murah yang memberi nama domain gratis sehingga tidak ada artinya memilih paket 3 bulan).
- Dalam bagian domain di bawahnya, masukkan nama domain yang Anda inginkan. Mungkin Anda harus mencoba beberapa kali sebelum menemukan nama yang tersedia.
- Walaupun bersifat opsional, kami juga sangat menyarankan Anda mencentang kotak “Sertifikat SSL”. Harganya tidak begitu mahal, tetapi akan membuat situs lebih aman dan tepercaya. Jika punya SSL, situs web Anda juga akan menampilkan ikon gembok aman berwarna hijau di bilah alamat peramban.
-
Bagian lain di halaman tersebut tidak esensial. Anda tentu bisa menyertakan semua opsi itu, tetapi kalau tidak juga tidak apa-apa. Pada titik ini, halaman konfigurasi Anda akan terlihat seperti berikut:
![]()
-
Sekarang lihat ke sisi kanan halaman dan cari teks abu-abu yang berbunyi, “Punya Kode Kupon?” Letaknya tepat di bawah jumlah order total. Ketika mengeklik tautan di sebelahnya, akan muncul bidang baru. Masukkan kode berikut:
SAVE15
-
Setelah memasukkan kode, klik ikon plus di kanan (warnanya ungu). Anda akan melihat pesan yang mengatakan bahwa kode kupon sudah berhasil digunakan, dan diskon baru akan muncul dalam order:
![]()
- Selamat! Anda sudah menghemat tambahan 15% dalam pembelian Hostinger sehingga harga akhirnya makin menarik.


Keputusan kami dan ulasan pengguna
Setelah mempelajari Hostinger dari semua sisi dan menggunakan layanannya selama beberapa waktu, kami dapat menyimpulkan bahwa ini adalah perusahaan hosting yang layak dipercaya: harga bagus, sederhana, mudah digunakan, dan dukungan yang selalu membantu adalah yang Anda butuhkan agar berhasil membuat dan mengelola situs web.
Di atas, kami juga sudah menunjukkan cara menghemat 15% lagi pada order Hostinger, menggunakan kode promo eksklusif kami. Memang tidak banyak mengingat bahwa Hostinger sudah sangat murah, tetapi tetap bonus yang menyenangkan, bukan?
Pernyataan afiliasi: dengan jujur kami memberi tahu bahwa beberapa tautan dalam ulasan ini merupakan tautan afiliasi, artinya kami mendapat sedikit komisi setiap kali ada orang yang membeli paket Hostinger melalui tautan tersebut. Itu tidak memengaruhi harga yang Anda dapatkan di penawaran Hostinger, tentu saja.
Apakah Anda berencana menggunakan Hostinger, tetapi masih belum yakin, atau tidak tahu paket mana yang harus dipilih? Atau, Anda sudah menggunakan Hostinger dan ingin berbagi pengalaman? Apa pun itu, silakan bergabung dengan diskusi dalam bagian komentar di bawah ini. Mari kita saling membantu!
↧
↧
Bir web sitesi sıfırdan nasıl yapılır: yeni başlayanlar için pratik kılavuz
İlk önce öncelikler
Bazı yanlış kanıları giderelim!
1. Adım: bir alan adı ve hosting hizmeti edinme
2. Adım: WordPress’i yükleme
3. Adım: WordPress’ı yapılandırma
4. Adım: tema ve eklenti ekleme
Ve tabii ki yararlı ipuçları
Sorunuz var mı? Bize sorun
Bazı yanlış kanıları giderelim!
1. Adım: bir alan adı ve hosting hizmeti edinme
2. Adım: WordPress’i yükleme
3. Adım: WordPress’ı yapılandırma
4. Adım: tema ve eklenti ekleme
Ve tabii ki yararlı ipuçları
Sorunuz var mı? Bize sorun
Peki, demek ki bir web sitesi yapman gerektiğine karar verdin. Öncelikle – tebrikler! Bu demek oluyor ki, tüm dünyanın bilmesi gereken bir şeyi yapıyorsun. Tüm dünya derken, tabii aslında dünyanın yarısı demek istiyorum, diğer yarısı henüz bir İnternet bağlantısına sahip değil (bu yüzden sen sahip olduğun için minnettar olmalısın!).
Neyse, bu kılavuz sana açık, az ama öz, ve en önemlisi palavra içermeyen bir yöntem ile bir web sitesi inşa etme sürecinin tamamında yön gösterecek – yarım saatten az bir sürede kendine ait pırıl pırıl bir web sitesine sahip olacaksın. Ve önemli şeylere odaklanarak ve promosyon kodumuzu kullanarak, bu süreçte 750 TL tasarruf edeceksin.

Evet, hepimiz bir an önce başlamayı arzuluyoruz, ancak öncesinde birkaç şeyi gözden geçirmeyi tavsiye ederim (hiç endişelenme, 5 dakikadan daha kısa sürecek). Amma velakin, bir site oluşturma arzusu ile tutuşuyorsan ve HEMEN BAŞLAMAK İSTİYORSAN, bu sayfa içi bağlantıyı kullanarak birkaç paragraf aşağıya kaydırabilirsin.
İlk önce öncelikler
Öncelikle, şunu baştan belirtelim: bu kılavuzun kendisi tamamen ücretsiz iken (hadi canım!), bir web sitesini ücretsiz oluşturmak için kullanılmamalıdır. Evet doğru, teknik olarak bir kuruş harcamadan bir web sitesi oluşturmak mümkün, ancak bu durumda ücretsiz bir hosting (fena derecede kötü oluyorlar) veya Weebly gibi bir site oluşturucu için ücretsiz abonelik planı (bunlar da web sitende reklamlar gösterir ve marka çalışması yapar, öğk) kullanmak zorunda kalırsın. Ancak, en büyük neden ise, bu durumda ücretsiz bir alan adı edinemezsin ve websitem.weebly.com gibi, başka birinin alan adına omzunu yaslamak ziyaretçilerinin seni ciddiye almaları için motive etmez.
İkinci olarak, “sen kim oluyorsun da bana ne yapmam gerektiğini söylüyorsun?!” diyenler var ise, işte kendimi tanıttığım (veya gizli gizli kendimi övdüğüm) kısa bir açıklama: adım Andrii Shekhirev, Satori Webmaster Academy’nin (yani bu sitenin) kurucusuyum. 2007 yılından beri kendi projelerim ve diğer kişiler için web sitesi oluşturmaya ek olarak, dünyanın en büyük web sitesi şablonu pazarı olan ThemeForest’da Elit Yaratıcıyım – ürünlerim 2000’den fazla kişiye kendi web sitelerini oluşturmalarında yardımcı oldu (hayır, burada reklamlarını yapmayacağım).
Yıllar içinde web sitesi yapmanın düzinelerce yolunu denemenin yanı sıra sayısız site oluşturucu, hosting sağlayıcı ve içerik yönetim sistemi test ettim. Bu kılavuz, öğrendiğim şeylerin bir özeti ve bugün onu sizinle paylaşmaktan mutluluk duyuyorum.
Oh! Sonunda bitti. Şimdi, son olarak, şunu belirtmemin dürüst bir davranış olduğunu düşündüm: bu kılavuz bazı ortaklık bağlantıları içeriyor. Bu demek oluyor ki, örneğin bu metin içindeki bağlantı üzerinden bir hosting planı satın aldığında, ilgili sağlayıcıdan sabit bir komisyon alıyorum.
İşin güzelliği de şu: bu anlaşmanın senin ödediğin miktara bir etkisi yok, çünkü sağlayıcı ödemeyi bize kendi parasından yapıyor – bu, onlar için reklam giderlerini başka bir tarafa yönlendirmek gibi. Yani evet, bu kılavuzu sevdiysen, hosting hizmetini bağlantılarımız üzerinden satın almayı düşünebilirsin. Bunu bu kocaman, çok uluslu şirkete ödetelim, muahahah!
..Öhm, peki. İşimize dönelim. Başlamadan önce son ön hazırlık için (az kaldı, söz!), işte kendi web siteni oluşturma hakkında bazı yaygın şehir efsaneleri. Onları başından yok etmek neyin ne olduğunu daha iyi anlamanı sağlayacak.
Bazı yanlış kanıları giderelim!
Şehir efsanesi #1: bir web sitesi yapmak için kodlama bilmen gerekiyor. Tabii ki gerekiyor. EĞER 1994 YILINDA YAŞIYORSAN! Cidden ama – bekleneceği gibi, teknoloji Web’in ilk günlerinden bu yana biraz daha gelişti ve site oluşturma işleminin büyük bir kısmı otomatikleşti. Buna kodun kendisini yazmak da dahil. Yapman gereken sadece en uygun araçları seçmek ve birkaç önemli ayrıntıyı bilmek (bu kılavuz da zaten onun için var).
Şehir efsanesi #2: kendi web siteni oluşturmak sana tonlarca paraya mal olacak. Bu, sadece bir ajanstan taşeron bir hizmet almak istersen olur – ki zaten o işlem de büyük ihtimalle bu kılavuz içerisinde tarif edilen adımları içerecek (ve sana bunun için okkalı bir fatura gönderilecek).
Şehir efsanesi #3: bir web sitesi yapmak dünya kadar zaman gerektiriyor. Yani, özellikle bu işte yeni isen ve sıfırdan başlıyorsan, bazen gerektirebilir. Ama akıllı olursan ve doğru şeylere odaklanırsan, YARIM SAATTEN KISA SÜREDE düzgün ve sorunsuz bir sayfaya sahip olabilirsin. Ve bu kılavuzun bütün amacı bunu yapmana yardımcı olmak, o yüzden hemen başlayalım!
1. Adım: bir alan adı ve hosting hizmeti edinme
İhtiyacın olan ilk şey web sitenin yaşayacağı bir yer. Teknik terimlerle, bu yerin adı web hosting – özü itibarıyla, web sitesinin dosyalarını saklayan ve onları web sitesinin adresini giren ve Enter tuşuna basan herkese sunan özel, her zaman açık olan bir bilgisayardır.
Yeri gelmişken: adresin kendisini de (örnekadres.com.tr gibi) rezerve etmen gerekir ve bu adres alan adı olarak adlandırılır. Çok şükür ki, çoğu hosting sağlayıcı alan adını bir paket olarak sunduğu için, bu ikisini tek seferde yapabilirsin.
Bu tür, büyük veya küçük, binlerce şirket bulunuyor, ancak küçük olanları seçmenin hiçbir mantığı yok: onun yerine, iyi bir geçmiş performansına sahip, istikrarlı, güvenilir bir hosting hizmetini seçmelisin. Web siten 7/24/365 erişilebilir olmalıdır, kullandığın sağlayıcının kepenk kapatması durumunda yeni bir sağlayıcıya taşınmanın neden olacağı sıkıntılara girmek istemiyorum bile. Çok can sıkıcı, inan bana.
Yıllar boyunca denediğim ve test ettiğim hosting sağlayıcılar arasında en istikrarlı ve kullanımı kolay olanı hala GoDaddy, 20 yıldan fazladır bu işi yapıyorlar, dünya etrafında 17+ milyon müşterileri bulunuyor ve yeni başlayanlar için kullanımı kolay. Ve şu anda hem hosting hem de alan adları için birazdan bahsedeceğim bazı ilgi çekici indirimler sunuyorlar.
Takip eden hosting hizmeti sipariş etme sürecini mümkün olduğu kadar hızlı ve sorunsuz halletmek için, bir ara vermeyi ve öncesinde bir alan adına karar vermeni tavsiye ederim: seçtiğin adın henüz var olmadığından kesin eminsen GoDaddy’nin alan adı arama çubuğunu kullanabilir – veya yeni bir tanesini ortaya çıkarmak için özel araçlardan birini kullanabilirsin. Aralarında bildiğim en iyisi (benim de sık sık kullandığım) ücretsiz olan Dot-o-Mator. Konulara göre düzenlenmiş, ön ek ve son ekler ile kaynak kelimeleri birleştirmeni sağlıyor. Eğer çok sıkışırsan, genel (ve kalabalık) .com yerine yeni alan adı uzantılarını deneyebilirsin.
Tamam mısın? Peki, şimdi başlamaya hazırız. GoDaddy’nin hosting için özel indirimlere sahip teklif sayfasına gitmek için aşağıdaki butona tıklayabilirsin. Bu arada, biraz önce bahsettiğimiz hosting + alan adı paketlerini hatırlıyor musun? GoDaddy şu anda her hosting planı için ÜCRETSİZ bir alan adı kaydı sunuyor ve bu ek bir 53 TL (bir .com alan adının normal maliyeti) tasarruf sağlıyor:
GoDaddy Hosting ve ücretsiz alan adı -%43 ›
O sayfa üzerinde, sana dört adet hosting planı sunulacak: tek seferde birden fazla web sitesine ihtiyacın olmadığı sürece, başlamak için ihtiyacın olan her şeyi barındırdığından dolayı Ekonomik planını seçebilirsin.
Planı sepetine ekledikten sonra, siparişini özelleştirmek için birçok tercih yapacaksın: önce, kaç ay için peşin ödeme yapmak istediğini seç. Hemen 3 yıllık ödeme periyodu ile ödemeyi seçebilirsin, ancak çevrimiçi girişimini test etmek VE %43 indirim kazanmak için 12 ay yeter de artar. Web siteni bir yıldan sonra açık tutmaya karar verirsen (umarım ki öyle yaparsın), herhangi bir işlem yapmana gerek olmayacak – otomatik bir devam ettirme mekanizması bulunuyor (ancak unutma ki sonraki periyotlar normal oran ile ücretlendirilecek).
Daha sonra, aynı ekranda GoDaddy’nin siparişine varsayılan olarak web sitesi yedekleme eklediğini göreceksin; o seçeneği gönül rahatlığı ile kaldırabilirsin, şu anda o kadar önemli değil (ayrıca aynı işlevselliği daha sonra hiçbir ek ücret olmadan yapılandırabilecek ve yılda 95 TL tasarruf edeceksin).
Ayrıca “Güvenli Başlangıç”a da ihtiyacın olmayacak, web siten hazır olduktan sonra onu da ücretsiz edinmek kolay (bam! 359 TL daha tasarruf ettik).
Son olarak, SSL Sertifika seçeneği bulunuyor: bu seçenek web sitesi trafiğini güvenli yapan ekstra şifreleme katmanıdır – ve ziyaretçilerin tarafından görülebilecek şekilde, tarayıcının adres çubuğunda bir “Güvenli” işareti ile yeşil bir kilit gösterir. Buna ek olarak, Google Chrome Temmuz 2018’den beri, açık bir şekilde güvenli olmayan web sitelerini sevmediğini belirtmek için, SSL’e sahip olmayan web siteleri için bir “Güvenli Değil” işareti göstermeye başladı.

Bu yüzden, web sitesi SSL olmadan çalışabilecek iken, yine de hemen edinmeni tavsiye ederim (çünkü SSL olmayan bir siteden SSL olan bir siteye taşımak da ayrı bir külfet).
Özetlemek gerekirse, GoDaddy hosting ekstralar sayfası yukarıda önerilen ayarlar ile şu şekilde görünecek:

Artık (şu anda ücretsiz olan) alan adına geçmeye hazırız: yeşil “Bu Seçeneklerle Devam Et” butonuna tıkladıktan sonra, daha önce seçtiğin adı girmek için bir arama çubuğu göreceksin. Aramayı gerçekleştirdikten sonra, alan adının yanındaki mavi “Seçin ve Devam Edin” butonuna tıklayarak sepetine ekleyebilirsin.
Hosting siparişimizin son adımı! “Ama dur, işler daha da güzelleşiyor” anlarından biri olduğu için gizliden gizliye heyecanlandım: promosyon kodumuzu kullanarak, son fiyat üzerinden ekstra bir %30 indirim edinebilirsin.

Sipariş sayfasının sağ alt köşesindeki (evet, GoDaddy olabildiğince fark edilmeyecek bir bölüme koymuş :) “Toplam” bölümünün hemen altındaki “Promosyon kodunuz mu var?” bağlantısına tıkla ve bu açılan penceredeki kombinasyonu gir ve Uygula’ya tıkla:
GDD1hos
Artık genel şeyler ile devam etmeye hazırsın – sol taraftaki “Hesap Oluştur”a tıkla, hesap ve fatura bilgilerini gir ve siparişi tamamla. İçimden bir ses daha önce çevrimiçi alışveriş yapmış olduğunu söylüyor, o yüzden bir mahsuru yoksa bu kısmı atlıyorum.
Bitti mi? O zaman bir hesap yapalım: hosting üzerinden 125 TL, ayrıca daha sonra ekleyebileceğin önemsiz özellikler üzerinden 95.88 TL + 359.88 TL = 455.76 TL tasarruf ettik. Bu yetmezmiş gibi, alan adını ücretsiz edinerek ek bir 53 TL tasarruf ettik. Şu ana kadar 755 TL tasarruf etmiş olduk. Güzel, güzel. Daha da iyisi ne biliyor musun? Bu kılavuzun geri kalanını uygulamak sana bir kuruşa bile mal olmayacak!
Bu arada, büyük ihtimalle en karmaşık olan 1. Adımı bitirdik – biraz hava almak ve bir kahve arası vermek için iyi bir zaman. Ben burada bekliyorum (çünkü ben sadece bir sayfa üzerinde bulunan bir metinim).
..
..
Kendine geldin mi? Şimdi sıra 2. adımda.
2. Adım: WordPress’i yükleme
Yeni web sitemiz için hoş, konforlu bir hosting edindik, yani bizi web sitesinin kendisini oluşturmak için alıkoyacak hiçbir şey kalmadı. O halde başlayalım.
“WordPress de neyin nesi” diye merak ediyorsan, kısa bir teneffüs: WordPress, veya kısaca WP, içerik yönetim sistemi dedikleri şey oluyor: esas olarak, tasarım ve içeriğinden ayarlar ve iskeletine kadar, web sitesinin çalışmasına yardımcı olan bir yazılım.
Neden WordPress’i seçmeli? Çok basit bir biçimde, çünkü İnternet’in en çok tercih edilen web sitesi motoru, ve dünya üzerindeki tüm web sitelerinin üçte birine güç sağlıyor (bu çoook sayıda web sitesi demek). Kullanmak ve üzerinde değişiklik yapmak ücretsiz, binlerce eklenti ile kolay bir şekilde genişletilebilir ve birbirilerini destekleme eğiliminde olan çok geniş bir topluluğa sahip. WP’i kullanma üzerine kılavuzlar, öğreticiler ve ipuçları Web’in her yerinde bulunuyor ve bunların çoğu da ücretsiz.

İlk kez bir web sitesine sahip olacak bir kişi için mantıklı bir seçenek olarak görünüyor, bu yüzden kılavuzumuz boyunca WordPress ile devam edeceğiz. Ayrıca, bu 3 adımlık kurulum bittikten sonra güvenlik ve performans üzerine ek ipuçları vereceğim.
Peki, devam edelim. Yeni oluşturduğun GoDaddy hesabına giriş yap – ürünlerinin bir listesini göreceksin. Genişletmek için “Web Hosting” satırına tıkla, sonra da sağ taraftaki “Yönet” butonuna tıkla. Yeni sayfada, “cPanel Admin” adli büyük bir mavi buton göreceksin – aradığımız şey işte bu! (diğer bir deyişle, ona tıkla)
Gelecekte hiç şüphesiz olarak defalarca ziyaret edeceğin hosting paneline yönlendirileceksin. Ama şimdilik “Web Uygulamaları” altında “WordPress”i bulalım (yukarıda dünyayı yiyen Pacman’in gözünde olduğu gibi, gri bir daire içinde beyaz bir “W” şeklinde olmalı, kıps) ve ona tıklayalım. Sonrasında şu ada sahip yükleme sihirbazına yönlendirileceksin:

Önemli olan kısmını edinmek için sağ üst köşedeki “+ bu uygulamayı kur” butonuna tıkla: yükleme parametreleri ekranında birkaç ayarı değiştireceğiz.
Domain açılan menüsünde, varsayılan olarak seçilmemesi durumunda satın aldığın alan adını seç; www olan veya olmayan bir adres seçimi kişisel bir tercihtir, ama bana soracak olursan, www olmayan versiyon daha modern duruyor ve daha kısa (ki bu web sitesi adresleri için bir artı).
Yeni web sitesi için birincil içerik yönetim sistemi olarak WordPress’in yüklenmesi için Dizin alanının boş olduğundan emin ol.
Versiyon ve Dil alanları oldukları gibi kalabilir, böylece lisans anlaşmaları zırvalarından sonra güncellemeler hakkında birkaç seçenek göreceksin: her birinde tam otomatik güncellemeleri seçtiğinden (son seçenekler) ve sonuncusunda otomatik güncelleme yedeklemesini etkinleştirdiğinden emin ol.
Bu, web sitesinin her zaman en güncel yazılım üzerinde çalıştığını sağlayacak ve bu güvenlik için iyi bir şey. Ayrıca, seni yeni versiyonları takip etme ve el ile güncelleme zorunluluğundan kurtaracak.
Doğru yolda olup olmadığımızı kontrol etmek için, bu bölümdeki tercihler serisi “3-2-2-1” şeklinde olmalı, veya, bunu görselleştirmek gerekirse:

Son olarak, ilk beş alanı doldurman gerekecek olan Ayarlar bölümü (son iki seçenek düğmesini oldukları gibi bırak). Önce, web sitesi yöneticisinin kullanıcı adını ve şifresini gir. Ve allah aşkına, lütfen “admin” ve “sifre” kelimelerini kullanma – tahmin edilmesi biraz daha zor olan şeyler düşün! WP oldukça popular olduğundan dolayı, tahmin etmesi kolay yönetici bilgilerine sahip WordPress siteleri için pusuya yatmış birçok korsan bulunuyor.
E-posta adresinin yanı sıra web sitesi başlığını ve etiket satırını doldurmaya geç (son ikisi şu anda o kadar önemli değil, WP yönetici panelinden dilediğin zaman kolayca değiştirebileceksin).
Burada işimiz bitti! En alttaki + kur butonuna tıkla ve sihirli perilerin senin için WordPress’i kurmasını bekle. Tamamlandığında, web sitesinin adının altında üç adet bağlantı göreceksin: “wp-admin” ile biten ikinci bağlantıya tıkla, bu herhangi bir web sitesinin WordPress yönetici paneli için standart son ektir.
Sana bir sürü saçma soru soran ve gereksiz eklentileri ekleyen bir WorPress sihirbazı ile yeni bir sekme açılacak, bu yüzden sadece “Hayır Teşekkürler”i seç ve WP yönetici paneline geç.
..o kokuyu alabiliyor musun? Sabahları taze bir web sitesinin kokusu! Yeni bir şeye başlamanın verdiği o kokuya bayılıyorum.
İşimiz hemen hemen bitti, ama bir an önce ince ayar yapmak isteyebileceğin birkaç şey var, çünkü deneyim gösteriyor ki tüm varsayılan WP ayarları aslında en uygun seçenekler değil.
3. Adım: WordPress’I yapılandırma
Yeni web sitene içerik eklemeye başlamadan önce, sistemde hızlı bir tur atıp ilerisi için bazı iyileştirmeler yapalım.
WP yönetici panelinin solunda koyu gri arka plana sahip bir yönetici menüsü göreceksin. Buradaki her öğe eşit derecede önemli değil ve çoğu zaman yalnızca birkaç tanesini kullanacaksın. Diğerleri hakkında bilgileri ilerledikçe öğrenebilirsin.
En sık kullanılan bölümler, yeni içerik oluşturabileceğin Yazılar ve Sayfalar bölümleri, ve bu özelliği etkinleştirmeyi tercih etmen durumunda, gönderilerin hakkındaki tartışmaları yönetebileceğin Yorumlar bölümüdür.
Bir sayfa ve bir gönderi arasında ki fark, birincisi “Hakkımızda” sayfası gibi zamanla değişmesi beklenmeyen sabit içerikler içindir; bir diğer yandan gönderiler ise, haberler veya blog yazıları gibi, düzenli bir biçimde eklediğin içerikler içindir. Ayrıca WordPress’de, tüm gönderilerin gösterildiği otomatik olarak oluşturulmuş bir sayfa olan özel bir blog sayfası konsepti bulunuyor. Buna ileride geleceğiz. Şimdilik devam ediyoruz!
WP yönetici menüsünde bir diğer önemli bölüm, web sitesi için görsel temayı yükleyebileceğin Görünüm bölümüdür (Görünüm → Temalar). Navigasyon menüsünün yanı sıra (Görünüm → Menüler), genellikle bir kenar çubuğunda bir kategori listesi veya bir arama çubuğu gibi özel işlevleri gerçekleştiren küçük bloklar olan araçlar (Görünüm → Bileşenler) eklemek için kullanışlı olacaktır. Görünüm bölümü ayrıca ağırlıklı olarak modern temalar tarafından web sitende renkler ve yazı tipleri gibi şeyleri özelleştirmeni sağlamak için kullanılan Özelleştir bölümünü içermektedir.
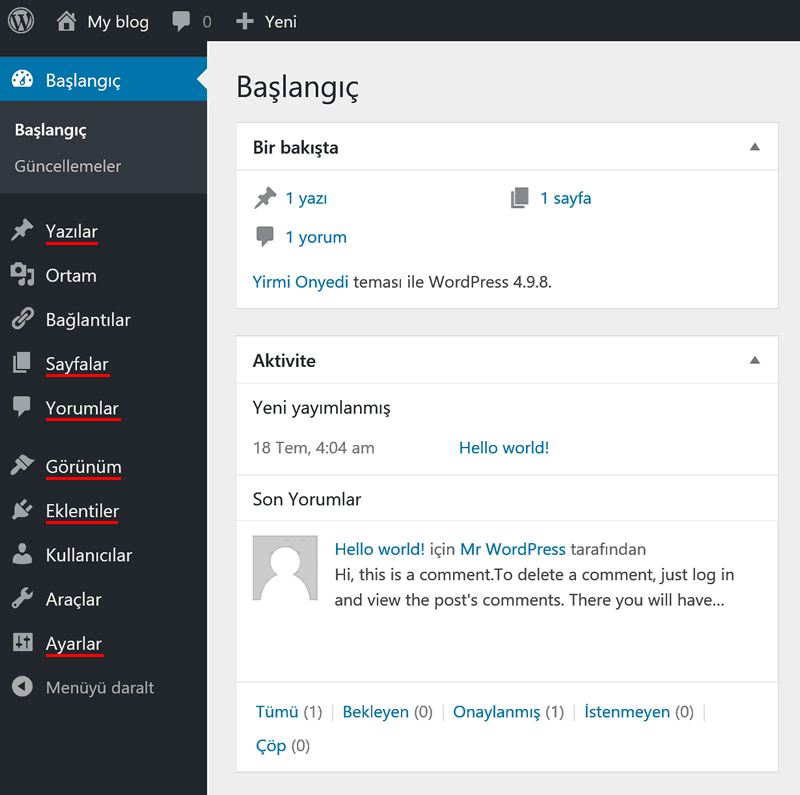
En kullanışlı WordPress yönetici bölümleri
Ve güvenlik, sosyal medya butonları, iletişim formları vs. vs. gibi daha çok özellik ekleyen birçok eklentiyi yükleyebileceğin ve özelleştirebileceğin Eklentiler bölümü bulunuyor.
Bu, herhalde dünyanın en hızlı WP turu oldu! Kurulumumuzu tamamlamak için, yönetici menüsünün en alt tarafındaki Ayarlar bölümünden ince ayar çekelim:
- Ayarlar → Genel: “Site Başlığı” ve “Slogan” daha sonra düzenleyebileceğini söylediğimi hatırlıyor musun? İşte onu buradan yapabilirsin. Ayrıca “Yeni kullanıcının varsayılan rolü”, “Zaman Dilimi”, “Tarih biçimi”, “Zaman biçimi” ve “Haftanın başladığı gün” seçenekleri için tercih yapmayı unutma.
- Ayarlar → Okuma: şimdilik bu bölümü bir kenara not al; buradan (hangisini istediğine karar verdikten sonra) blog yazılarını veya sabit sayfayı göstermek için web sitesinin ilk sayfasını ayarlayabileceksin. Blog sayfalarını ilk sayfan olarak ayarlamak istemiyorsan, farklı bir yer seçebileceksin – sadece daha önce bahsettiğim Sayfalar yönetici bölümünden yeni bir boş sayfa oluştur. Daha sonra, buraya geri gel ve ilk sayfa olmayan blog yazısı sayfası olarak kullan; o sayfa değişiklikleri kaydettikten sonra otomatik olarak gönderilerini göstermeye başlayacak.
- Ayarlar → Tartışma: insanların web sitesi blog/haber yazıları hakkında yorum yapmalarına izin vermek istersen, “Yeni yazılar üzerine yorum yapılmasına izin ver” onay kutusunun yanı sıra, “Zincirli yorumlara izin ver” (insanların birbirilerinin yorumlarına cevap vermelerini sağlamak için) ve “Yorum yazanın önceden onaylanmış bir yorumu olmalı” (aksi halde BİRÇOK SPAM alacaksın) onay kutularını işaretlediğinden emin ol. Ne yaparsan yap, “Diğer bloglardan yeni makaleler için bağlantı bildirimlerini etkinleştir” seçeneğini kaldırma, bu sadece daha çok spam’e neden olacak. Son olarak, “Şu durumlarda bana e-posta gönder” bölümüne, seçeneklerin kişisel tercihlerine göre ayarlandığından emin olmak için bir göz at.
- Ayarlar → Kalıcı bağlantılar: sayfaların ve gönderilerin için en uygun URL’leri oluşturduğundan dolayı, Gönderi Adı seçeneğini seçmeyi şiddetle öneririm (açıkçası, bu alt bölümde diğer seçeneklerin neden var olduğundan hiç emin değilim).
Esas olarak hepsi bu kadar! Artık yeni web siteni kurcalamaya ve yeni içerik eklemeye başlayabilirsin. Ancak bir adım daha var, bu isteğe bağlı bir adım ama yine de gerekli gibi:
4. Adım: temalar ve eklentiler
Prensipte, web sitesinin görsel görünümünü olduğu gibi bırakabilir ve sadece içeriğe odaklanabilirsin. Ancak, bu durumda web sitesi sadece çok sıradan görünmekle kalmaz, aslında varsayılan temayı değiştirmek için çok tembel olan milyarlarca web sitesinin birebir aynısı gibi görünür.
Ayrıca, her web sitesinin özgün görünmesini sağlayan ve özelleştirme ve kişiselleştirme için daha çok imkan sağlayan birçok WP teması ücretsiz kullanılabilir.
Ama burada utanmadan bir reklam yapacağım: bize ait olan Bento adlı (Satori’de Japonya’yı çok sevdiğimiz bariz oldu sanırım :) çok amaçlı WP temamızı kullanmanı önereceğim.

Bu tema, web sitesi üzerindeki hemen hemen her şeyin rengini ve görünümünü özelleştirmeni, her sayfada mobil kullanıcı dostu ızgara tasarımları oluşturmanı, ve resmi sayfada listelenen birçok kullanışlı şeyi yapmanı sağlar:
Buna ek olarak, Bento yazılı olarak desteklenmiştir (WordPress dünyasında hiç olmayan bir şey) ve tema hakkındaki soruları cevaplandırdığımız özel destek forumuna sahiptir.
/ açıkça kendi reklamını yapma sona erdi /
Eklentilere gelince, çeviriden forum ve topluluk pencerelerine kadar, web sitesine çeşitli işlevsellikler ekleyen 50,000+ ücretsiz eklentiyi istediğin zaman kullanabilirsin (hayır, eklenti oluşturmuyoruz, bu yüzden bir “Sushi” veya “Kamikaze” eklentisi için bağlantı bekleme).
Onun yerine; kendi deneyimim, diğer insanların değerlendirmeleri ve objektif istatistiklere bağlı olarak, her web sitesi sahibi kişinin yüklemeyi göz önünde bulundurması gereken bazı en güvenilir ve kül halinde kullanışlı eklentileri listeleyeceğim. Ve tabii ki tamamı ücretsiz:
- Akismet otomatik olarak yorumlarda spamleri filtreliyor. Bu eklenti bir hayat kurtarıyor! Veya spam olan bağlantıları ve kelimeleri yok ettiğinden dolayı en azından zaman kazandırıyor. Akismet benimle daha uyumlu olmak için bir çeşit yapay zeka ile öğrenme algoritması kullanıyor.
- All in One SEO arama motoru optimizasyonu için kullanılıyor. Bu eklenti, web sitesinin Google aramalarında berbat bir şekilde görünmemesi için web sitesinde uygun meta datayı ayarlamak için sanırım en iyi WP eklentisi. Google bu tür detaylara önem vermeyi çok seviyor.
- Google Analytics Dashboard gelen ziyaretçileri takip etmek için kullanılıyor. Tabii bir Google Analytics hesabına ihtiyacın olacak, onu da resmi web sitelerinden ücretsiz edinebilirsin.
- Contact Form 7 ziyaretçilerinin sana mesaj göndermelerini sağlıyor. Her seferinde birisi web sitende bir mesaj bıraktığında bir e-posta almak için, ayrıca WP Mail SMTP gibi bir e-posta eklentisi yüklemen gerekecek (GoDaddy’nin e-posta sistemi ile çalışmasını sağlamaya yardımcı olacak bazı bağlantılar: 1, 2).
Evet, artık resmen bitti. Gıcır gıcır web sitesinin tadını çıkar! Daha fazla nasihat ve en iyi yöntemleri duymak istersen, seni kılavuzun uygun bir şekilde adlandırılmış son bölümüne alalım:
Yararlı ipuçları (isteğe bağlı)
Web sitesi güvenliğini iyileştirme ve yedekleme yapma konusunda ücretsiz yöntemleri ele alma sözümü unutmadım. Buyur.
İpucu #1: Web sitesini daha güvenli yapmak. Web sitesi hala genç ve masum iken başka şeylere odaklanmalısın çünkü henüz kimse onu hacklemeye çalışmıyor. Ancak, bazı kolay şeyler var ki, hiç zamanını almayacak ama başarılı bir saldırının hedefi olma riskini 10 kat azaltacak.
Öncelikle, bariz öneriler (ki %99’u uygulamıyor): WP yönetici panelinin kullanıcı adı için “admin”I kullanma, farklı bir kelime kullan. Tek başına bu, WordPress web sitesini çökertmeyi binlerce kez zorlaştıracak. Ve harfler, sayılar, semboller ve diğer şeyleri kullanarak güçlü bir şifre oluştur. Ekstra zorluk için, iki faktörlü kimlik doğrulama (giriş sırasında akıllı telefonun tarafından oluşturulan ek bir kod) kullan.
Çoğu kişinin görmezden geldiği başka bir bariz alışkanlık: WordPress’in yanı sıra, eklentileri ve temaları güncel tutmak. Bunu halihazırda 2. adımda (“WordPress’I yükleme”) ele aldık, ama yine de WP yöneticisi içerisinden dikkat etmek mantıklı olur.
Tedbirli olanlarınız için ücretsiz Wordfence eklentisini yüklemenizi tavsiye edebilirim – en paranoyak ağ yöneticisinin bile geceleri rahat uyumasına yardımcı olacak tonlarca ekstra koruma seçeneklerine sahip.
İpucu #2: Kolay otomatik yedekleme. Çünkü her seferinde el ile yaparak zaman kaybetmek istemeyeceksin. Yapacağın daha önemli işler var, mesela yeni web siten için içerik yaratmak gibi! Tek kelime ile: UpdraftPlus. Ücretsiz, kurulumu kolay ve kendi sunucundan (ama önermem) bulut depolamaya kadar, birçok yerde yedek saklama imkanı sağlıyor.
Ben şahsen Updraft içinde Google Drive seçeneğini kullanıyorum ve kendi entegrasyonlarını sunduklarından beri kurulumu daha da kolaylaştı. Not: ücretsiz versiyonu normal bir web sitesi için gereken her şeye sahip, çeşitli karmaşıklıklarda birçok çevrimiçi projede çalışmama rağmen Pro versiyonunu hiç kullanmadım bile.
Özet / Soru – cevap vakti
Bazinga! Nasıl web sitesi yapılacağını öğrendik, 755TL’dan fazla tasarruf ettik ve belki biraz da keyif aldık.. değil mi?.. Peki, keyif almaktan çok çalıştık belki de, ama kesinlikle değdi.
Bu kılavuzu sevdiysen, sosyal medyada paylaşmaya ne dersin (biliyorum, artık kimse bunu yapmıyor, ama yine de söylemem gerekiyordu) ve belki de arkadaşlarına da bahsedersin? Peki, peki. Twitter da olur :/
Hala burada mısın? Biraz şaşırdım açıkçası. Ne bileyim.. Kılavuzda bahsettiğimiz şeyler hakkında herhangi bir sorun var ise, aşağıdaki yorumlar bölümünden beni haberdar et, zaman zaman orayı kontrol ediyorum. Ciddiyim. Ve bu kılavuza bir şey eklemek veya tarzımı eleştirmek istersen de, onu kendine sakla!! Şaka yapıyorum, tabii ki onların da başımın üstünde yeri var vs. vs.
İlgili kal, hedefini yüksek tut, ve web siteni her ne için yapıyorsan başarılar dilerim! Hoşçakal.
↧
Hostinger รีวิว: โฮสติง “เกือบฟรี” ดีกว่า “ฟรี” ใช่ป่าว? + คูปองส่วนลด 15%
เรารู้เรื่องนี้ดี: คุณอยากมีเว็บไซต์เป็นของตัวเอง แต่บริการโฮสติงมีให้เลือกเยอะมากกก เยอะจนรู้สึกว่าเลือกไม่ได้แน่ๆ: เลือกอันไหนดี?!
ถ้าคุณกำลังอ่านบทความนี้อยู่ คุณคงเคยได้ยินชื่อ Hostinger ละ บริษัทนี้ให้บริการโดเมนและเว็บโฮสติงในราคาต่ำกว่าคู่แข่งเกือบทั้งหมด ในการรีวิวโดยละเอียดนี้ เราจะเพ่งดูบริการของ Hostinger ด้วยแว่นขยาย และตอบคำถามต่อไปนี้
- คุณควรเลือกใช้บริการของ Hostinger แทนของบริษัทคู่แข่งอื่นไหม?
- บริการโฮสติงชุดไหนดีที่สุดสำหรับคุณ?
- แล้วบริการสร้างเว็บไซต์ของเค้าล่ะ – เสียเวลาลองดีไหม?
- บริการของ Hostinger ลดราคาได้อีกไหม?
ก่อนอื่น เราจะกล่าวถึงภูมิหลังและความเป็นมาของบริษัท เพื่อดูว่า เราไว้ใจได้ไหม ต่อจากนั้นค่อยว่ากันต่อในรายละเอียดการบริการ และสุดท้ายจะตัดสิน และตอบคำถามแต่ละข้อที่กล่าวข้างต้น
อ้อ ใช่ และตอนท้ายของรีวิวนี้ เราจะแจ้ง รหัสส่วนลดพิเศษ ให้คุณประหยัดอีก 15% รับส่วนลดเพิ่มเมื่อสั่งซื้อบริการของ Hostinger ในราคาพิเศษที่จากเว็บไซต์ของบริษัท เยี่ยม!
ว่าด้วยเรื่องของ Hostinger
บริการเว็บโฮสติง – เลือกยังไงดี?
ใช้บริการ Hostinger: ความเห็นของเรา
การบริการลูกค้าของ Hostinger
ข้อดี ข้อด้อย ของ Hostinger
โบนัส: รหัสส่วนลด 15%
คำตัดสินของเรา และรีวิวจากผู้ใช้งาน
บริการเว็บโฮสติง – เลือกยังไงดี?
ใช้บริการ Hostinger: ความเห็นของเรา
การบริการลูกค้าของ Hostinger
ข้อดี ข้อด้อย ของ Hostinger
โบนัส: รหัสส่วนลด 15%
คำตัดสินของเรา และรีวิวจากผู้ใช้งาน
ว่าด้วยเรื่องของ Hostinger
เพื่อช่วยให้คุณนึกภาพออกว่า Hostinger เป็นบริษัทฯใหญ่แค่ไหน: ตอนนี้เค้ามี ลูกค้าเกือบ 30 ล้านราย ไม่เพียงแต่ในสหรัฐอเมริกา สหราชอาณาจักร อินเดีย และอินโดนีเซียเท่านั้น แต่ลูกค้าของเค้ามาจาก 170+ ประเทศ (นั่นคือเกือบทุกประเทศทั่วโลก!)
ละยังไม่มีแววว่าจะชะลอตัวเลย – ตามข้อมูลของเค้า Hostinger ยังขยายตัวอย่างต่อเนื่อง โดยมีอัตราลูกค้าใหม่ 1 ราย ในทุก 5 วินา¬¬ที
ไงก็เถอะ อย่างที่คุณอาจจะคาดไว้ละ Hostinger ไม่ได้เป็นบริษัทข้ามชาติยักษ์ใหญ่อย่างที่เป็นอยู่ทุกวันนี้แต่แรก ก่อตั้งเมื่อปี 2004 ให้บริการในนาม “โฮสติงมีเดีย” เล็กๆ แต่เติบโตอย่างรวดเร็วในประเทศลิทัวเนีย ตั้งอยู่ทางตะวันออกเฉียงเหนือของสหภาพยุโรป
ผู้ก่อตั้ง Hostinger ไม่ได้ตั้งใจจะทำตามคนอื่นและตั้งบริษัทเพื่อให้บริการโฮสติงเท่านั้น – บริษัทใหม่นี้มีพื้นฐานคือความคิดเชิงนวัตกรรม
ผู้คนไม่ต้องการจ่ายค่าโฆษณา – จ่ายแค่บริการโฮสติง: ง่าย ไว้ใจได้ และราคาถูกที่สุด
หลายปีผ่านไป หลักการนี้ยังคงเป็นแก่นความตั้งใจของ Hostinger คือ ให้บริการคุณภาพสูง ในราคาเกือบเป็นศูนย์
แล้ว Hostinger มีความสามารถในการแข่งขันสูงได้อย่างไร – คุณอาจจะถาม – พูดอีกอย่างนึงก็คือ บริษัทนี้กำหนดราคาต่ำได้อย่างไร เมื่อให้บริการคุณภาพสูง? เดี๋ยวเราจะอธิบายให้ฟังนะ – แต่ก่อนอื่น มาดูตัวผลิตภัณฑ์กันก่อน
แพ็คเกจโฮสติงชุดไหนใช่สำหรับคุณ?
บริการโฮสติงมีหลายประเภทบนเว็บไซต์ของ Hostinger แต่ละประเภทมีราคาแตกต่างกัน เลือกไม่ถูกเลยทีเดียว เพราะแต่ละชุด มีบริการเสริม และฟีจเจอร์ฟรี แล้วแต่ว่าจะเลือกแพ็คเกจไหน
มาลุยกันสักตั้งนะ ทำความเข้าใจองค์ประกอบสำคัญของเว็บโฮสติงกัน – วิธีการนี้จะช่วยให้เราคัดตัวเลือกให้น้อยลงหน่อย และสรุปได้ในที่สุดว่าเลือกอันไหนดี
เราจะวิเคราะห์แพ็คเกจแต่ละชุดของ Hostinger แต่ก่อนอื่น ดูตารางด้านล่างนี้นิดนึง ตารางนี้สรุปข้อแตกต่างที่สำคัญของบริการโฮสติงแต่ละชุด และแสดงตัวอย่างการใช้งานโดยทั่วไป –
| โฮสติงรวม | โฮสติงธุรกิจ | โฮสติง VPS | |
|---|---|---|---|
| ความง่ายในการใช้งาน | ง่าย | ง่าย/ปานกลาง | ปานกลาง/ยาก |
| สำหรับใคร | บุคคลทั่วไป/ธุรกิจขนาดเล็ก | ธุรกิจขนานกลางและขนาดใหญ่ | นักพัฒนาและโปรแกรมเมอร์ |
| ระดับการควบคุม | ฟีจเจอร์มาตรฐาน | ฟีจเจอร์ควบคุมเพิ่ม | ควบคุมได้ทั้งหมด |
| ประสิทธิภาพ | พอสำหรับเว็บไซต์ขนาดเล็ก และขนาดกลาง | ประสิทธิภาพสูงสำหรับเว็บไซต์ขนาดใหญ่และโปรเจคออนไลน์ | ระดับกลางถึงสูงขึ้นอยู่กับแพ็คเกจที่เลือก |
| พื้นที่ในการเติบโต | ไม่ยืดหยุ่น – จำเป็นต้องอัพเกรดเป็นแพ็คเกจอื่น | มีความยืดหยุ่น – เพิ่มทรัพยากร “ได้เรื่อยๆ” | ยืดหยุ่นมาก – ควบคุมทรัพยากรได้ทั้งหมด |
| ระดับราคา | ถูก | ปานกลาง | ยืดหยุ่นได้ |
เราว่าแค่ดูตารางนี้ก็เห็นได้อย่างชัดเจนแล้วนะว่า ประเภทของโฮสติงจำหน่ายโดย Hostinger ต่างกันอย่างไรบ้าง แต่เราจะกล่าวถึงข้อมูลในรายละเอียดอีกหน่อย ดังนี้
แต่ก่อนจะดูรายละเอียดได้ เราต้องทำความเข้าใจแนวคิดหลักอย่างนึงก่อน เซิร์ฟเวอร์ พูดง่ายๆคือ คอมพิวเตอร์เครื่องพิเศษซึ่งเก็บข้อมูลเว็บไซต์ และแสดงข้อมูลนั้นให้กับผู้เยี่ยมเยือนออนไลน์ของคุณ
บริการโฮสติงไหนก็คือเซิร์ฟเวอร์ชุดหนึ่ง คอมพิวเตอร์เครื่องแรง ตั้งค่าให้ออนไลน์ตลอด 24 ชั่วโมงทุกวัน และแสดงเว็บไซต์ของคุณให้ใครก็ตามที่พิมพ์ที่อยู่เว็บของคุณบนเบราวเซอร์
ดังนั้น เซิร์ฟเวอร์จึงเป็นองค์ประกอบหลักของบริการโฮสติงทุกที่ และสามารถใช้งานได้แตกต่างกัน ขึ้นอยู่กับความต้องการของลูกค้าและงบประมาณ ส่วนนี่แหละที่เราต้องดูการบริการทั้งสามประเภท –
-
โฮสติงรวม (shared hosting) คือ เวอร์ชันพื้นฐานสำหรับผู้เริ่มต้นหรือต้องการทดสอบโครงการออนไลน์ด้วยงบประมาณเพียงเล็กน้อย บริการนี้เรียกว่า “รวม” เพราะเซิร์ฟเวอร์แต่ละเครื่องเก็บข้อมูลของเว็บไซต์เป็นร้อยเป็นพันของลูกค้าจำนวนมาก
ส่วนนี้หมายถึง ทรัพยากรของเซิร์ฟเวอร์หนึ่งใช้งานพร้อมกันโดยเว็บไซต์หลายแห่ง – ซึ่งไม่ใช่ปัญหาอะไรสำหรับเว็บไซต์ที่มีผู้ใช้งานไม่มาก แต่มีผลกระทบมากต่อเว็บไซต์ขนาดใหญ่
ในทางตรงข้าม บริการโฮสติงรวมนี้ราคาถูกมาก และใช้งานง่ายมาก จึงเหมาะที่สุดเลยสำหรับบุคคลทั่วไปและธุรกิจขนาดเล็กผู้เพิ่งเริ่มเข้าสู่โลกออนไลน์
-
โฮสติงธุรกิจ (business hosting) ประเภทนี้ก้าวหน้ากว่า เหมาะสำหรับเว็บไซต์ขนาดใหญ่ขึ้น และคาดว่าจะมีผู้ใช้งานระดับปานกลางหรือสูงทุกวัน (จำนวนผู้ใช้งานต่อวันหลายพันคนหรือมากกว่า)
Hostinger สำหรับธุรกิจใช้เทคโนโลยีเคลาวด์ (cloud technologies) – ทรัพยากรคอมพิวเตอร์ของคุณไม่ขึ้นอยู่กับเซิร์ฟเวอร์เครื่องใดโดยเฉพาะ แต่กระจายอยู่บนคอมพิวเตอร์หลายเครื่องซึ่งรับประกันความเสถียรและมีความยืดหยุ่นมากกว่า
นี่หมายถึง ทรัพยากรโอสติงของคุณแยกจากเว็บไซต์อื่น ประสิทธิภาพโดยรวมจึงดีกว่า เมื่อเทียบกับโฮสติงรวม
ข้อดีเหล่านี้มีราคา แน่ล่ะ – โฮสติงสำหรับธุรกิจราคาสูงกว่าทีเดียว โดยแพ็จเกจต่ำสุด “เริ่มต้น” (Startup) ที่ ฿521 ต่อเดือน คิดเป็นสองเท่าของโฮสติงรวมราคาสูงสุด (“ธุรกิจ” ราคา ฿101 ต่อเดือน) อืมม์ ชื่อแพ็จเกจนี้งงๆนะเราว่า – แต่ก็เถอะ ตอนนี้เรารู้ละว่าอะไรคืออะไร :)
-
โฮสติง VPS เป็นบริการที่ยืดหยุ่นที่สุด และใช้งานยุ่งยากที่สุด ที่ให้บริการโดย Hostinger VPS ย่อมาจากคำว่า “Virtual Private Server” แปลว่า เซิร์ฟเวอร์เสมือน บริการนี้เซิร์ฟเวอร์แต่ละเครื่องประมวลผลให้กับแต่ละเว็บไซต์หลายแห่งโดยไม่เกี่ยวข้องกันเลย ลักษณะเหมือนคุณมีเซิร์ฟเวอร์เป็นของตัวเอง แต่เป็นเครื่อง “เสมือนจริง”
การตั้งค่าแบบนี้ทำให้มีความยืดหยุ่นสูงสุด – คุณสามารถทำอะไรก็ได้ตามชอบใจกับเซิร์ฟเวอร์เสมือนนี้ เพราะคุณมีอำนาจควบคุมระดับแอดมินทุกจุดในระบบนี้
ระบบนี้อาจจะฟังดูน่าสนุก จนคุณพบว่าคุณจะไม่มีแผงควบคุมสำหรับแพ็คเกจ VPS พูดอีกอย่างหนึ่งก็คือ คุณจะตั้งค่าอะไรก็ได้สำหรับทุกส่วนของเซิร์ฟเวอร์เสมือนของคุณ
เพราะเหตุนี้ โฮสติงประเภทนี้จึงมีประโยชน์มากสำหรับผู้เชี่ยวชาญที่สามารถจัดการทุกอย่างได้เอง (เช่น โปรแกรมเมอร์ และนักพัฒนาเว็บไซต์) และเกือบจะไร้ประโยชน์สำหรับคนอื่น
เนื่องจากโฮสติงแต่ละประเภทมีลักษณะเฉพาะแตกต่างกัน เราแนะนำได้เลยว่า คุณควรเลือกประเภทรวม ทำไม? เพราะถ้าคุณเป็นตัวแทนธุรกิจขนาดใหญ่ หรือบริษัทพัฒนาเว็บไซต์ คุณคงรู้ทุกออย่างที่เรากล่าวถึงข้างต้นแล้ว
อย่างไรก็เถอะ ลองสรุปกันก่อนว่าคุณต้องการแค่โฮสติงพื้นฐาน – และมาดูกันว่าหนึ่งในสามแพ็คเกจรวมของ Hostinger อันไหนที่เป็นตัวเลือกเหมาะสมที่สุด

บนหน้า โฮสติงรวมของ Hostinger คุณจะเห็นว่ามี 3 แบบ ประกอบด้วย แพ็คเกจเดี่ยว ค่าบริการเดือนละ $0.88 แพ็คเกจพรีเมียม เดือนละ $3.49 และแพ็คเกจธุรกิจ เดือนละ $7.95 ที่สำคัญคือคุณต้องเข้าใจด้วยว่านี่เป็นราคาพิเศษ คือ –
- คุณจะรับบริการได้ในราคานี้หากคุณรับบริการเป็นเวลา 48 เดือน หากเวลาสั้นลง ราคาต่อเดือนจะสูงขึ้นอีกหน่อย (ถ้าถามความเห็นเรา โดยทั่วไปใช้แพ็คเกจ 12 เดือนก็เกินพอละ ที่จะตัดสินใจว่า คุณควรมีเว็บไซต์ไหม และสำหรับทดลองโครงการออนไลน์ของคุณ)
- ราคาดังกล่าวจะมีผลตลอดระยะเวลาของแพ็คเกจที่คุณเลือก หลังจากนั้น บริการของคุณจะปรับเป็นราคาปกติ
ขอแจ้งให้ชัดเจน – การคิดค่าบริการลักษณะนี้เป็นปกติของบริการโฮสติงทั่วไป จึงไม่ได้เป็นการฉวยโอกาสของ Hostinger เท่านั้น
แพ็คเกจรวมทั้งสามแบบมาพร้อมกับเครื่องมือจำเป็นทุกอย่างสำหรับการเริ่มต้นง่ายๆ ทั้งฮาร์ดแวร์และซอฟต์แวร์ คุณดูเพียงแค่ความแตกต่างเท่านั้น –
| เดี่ยว | พรีเมียม | ธุรกิจ | |
|---|---|---|---|
| จำนวนโดเมน | 1 | ∞ | ∞ |
| จำนวนที่อยู่อีเมล | 1 | ∞ | ∞ |
| รวมบริการ SSL ฟรีแล้ว? | – | – | yes |
| หน่วยสำรองข้อมูล | – | รายสัปดาห์ | รายวัน |
| กำลังประมวลผล | 1x | 2x | 4x |
| โดเมนฟรี? | – | Yes | yes |
แพ็คเกจ Single มีฟีจเจอร์น้อยไป ละพอสำหรับเว็บไซต์ขนาดเล็กที่สุดเท่านั้น ขณะที่ Business เพิ่มผลประโยชน์ให้อีกแค่นิดหน่อยเมื่อเทียบกับแบบ Premium ในราคาสองเท่า
กล่าวอีกอย่างนึงก็คือ แพ็คเกจ Premium มีฟีจเจอร์สมดุลย์ที่สุด และที่สำคัญราคาต่ำสุดที่มารวมบริการโดเมนฟรีแล้ว
นอกจากนี้ ยังเป็นแพ็คเกจราคาถูกสุดที่มาพร้อมกับบริการสำรองข้อมูลอัตโนมัติ – คุณจะเห็นประโยชน์ของฟีจเจอร์นี้ทันที เมื่อมีอะไรเกิดขึ้นกับเว็บไซต์ของคุณแค่ครั้งแรก :)
สรุปก็คือ สำหรับคนทั่วไป และองค์กรขนาดเล็กถึงขนาดกลาง แพ็คเกจรวมแบบพรีเมียมของ Hostinger เป็นตัวเลือกที่เหมาะสมที่สุด ในตอนท้ายของรีวิว เราจะบอกรหัสเพื่อรับส่วนลดพิเศษอีก 15% สำหรับแพ็คเกจนี้ อย่าเพิ่งหนีไปไหนนะ!
ความพึงพอใจของเราในการใช้บริการของ Hostinger
เพื่อทำการรีวิวนี้ เราได้สั่งซื้อบริการ Hostinger เพื่อทดสอบโดยละเอียด ขณะนี้เราแบ่งปันประสบการณ์กับผู้อ่านบทความนี้
เมื่อคุณทำการสั่งซื้อแล้ว คุณจะเข้าใช้งานแผงควบคุมแอดมินโฮสติง – ที่นี่คือที่คุณใช้จัดการบัญชีโฮสติงของคุณ:
Hostinger เสนอแผงควบคุมที่ปรับค่าได้ ผลิตโดยนักพัฒนาของบริษัทเอง เราพบว่า แผงควบคุมนี้เป็นมิตรกับผู้ใช้งานและเข้าใจง่าย เมื่อเทียบกับตัวเลือกอื่นที่ใช้กันเยอะ เช่น cPanel หรือ Plesk
ทุกอย่างที่คุณต้องใช้แสดงเป็นช่องสี่เหลี่ยมพร้อมรูปภาพ และจัดเรียงเรียบร้อยเป็นกลุ่ม ให้คุณพบแต่ละบริการได้อย่างรวดเร็ว คุณยังค้นหาผ่านช่องด้านบนเพื่อเข้าสู่สิ่งที่ต้องการได้ด้วย
ถ้าคุณซื้อโดเมนพร้อมกับโฮสติง (ด้านล่าง เราจะชี้ให้เห็นว่าคุณรับบริการนี้ฟรีได้อย่างไร) สักพักโดเมนจะเปิดใช้งานโดยอัตโนมัติ และคุณจะเริ่มสร้างเว็บไซต์ได้เลย
ในส่วนนี้ คุณจะใช้ Auto Installer (การติดตั้งอัตโนมัติ) เพื่อติดตั้งระบบจัดการเนื้อหา เช่น WordPress (เวิร์ดเพรส) – หรือใช้เครื่องมือสร้างเว็บไซต์ของ Hostinger โดยการ ลาก-และ-วาง ก็ได้ ทั้งสองวิธีเลือกได้จากช่อง เว็บไซต์ ในแผงควบคุมแอดมิน
หลังจากเราลองใช้เครื่องมือสร้างเว็บไซต์ ลาก-และ-วาง (ที่เค้าเรียกว่า ไซโร (Zyro)) เราบอกได้เลยว่า ไม่คุ้มค่าเสียเวลาของคุณ: แม่แบบ (Template) หน้าตาตกรุ่น และบางครั้งดูมั่วไปหมดเมื่อคุณลองปรับค่า เพื่อเป็นตัวอย่าง นี่คือสิ่งที่คุณจะได้หลังจากเปิดใช้งานแล้ว:
แทนที่จะทำแบบนั้น เราแนะนำให้คุณติดตั้ง WordPress (เรียกอีกอย่างหนึ่งว่า WP) โดยใช้ การติดตั้งอัตโนมัติ ที่กล่าวถึงด้านบน เหตุผลที่คุณควรใช้เวิร์ดเพรสเพื่อทำเว็บไซต์แรกของคุณ คือ –
- เวิร์ดเพรสคือเครื่องมือสร้างเว็บไซต์ที่มีการใช้งานมากที่สุดในโลก จึงมีแบบฝึก คู่มือ และเคล็ดลับให้ใช้ฟรีเป็นพัน – มีอยู่ทั่วอินเตอร์เน็ต!
- คุณเลือกแม่แบบได้เป็นพัน ฟรี จากบัญชีรายชื่ออย่างเป็นทางการ (ลองใช้ Bento ดูนะ เป็นตัวอย่าง – แม่แบบนี้มีฟังก์ชันหลายอย่าง และปรับใช้ง่าย)
- นอกจากนี้ยังมีโปรแกรมเสริมฟรีเป็นพันสำหรับเวิร์ดเพรส ทำให้คุณเพิ่มฟังก์ชันอะไรก็ได้ให้กับเว็บของคุณ ทั้งปุ่มแชร์ในสังคมออนไลน์ และแบบฟอร์มติดต่อ ไปจนถึงเครื่องมือสร้างแบบ ลาก-และ-วาง
นอกจากตัวผลิตภัณฑ์แล้ว สิ่งสำคัญอีกอย่างหนึ่งคือการบริการลูกค้าที่คุณจะได้รับ มาดูกันว่า Hostinger ให้บริการส่วนนี้ดีแค่ไหน
การบริการลูกค้าของ Hostinger
คุณขอความช่วยเหลือจากทีมงานของ Hostinger ได้ตลอด 24 ชั่วโมง ผ่านการแชตด้านล่างขวาของแผงควบคุมแอดมิน
เพื่อทดสอบคุณภาพของการช่วยเหลือ เราลองสอบถามผ่านการแชต ได้รับการตอบคำถามเร็วมาก (ไม่กี่วินาทีเท่านั้น) และตัวแทนของ Hostinger เป็นมิตร สุภาพ และช่วยเหลือดีมาก บางทีเค้าใช้รูปแมวเพื่อสร้างบรรยากาศให้เบาๆด้วย ขณะที่คุณรอคำตอบ :)
นอกจากการแชตแล้ว ยังมีห้องสมุดฟรีซึ่งเต็มไปด้วยบทความเกี่ยวกับผลิตภัณฑ์และบริการของ Hostinger ทั้งหมด คุณพบบริการนี้โดยคลิกลิงค์ “ความช่วยเหลือ” (Help) ด้านบนของแผงควบคุมแอดมิน นอกจากนี้ ยังมีรายการคำถามที่พบบ่อย – มีโอกาสสูงมากที่คุณจะพบวิธีแก้ปัญหาของคุณได้ที่นี่
กล่าวโดยรวมนะ Hostinger ดีกว่าที่เราคาดหวังด้านคุณภาพของความช่วยเหลือ – โดยเฉพาะอย่างยิ่ง เมื่อมีค่าบริการราคาถูกมาก เราเคยเห็นบริการแย่กว่านี้ จากบริษัทที่คิดราคาแพงกว่า
ข้อดีและข้อด้วยของ Hostinger
ตอนนี้เราได้วิเคราะห์ผลิตภัณฑ์และบริการของ Hostinger แล้ว รวมทั้งการบริการลูกค้า – มาสรุปด้านบวกและด้านลบกัน
- คุ้มค่า: ราคาคุ้มมากสำหรับแพ็คเกจโฮสติงทั้งหมด – อย่างที่ Hostinger กล่าว “คุณจ่ายแค่ค่าบริการโฮสติง, ไม่ได้จ่ายค่าโฆษณา”
- เสนอบริการยืดหยุ่นได้ให้กับลูกค้าทุกประเภท – ทั้งแต่บุคคลทั่วไปถึงธุรกิจขนาดเล็ก (โฮสติงรวม) ไปจนถึงบริษัทฯขนาดใหญ่ (โฮสติงธุรกิจ) และโปรแกรมเมอร์ผู้เชี่ยวชาญ (โฮสติง VPS)
- รับประกัน 99% ว่าใช้งานได้ตลอด – ประเด็นก็คือ Hostinger สัญญาว่าเว็บไซต์ของคุณจะใช้งานได้ตลอดเวลา กล่าวเป็นตัวเลขได้คือ อาจจะมีช่วงที่ระบบขัดข้องประมาณ 44 นาทีต่อเดือน แต่ในทางปฎิบัติแล้ว เวลาที่เว็บไซต์ใช้งานไม่ได้คือประมาณ 0 นาที ตามผลการทดสอบของเรา
- คุณจะได้รับโดเมนฟรีเมื่อคุณซื้อบริการโฮสติง ถ้าคุณเลือกแพ็คเกจ 12 เดือนขึ้นไป
- ใช้งานง่าย มีแผงควบคุมแอดมินที่ไม่เหมือนใคร ผลิตโดยทีมงานของ Hostinger เอง สำหรับลูกค้าของเค้าโดยเฉพาะ
- คุณติดตั้งเวิร์ดเพรสได้ด้วยไม่กี่คลิกโดยใช้ การติดตั้งอัตโนมัติ จากแผงควบคุมแอดมิน
- ห้องสมุดขนาดใหญ่ มีข้อมูลเพื่อการศึกษามากมายเกี่ยวกับการใช้งานผลิตภัณฑ์ของ Hostinger ลูกค้าทุกท่านใช้งานได้ฟรี
- บริการลูกค้าคุณภาพเยี่ยม ให้บริการโดยทีมงานที่เป็นมิตร รวดเร็ว และช่วยเหลือดีมาก พร้อมช่วยแก้ปัญหาของคุณตลอด 24 ชั่วโมง
- เครื่องมือสร้างเว็บไซต์เล็กเกิน แม่แบบล้าสมัยล้าสมัย และเกิดข้อผิดพลาดบ้างเมื่อมีการเปลี่ยนแม่แบบจากอันนึงไปเป็นอีกอันนึง เราแนะนำให้ใช้เวิร์ดเพรสดีกว่า
- ไม่สามารถติดต่อทางโทรศัพท์ได้ – คุณจำเป็นต้องใช้การแชต อีเมล หรือแบบฟอร์มติดต่อเท่านั้น
ก่อนที่เราจะจบการรีวิวพร้อมกับคำตัดสินของเรานี้ (คุณควรใช้บริการ Hostinger ไหม?) เราขอบอกขั้นตอนการรับส่วนลด 15% เมื่อซื้อบริการของ Hostinger
โบนัส: รหัสส่วนลด Hostinger – 15%
เราตื่นเต้นมากที่จะได้บอกวิธีรับส่วนลดเพิ่มโดยการใช้คูปองส่วนลดพิเศษ 15% กับเรา ทำตามขั้นตอนง่ายๆต่อไปนี้ เพื่อรับส่วนลดเมื่อสั่งซื้อบริการของ Hostinger
เนื่องจากเราได้สรุปไปแล้ว ก่อนหน้านี้ ว่าแพ็คเกจพรีเมียม 12 เดือนเป็นตัวเลือกที่เหมาะที่สุดสำหรับกรณีทั่วไป เราจะใช้ตัวเลือกนี้เป็นตัวอย่างสำหรับวิธีการของเรา
- ไปยังหน้าโฮสติงรวมบนเว็บไซต์ทางการของ Hostinger โดยคลิกปุ่มด้านล่าง (หน้าต่างใหม่จะเปิดโดยอัตโนมัติ)
- ด้านล่างโฮสติงรวม Premium (พรีเมียม), คือ ตัวเลือกตรงกลาง, คลิกปุ่มใหญ่สีแดง “มาเริ่มกันเลย” คุณจะไปยังหน้าการตั้งค่า
- คลิกเลือกแพ็คเกจ 12 เดือน (แพ็คเกจนี้ราคาต่ำสุดที่คุณจะได้ชื่อโดเมนฟรี ไม่คุ้มหรอกที่จะซื้อแพ็คเกจ 3 เดือน)
- ในช่องโดเมนด้านล่าง ระบุชื่อโดเมนที่คุณต้องการ คุณอาจจะต้องลองหลายครั้งหน่อยก่อนที่จะได้ชื่อที่ลงทะเบียนได้
- แม้ขั้นตอนนี้ไม่จำเป็น เราแนะนำอย่างยิ่งว่าให้เลือกช่อง “SSL certificate” ด้วย – จ่ายเพียงเล็กน้อย แต่ตัวเลือกนี้จะทำให้เว็บไซต์ของคุณปลอดภัย และน่าเชื่อถือขึ้น เว็บไซต์ของคุณจะมาพร้อมกับรูปกุญแจสีเขียวปลอดภัยเมื่อคุณมี SSL
-
ตัวเลือกอื่นบนหน้านี้ไม่จำเป็นต้องใช้ – แน่นอนคุณจะเลือกด้วยก็ได้ แต่ถ้าไม่เลือก คุณโอเคแน่นอน ถึงตรงนี้ละ การตั้งค่าของคุณมีหน้าตาแบบนี้:
![]()
-
ถึงตรงนี้ ที่ด้านขวาของหน้า คุณจะพบตัวหนังสือเทาอ่อนเขียนว่า “มีรหัสส่วนลด?” ข้อความนี้ควรอยู่ด้านบนตัวเลขราคารวมที่คุณต้องจ่าย เมื่อคุณคลิกลิงค์ถัดจากนี้ คุณจะเห็นช่องว่างให้เติม พิมพ์รหัสนี้เลยจ้า:
SAVE15
-
หลังจากใส่รหัสแล้ว คลิกเครื่องหมายบวกด้านขวา (น่าจะกลายไปสีม่วงไวโอเล็ตละ) คุณจะเห็นข้อความแจ้งว่า รหัสคูปองได้รับแล้ว และส่วนลดจะปรากฏบนรายการสั่งซื้อของคุณ:
![]()
- ยินดีด้วยนะ! คุณเพิ่งประหยัดอีก 15% ในการสั่งซื้อบริการ Hostinger ของคุณ ทำให้ราคารวมดูดีขึ้นไปอีก


คำตัดสินของเรา และรีวิวการใช้งาน
หลังจากเราได้ทดสอบ Hostinger ทุกแง่มุม และใช้บริการมาระยะหนึ่งแล้ว เราสรุปได้ว่า เป็นบริษัทให้บริการโฮสติงที่ไว้ใจได้: คุ้มค่า ไม่ซับซ้อน ใช้งานง่าย และมีบริการช่วยเหลือดี มีทุกอย่างที่คุณต้องการในการสร้าง และจัดการเว็บไซต์ของคุณ
เราบอกวิธีไว้ ด้านบน แล้ว คุณประหยัดอีก 15% ได้ เมื่อคุณสั่งซื้อบริการ Hostinger โดยใช้รหัสส่วนลดของเรา จำนวนอาจจะไม่เยอะ เพราะบริการ Hostinger ราคาไม่สูงอยู่แล้ว แต่ก็เป็นโบนัสที่ดีทีเดียว จริงมะ?
เปิดเผยข้อมูลที่เกี่ยวข้อง: เราเชื่อว่าเราควรแสดงความจริงใจและแจ้งให้คุณทราบว่า ลิงค์บางส่วนในรีวิวนี้เป็นบริการพันธมิตรของเรา หมายถึง เราได้รับค่านายหน้าเล็กน้อยเมื่อคุณซื้อบริการของ Hostinger ผ่านลิงค์เหล่านั้น แต่แน่นอน ความร่วมมือดังกล่าวไม่กระทบต่อราคาที่คุณจ่ายให้กับ Hostinger แต่อย่างไร
คุณตั้งใจจะใช้บริการของ Hostinger แต่ยังไม่แน่ใจว่าต้องทำอะไรบ้าง หรือเลือกแพ็คเกจไหนหรือเปล่า? หรือคุณเริ่มใช้บริการของ Hostinger แล้ว และต้องการแบ่งปันประสบการณ์? ไม่ว่าอะไรก็ตาม ร่วมเป็นส่วนหนึ่งของการสนทนาของเราใน คอมเมนต์ด้านล่าง เข้ามาช่วยกันเถอะ!
↧
Đánh giá Hostinger: có phải đối với hosting thì “gần như miễn phí” tốt hơn “miễn phí”? + coupon giảm giá 15%
Tôi hiểu tình hình thế này: bạn muốn có trang web riêng, nhưng ngoài kia có QUÁ NHIỀU chọn lựa hosting đến nỗi không thể đưa ra quyết định sau cùng: chọn cái nào?!
Nếu đang đọc những dòng này, có thể bạn đã nghe về Hostinger, một công ty tên miền và hosting cung cấp những mức giá thấp hơn đáng kể so với hầu hết các đối thủ cạnh tranh. Trong bài đánh giá chi tiết này, chúng ta sẽ soi xét Hostinger thật tỉ mỉ và trả lời những câu hỏi sau:
- Bạn có nên chọn Hostinger thay vì các đối thủ khác?
- Gói hosting nào của họ là tốt nhất cho bạn?
- Site builder của họ thì sao – có đáng thử không?
- Bạn có thể mua các dịch vụ Hostinger rẻ hơn nữa không?
Trước hết, chúng ta xẽ xem nhanh về nền tảng và lịch sử công ty để hiểu có thể tin tưởng họ không, sau đó sẽ đi chi tiết hơn về các dịch vụ của họ, và sau cùng chúng tôi sẽ kết luận bằng nhận định và cung cấp những câu trả lời cho các câu hỏi đã nêu bên trên.
À vâng, vào cuối bài đánh giá này tôi sẽ tiết lộ một mã khuyến mãi độc quyền giúp bạn tiết kiệm 15% cho đơn hàng Hostinger của mình, ngoài tất cả các khoản giảm giá và ưu đãi đặc biệt hiện có mà bạn có thể thấy trên trang web của họ. Thú vị lắm!
Câu chuyện về Hostinger
Các dịch vụ của Hostinger – chọn như thế nào?
Sử dụng Hostinger: ấn tượng của chúng tôi
Khâu hỗ trợ khách hàng của Hostinger
Ưu và khuyết điểm của Hostinger
BONUS: mã khuyến mãi giảm giá 15%
Nhận định của chúng tôi và đánh giá của người dùng
Các dịch vụ của Hostinger – chọn như thế nào?
Sử dụng Hostinger: ấn tượng của chúng tôi
Khâu hỗ trợ khách hàng của Hostinger
Ưu và khuyết điểm của Hostinger
BONUS: mã khuyến mãi giảm giá 15%
Nhận định của chúng tôi và đánh giá của người dùng
Câu chuyện về Hostinger
Để bạn hình dung được Hostinger lớn như thế nào, đây là một vài số liệu: công ty hiện có gần 30 triệu khách hàng không chỉ ở Mỹ, Anh, Ấn Độ và Indonesia, mà còn ở hơn 170 quốc gia khác (nghĩa là hầu như mọi quốc gia trên thế giới!)
Và không hề có dấu hiệu phát triển chậm lại – theo dữ liệu của Hostinger, họ vẫn đang mở rộng với tốc độ 1 khách hàng cho mỗi 5 giây.
Tuy nhiên, như bạn có thể đoán, Hostinger không phải lúc nào cũng là ông trùm quốc tế như hiện tại. Công ty khởi đầu vào năm 2004 với tư cách là công ty “Hosting Media” khiêm tốn ở một quốc gia tuy nhỏ nhưng phát triển nhanh là Lithuania, nằm ở vùng đông bắc của Liên Minh Châu Âu.
Những nhà sáng lập Hostinger không muốn mang tính đại trà mà muốn tạo ra một dịch vụ hosting khác biệt – họ lấy một ý tưởng đổi mới làm nền tảng cho công ty non trẻ:
Người ta không muốn trả tiền để chúng ta làm tiếp thị – mà trả cho hosting: đơn giản, đáng tin cậy, và rẻ nhất có thể.
Sau nhiều năm, nguyên lý này vẫn là trọng điểm mà Hostinger nhắm tới, cụ thể là các dịch vụ chất lượng cao với giá gần như bằng không.
Thế nhưng làm thế nào Hostinger lại đạt được khả năng cạnh tranh như thế? – bạn có thể hỏi ngay lập tức – Nói cách khác, làm sao họ có thể giữ giá thấp mà vẫn duy trì chất lượng cao? Tôi sẽ sớm giải thích – nhưng chúng ta hãy xem qua sản phẩm trước đã:
Gói hosting nào thích hợp cho bạn?
Có vài loại hosting khác nhau trên trang web chính thức của Hostinger, mỗi loại có nhiều gói giá. Điều này khiến chúng ta khó chọn lựa một gói, vì rằng cũng có nhiều dịch vụ cộng thêm và tính năng khác nhau được bao gồm miễn phí tùy vào gói.
Chúng ta cùng xăn tay áo lên và cố gắng hiểu về những yếu tố thiết yếu của hosting – điều này sẽ cho phép chúng ta thu hẹp chọn lựa của mình và đi đến kết luận sau cùng.
Chúng ta sẽ xem xét từng loại một trong ba loại dịch vụ hosting của Hostinger, nhưng trước tiên, hãy xem qua một bảng thông tin nhỏ. Bảng này tóm tắt những điểm khác biệt quan trọng giữa các loại hosting và cung cấp các trường hợp sử dụng phổ biến nhất:
| Hosting dùng chung | Hosting thương mại | Hosting VPS | |
|---|---|---|---|
| Dễ sử dụng | Dễ | Dễ/trung bình | Trung bình/khó |
| Dành cho ai? | Cá nhân và doanh nghiệp nhỏ | Doanh nghiệp vừa và lớn | Nhà phát triển và Lập trình viên |
| Mức độ kiểm soát | Các tính năng tiêu chuẩn | Các tính năng mở rộng | Toàn quyền kiểm soát |
| Hiệu suất | Đủ cho các trang web nhỏ và vừa | Hiệu suất cao cho các trang web lớn và dự án online | Từ trung bình đến cao tùy vào gói |
| Khả năng phát triển | Cố định – cần nâng cấp lên gói hosting khác | Linh hoạt – có thể thêm nhiều nguồn “on the fly” | Rất linh hoạt – kiểm soát chi tiết các nguồn |
| Mức giá | Rẻ | Trung bình | Linh hoạt |
Tôi nghĩ rằng dù chỉ qua bảng này, sự khác biệt giữa ba loại hosting mà Hostinger cung cấp đã khá rõ, nhưng chúng tôi cũng sẽ giải thích chi tiết thêm đôi chút bên dưới.
Tuy nhiên, trước khi đi vào chi tiết, chúng ta cần hiểu một khái niệm chính: server. Nói đơn giản, đó là một máy tính chuyên dụng lưu trữ các trang web và cho hiển thị chúng với khách truy cập online của bạn:
Bất kỳ hosting nào cũng là một bộ sưu tập các server, những máy tính quyền lực được tối ưu hóa để online 24/7/365 và cho hiển thị trang web của bạn với bất cứ ai gõ địa chỉ vào trình duyệt.
Như vậy, các server hẳn là nhân tố chính của bất kỳ dịch vụ hosting nào, và chúng có thể được dùng theo những cách khác nhau tùy vào yêu cầu và ngân sách của khách hàng. Đây là lý do có ba dạng hosting:
-
Hosting dùng chung là phiên bản cơ bản dành cho những ai mới bắt đầu hoặc muốn thử nghiệm các dự án online của mình với chi phí tối thiểu. Gọi là “dùng chung” bởi vì mỗi server chứa hàng trăm hay thậm chí hàng ngàn trang web từ các khách hàng khác nhau.
Điều này ám chỉ rằng nguồn của một server duy nhất được nhiều trang sử dụng đồng thời – ổn với những trang web có lưu lượng vừa phải, nhưng có thể ảnh hưởng lớn đến hiệu suất đối với những trang web lớn.
Xét về mặt tích cực, hosting dùng chung cực kỳ rẻ và dễ sử dụng. Điều này làm cho gói này lý tưởng cho cá nhân và các doanh nghiệp nhỏ vừa mới bước chân vào thế giới online.
-
Hosting thương mại là loại cao cấp hơn, thích hợp cho các trang web lớn có thể có lưu lượng truy cập hàng ngày từ trung bình đến cao (hàng ngàn người dùng mỗi ngày trở lên).
Hosting thương mại của Hostinger dùng cái gọi là công nghệ đám mây – nguồn máy tính của bạn không gắn với một server hữu hình cụ thể nào, nhưng rải khắp nhiều máy, điều này đảm bảo tính ổn định và khả năng khôi phục tốt hơn.
Điều này cũng có nghĩa là các nguồn hosting của bạn được tách biệt khỏi tất cả các trang web khác trong trường hợp này, nhờ đó hiệu suất cao hơn so với hosting dùng chung.
Dĩ nhiên, những lợi ích này có giá của chúng – hosting doanh nghiệp mắc hơn đáng kể, với gói rẻ nhất (“Khởi nghiệp” có giá VNĐ 370,230 mỗi tháng) cao gấp đôi so với gói dùng chung mắc nhất (“Doanh nghiệp” có giá VNĐ 71,715 mỗi tháng). Tiện thể, đối với tôi thì tên gọi thứ hai đó nghe hơi rối – nhưng giờ thì chúng ta biết nên kỳ vọng những gì rồi :)
-
Hosting VPS là loại hosting linh hoạt nhất và ít thân thiện với người dùng nhất mà Hostinger cung cấp. VPS là chữ viết tắt của “Virtual Private Server” (server riêng ảo), bởi vì trong trường hợp này, một server hữu hình điều hành vài môi trường riêng mà hoàn toàn không xung đột với nhau. Giống như có server riêng, ngoại trừ việc nó bị gọi là máy “ảo”.
Việc thiết lập như thế cho phép linh hoạt tối đa – bạn có thể làm hầu như bất cứ điều gì tùy ý với server ảo của mình, bởi vì bạn có quyền kiểm soát cấp quản trị đối với toàn bộ hệ thống.
Điều này nghe thật thú vị, cho đến khi bạn nhận ra mình sẽ không có bảng điểu khiển tiện lợi với gói hosting VPS. Nói cách khác, việc thiết lập mọi phần của server ảo là tùy ở bạn.
Đây là lý do vì sao loại hosting này vừa rất hữu ích cho các chuyên gia – những người biết chính xác mình đang làm gì (lập trình viên và nhà phát triển web) vừa gần như vô dụng với bất kỳ ai khác.
Bởi những tính năng cụ thể của từng loại hosting, tôi có thể gợi ý một cách chính đáng rằng bạn có thể chọn loại dùng chung. Tại sao? Bởi vì nếu bạn đang đại diện cho một doanh nghiệp lớn hay một công ty phát triển web, bạn hẳn đã biết mọi điều mà tôi đã đề cập ở những phần trước.
Để trường hợp đó sang một bên, giả sử bạn cần hosting cơ bản – và hãy xem loại nào trong số ba gói Hosting Dùng Chung là chọn lựa thích hợp nhất.

Trên trang hosting dùng chung của Hostinger, bạn có thể thấy ba chọn lựa khác nhau: gói Cá Nhân, giá $0.88 mỗi tháng, gói Cao Cấp, giá $3.49 mỗi tháng, và gói Doanh Nghiệp, giá $7.95 mỗi tháng. Tôi tin điều quan trọng là hiểu rằng đây là những khuyến mãi đặc biệt:
- Bạn có thể có được những mức giá này nếu đặt hàng gói 48 tháng, khoảng thời gian ngắn hơn thì sẽ mắc hơn một chút (nếu bạn hỏi, gói 12 tháng thường đã là dư để hiểu bạn có thật sự cần một trang web hay không, và để thử nghiệm dự án online của mình).
- Những mức giá đó có hiệu lực trong thời lượng của gói mà bạn đặt hàng, sau đó hosting của bạn sẽ được gia hạn với mức giá thông thường.
Để làm rõ – đây là hai thông lệ phổ biến trong việc cung cấp hosting, do đó xét về mặt này thì Hostinger không có gì lén lút cả.
Cả ba gói dùng chung này đều được trang bị mọi thứ cần thiết cho một khởi đầu dễ dàng, bao gồm phần mềm và phần cứng được tối ưu hóa, do đó chúng ta sẽ chỉ tập trung vào những điểm khác biệt:
| Cá nhân | Cao cấp | Doanh nghiệp | |
|---|---|---|---|
| Số lượng tên miền | 1 | ∞ | ∞ |
| Tài khoản Email | 1 | ∞ | ∞ |
| Bao gồm SSL miễn phí? | – | – | có |
| Backups | – | hàng tuần | hàng ngày |
| Khả năng xử lý | 1x | 2x | 4x |
| Tên miền miễn phí? | – | có | có |
Gói Cá Nhân có rất ít tính năng và khả năng máy tính chỉ đủ cho những trang web nhỏ nhất, trong khi đó, gói Doanh Nghiệp thì có thêm rất ít lợi ích so với gói Cao Cấp mà lại mắc gấp đôi.
Nói cách khác, gói Cao Cấp là cân bằng nhất xét về các tính năng, quan trọng nhất, đó là gói rẻ nhất có bao gồm một tên miền miễn phí.
Hơn nữa, đây là gói rẻ nhất cung cấp backup tự động – và bạn chắc chắn sẽ cảm nhận sự hữu ích của tính năng này ngay khi trang web của mình gặp vấn đề lần đầu tiên :)
Để kết luận, đối với hầu hết các cá nhân và tổ chức nhỏ-vừa, gói Dùng Chung Cao Cấp của Hostinger là chọn lựa chính đáng nhất. Trong phần cuối của bài đánh giá, tôi sẽ cung cấp mã khuyến mãi độc quyền để giảm thêm 15% cho gói này, cứ theo dõi nhé!
Ấn tượng của chúng tôi khi sử dụng Hostinger
Để có bài đánh giá này, chúng tôi đã mua gói hosting Cao Cấp từ Hostinger và thử nghiệm rộng khắp. Bây giờ, chúng tôi xin chia sẻ những trải nghiệm với độc giả của bài hướng dẫn này.
Khi hoàn tất đơn hàng, bạn được truy cập vào bảng điều khiển quản trị hosting – đây là nơi bạn sẽ quản lý tài khoản hosting của mình:
Hostinger cung cấp một bảng điều khiển quản trị tùy chỉnh, được xây dựng bởi các nhà phát triển nội bộ của công ty. Chúng tôi thấy bảng này khá thân thiện với người dùng và dễ hiểu, so với những chọn lựa thay thế được nhiều người sử dụng như cPanel hay Plesk.
Tất cả những gì bạn cần được thể hiện bằng các khối với hình ảnh, và được tổ chức ngay ngắn thành các nhóm để giúp bạn tìm dịch vụ nhanh hơn. Bạn cũng có thể dùng thanh tìm kiếm ở trên cùng để dễ đi vào những mục mình muốn.
Nếu bạn mua một tên miền với hosting của mình (tôi sẽ chỉ bạn cách lấy miễn phí bên dưới), nó sẽ tự động kích hoạt sau một lúc, và bạn sẽ có thể bắt đầu tạo trang web cho mình.
Đối với việc này, bạn có thể dùng Auto Installer (Cài đặt tự động) để thiết lập hệ điều hành nội dung chẳng hạn như WordPress – hoặc dùng website builder kéo-thả của Hostinger. Có thể đi vào cả hai chọn lựa từ mục Website của bảng quản trị hosting.
Sau khi thử builder kéo-thả (mà họ gọi là Zyro), chúng tôi có thể kết luận rằng không đáng để phí thời gian: các mẫu trông lỗi thời và đôi khi còn bị rối khi bạn sử dụng, ví dụ như đây là cái mà tôi có sau khi kích hoạt:
Thay vào đó, chúng tôi khuyên cài đặt WordPress (còn gọi là WP) bằng cách sử dụng tính năng Auto Installer đã đề cập bên trên. Sau đây là một vài trong số những lý do bạn nên chọn WP cho trang web đầu tiên của mình:
- WordPress là công cụ web phổ biến nhất trên thế giới, do đó có hàng tá bài hướng dẫn miễn phí và lời khuyên về cách sử dụng – ở khắp nơi trên mạng Internet!
- Bạn có thể lấy hàng ngàn mẫu miễn phí từ catalog chính thức của họ (ví dụ, hãy thử Bento – đa chức năng và dễ cá nhân hóa).
- Cũng có hàng ngàn extension dành cho WordPress, cho phép bạn thêm hầu như bất ký chức năng đơn giản nào vào trang web của mình, từ các nút chia sẻ xã hội và form liên hệ đến xây dựng giao diện kéo-thả.
Bên cạnh bản thân sản phẩm, một phần rất quan trọng khác của bất kỳ mặt hàng nào chính là khâu hỗ trợ khách hàng. Chúng ta hãy xem Hostinger hoạt động thế nào ở phương diện này:
Khâu Hỗ trợ Khách hàng của Hostinger
Bạn có thể nhờ đội ngũ Hostinger trợ giúp bất cứ lúc nào trong ngày, 24/7 thông qua phần chat ở góc phải dưới cùng của bảng quản trị hosting.
Để kiểm tra chất lượng hỗ trợ, chúng tôi đã hỏi họ nhiều câu hỏi qua live chat: thời gian phản hồi cực kỳ nhanh (thường chỉ trong vài giây), và người đại diện Hostinger luôn thân thiện, lịch sự và sẵn sàng trợ giúp. Đôi khi họ còn dùng hình của những chú mèo để làm bạn thoải mái hơn khi đợi họ gõ câu trả lời :)
Ngoài live chat, có một thư viện miễn phí với những bài viết hữu ích về các sản phẩm và dịch vụ của Hostinger. Bạn có thể tìm bằng cách click vào link “Trợ giúp” ở phía trên menu của bảng quản trị hosting. Ở đó cũng có danh sách những câu hỏi thường gặp nhất – nhiều khả năng là vấn đề của bạn đã được xử lý ở đó.
Nói chung, Hostinger hoạt động vượt hơn cả những gì chúng ta kỳ vọng về chất lượng hỗ trợ – đặc biệt là khi hosting của họ rất rẻ. Chúng tôi thấy những công ty cạnh tranh với giá cao hơn còn tệ hơn nhiều.
Ưu và Khuyết điểm của Hostinger
Bây giờ khi đã xem xét các sản phẩm và dịch vụ của Hostinger, cũng như khâu hỗ trợ khách hàng – chúng ta hãy tóm tắt những mặt tích cực và tiêu cực. Chúng tôi sẽ cố gắng khách quan nhất có thể:
- Giá rất tốt: các mức giá rất cạnh tranh dành cho tất cả các gói hosting – theo cách nói của Hostinger, “bạn chỉ trả tiền hosting, không trả tiền tiếp thị”
- Nhiều chọn lựa linh hoạt cho mọi dạng khách hàng – từ cá nhân đến doanh nghiệp nhỏ (hosting dùng chung) cho tới các công ty lớn (hosting doanh nghiệp) và các lập trình viên chuyên nghiệp (hosting VPS)
- Bảo đảm thời gian sử dụng 99.9% – về cơ bản, Hostinger cam kết rằng trang web của bạn sẽ luôn khả dụng online. Con số trên có nghĩa là thời gian chết tối đa mỗi tháng là 44 phút, nhưng thực tế, thời gian chết là gần như 0 phút theo những thử nghiệm của chúng tôi.
- Bạn có thể có tên miền miễn phí khi mua hosting nếu chọn gói ít nhất 12 tháng
- Bảng quản trị hosting dễ sử dụng, độc nhất vô nhị được phát triển bởi đội ngũ Hostinger dành riêng cho khách hàng của công ty
- Bạn có thể cài đặt WordPress chỉ trong vài cú click bằng cách sử dụng tính năng Cài đặt tự động (Auto Installer) từ bảng quản trị hosting
- Thư viện tài liệu hướng dẫn về các sản phẩm Hostinger hiện có miễn phí cho mọi khách hàng
- Hỗ trợ tuyệt vời từ đội ngũ thân thiện, nhanh chóng và sẵn sàng trợ giúp giải quyết vấn đề của bạn 24/7
- Website builder thông thường với các mẫu thiết kế lỗi thời và thường bị lỗi khi chuyển từ mẫu này sang mẫu khác. Chúng tôi khuyên dùng WordPress thay thế.
- Không thể nhận hỗ trợ qua điện thoại – bạn cần dùng live chat hoặc email hay form liên hệ để thay thế
Trước khi chúng ta hoàn tất bài đánh giá này bằng kết luận và nhận định (bạn có nên dùng Hostinger hay không?), đây là hướng dẫn từng bước để được giảm giá thêm 15% khi mua Hostinger:
Bonus: Mã khuyến mãi -15% Hostinger
Chúng tôi rất phấn khởi khi có thể chỉ bạn tiết kiệm tiền hơn nữa bằng cách sử dụng mã coupon giảm giá 15% độc quyền. Hãy làm theo những bước đơn giản này trước khi được giảm giá thêm khi mua Hostinger.
Bởi vì ở phần trước chúng tôi đã kết luận rằng gói dùng chung Cao Cấp 12 tháng là chọn lựa chính đáng nhất cho hầu hết các trường hợp, chúng tôi sẽ dùng nó làm ví dụ cho phần hướng dẫn.
- Vào trang hosting dùng chung trên trang web Hostinger chính thức bằng cách click vào nút bên dưới (sẽ tự động mở một cửa sổ mới):
- Bên dưới Hosting Dùng chung Cao Cấp (chọn lựa ở giữa), click vào nút lớn “Đăng ký”. Bạn sẽ được đưa đến trang cấu hình.
- Click chọn gói 12 tháng (đây là gói rẻ nhất có cung cấp tên miền miễn phí, do đó không nên chọn gói 3 tháng).
- Ở phần tên miền bên dưới, nhập tên miền mà bạn muốn. Bạn có thể phải thử vài lần trước khi tìm được tên khả dụng.
- Mặc dù không bắt buộc, chúng tôi rất khuyên bạn đánh dấu vào ô “chứng chỉ SSL” – không tốn kém nhiều nhưng làm cho trang web của bạn an toàn và đáng tin cậy hơn. Trang web của bạn sẽ hiển thị ổ khóa an toàn màu xanh lá trên thanh địa chỉ trình duyệt nếu bạn có SSL.
-
Tất cả những thứ khác trong trang đó đều không cần thiết – dĩ nhiên bạn cũng có thể bao gồm chúng nhưng nếu không có thì cũng không sao. Vào lúc này trang cấu hình của bạn sẽ trông như thế này:
![]()
-
Bây giờ nhìn sang bên phải của trang và tìm dòng chữ màu xám nhạt “Có mã giảm giá?”. Dòng chữ này nằm ngay bên trên tổng giá trị đơn hàng. Khi bạn click vào link kế bên đó, trường nội dung mới sẽ xuất hiện. Nhập mã sau:
SAVE15
-
Sau khi nhập mã, click vào biểu tượng dấu cộng bên phải (màu tím). Bạn sẽ thấy tin nhắn nói rằng đã áp dụng mã coupon thành công, và giá giảm mới sẽ xuất hiện trong đơn hàng:
![]()
- Xin chúc mừng! Bạn đã tiết kiệm thêm 15% khi mua Hostinger, nhờ đó giá sau cùng càng hấp dẫn hơn nữa.


Nhận định của chúng tôi và Đánh giá của người dùng
Sau khi xem xét Hostinger từ mọi góc độ có thể và thỉnh thoảng sử dụng các dịch vụ của họ, chúng tôi có thể kết luận rằng họ là một công ty hosting đáng tin cậy: giá tốt, đơn giản, dễ sử dụng và khâu hỗ trợ hữu ích là tất cả những gì bạn cần để tạo và quản lý thành công trang web của mình.
Chúng tôi cũng đã chỉ cách tiết kiệm thêm 15% cho đơn hàng Hostinger ở phía trên bằng cách sử dụng mã giảm giá độc quyền. Tuy không nhiều lắm, bởi vì Hostinger vốn đã rất rẻ – nhưng vẫn là khoản bonus thú vị, đúng không nào?
Tiết lộ về liên kết: chúng tôi tin sẽ là phải phép khi cho bạn biết rằng một số link trong bài đánh giá này là link liên kết, nghĩa là chúng tôi nhận được khoản huê hồng nho nhỏ khi ai đó mua gói Hostinger thông qua các link này. Dĩ nhiên điều này không làm ảnh hưởng giá Hostinger của bạn.
Bạn đang lên kế hoạch sử dụng Hostinger nhưng vẫn không chắc có nên chọn hay không, hoặc nên chọn gói nào? Hay bạn đã dùng Hostinger và muốn chia sẻ trải nghiệm của mình? Bất cứ trường hợp nào, hãy tham gia thảo luận trong phần bình luận bên dưới, chúng ta cùng giúp nhau một tay nào!
↧
Hostinger İncelemesi: hosting için “neredeyse ücretsiz”, “ücretsiz”den iyi midir? + %15 indirim kuponu
Durumunuzu biliyoruz: kendi web sitenizi istiyorsunuz, ama etrafta o kadar çok hosting seçeneği var ki, karar vermek imkansız gibi görünüyor: hangisini seçmeli?!
Bunu okuyorsanız muhtemelen piyasadaki rakiplerine kıyasla daha düşük fiyatlarla alan adı ve hosting sunan bir şirket olan Hostinger’i duydunuz. Bu ayrıntılı incelemede, Hostinger’e yakından bakıyoruz ve şu soruları cevaplıyoruz:
- Rakipleri yerine Hostinger’i seçmeli miyim?
- Hosting planlarından hangisi size daha uygun?
- Peki web sitesi kurucuları – denemeye değer mi?
- Hostinger hizmetlerini daha da ucuza alabilir misiniz?
Öncelikle şirketin güvenilir olup olmadığını anlamak için arka planını ve geçmişini kısaca inceleyeceğiz. Daha sonra hizmetleri ile ilgili ayrıntıya gireceğiz. Son olarak kararımızı size ileteceğiz ve yukarıda belirtilen soruların cevaplarını vereceğiz.
Evet! Bu incelemenin sonunda, Hostinger siparişinizde, sitede sundukları indirimler ve özel fırsatlara ek olarak %15 indirim almanızı sağlayacak, özel bir promosyon kodu vereceğim!
Hostinger’in hikayesi
Hosting hizmetleri – nasıl seçilmeli?
Hostinger’i kullanmak: izlenimlerimiz
Hostinger müşteri desteği
Hostinger’in iyi ve kötü tarafları
BONUS: %15 promosyon kodu
Bizim kararımız ve kullanıcı incelemeleri
Hosting hizmetleri – nasıl seçilmeli?
Hostinger’i kullanmak: izlenimlerimiz
Hostinger müşteri desteği
Hostinger’in iyi ve kötü tarafları
BONUS: %15 promosyon kodu
Bizim kararımız ve kullanıcı incelemeleri
Hostinger’in hikayesi
Hostinger’in ne kadar geniş olduğunu anlayabilmeniz için bir kaç sayı paylaşalım: şirketin şu anda sadece ABD, Birleşik Krallık, Hindistan ve Endonezya değil, 170’den fazla diğer ülkede (yani neredeyse dünyadaki her ülke!) 30 milyona yakın müşterisi var.
Ve yavaşlama yok – verilerine göre, Hostinger hala her 5 saniyede 1 müşteri hızında büyümeye devam ediyor.
Tabi, bekleyeceğiniz gibi, Hostinger her zaman şu anda olduğu gibi uluslararası bir dev değildi. 2004’te, mütevazı bir “Hosting Medya” olarak, küçük ama hızla büyüyen ve Avrupa Birliği’nin Kuzeydoğu bölgesinde bulunan Litvanya’da başladı.
Hostinger’in kurucuları kalabalıkları takip etmeyi ve sıradan bir hosting hizmeti oluşturmayı amaçlamıyordu – şirketi yeniliklere açık bir fikre dayandırdılar:
İnsanlar pazarlama masraflarımızı ödemek istemiyorlar, basit, güvenilir ve mümkün olduğunca ucuz hosting istiyorlar.
Uzun yıllardan beri, bu prensip hala Hostinger’in amaçladığı şeyin, yani sıfıra yakın fiyatta yüksek kaliteli hizmetlerin merkezinde duruyor.
Fakat Hostinger böyle bir rekabet gücünü nasıl sağlıyor? – Sormakta haklısınız – Başka bir deyişle, kaliteyi yüksek tutarken fiyatlarını düşük tutmayı nasıl başarabiliyor? Yakında açıklayacağım – ama önce, ürünün kendisine bakalım:
Hosting planlarından hangisi size daha uygun?
Hostinger’ın resmi web sitesinde, birden fazla fiyatlandırma planına sahip birkaç farklı hosting türü var. Bu, plana bağlı olarak ücretsiz olarak sunulan çeşitli ek hizmetler ve özelliklerin de bulunduğu göz önüne alındığında, sadece birini seçmeyi zorlaştırıyor.
Kollarımızı sıvayalım ve temel hosting bileşenlerini anlamaya çalışalım – bu, seçimimizi daraltmamızı ve nihai sonuca ulaşmamızı sağlayacaktır.
Hostinger’in hosting hizmet türlerinin üçünü de inceleyeceğiz, ama önce şu küçük tabloya bir göz atın. Bu tablo hosting türleri arasındaki en önemli farkları özetliyor ve en yaygın kullanım durumlarını belirtiyor:
| Web hosting | Kurumsal hosting | VPS hosting | |
|---|---|---|---|
| Kullanım Kolaylığı | Kolay | Kolay/Orta | Orta/Zor |
| Kim için? | Bireyler ve küçük işletmeler | Orta ve büyük ölçekli işletmeler | Geliştiriciler ve programcılar |
| Kontrol derecesi | Standart özellikler | Gelişmiş özellikler | Tam kontrol |
| Performans | Küçük ve orta boyutlu web siteleri için yeterli | Daha büyük siteler ve online projeler için yüksek performans | Plana bağlı olarak orta ve yüksek |
| Büyüme alanı | Katı – Başka bir hosting planına yükseltmek gerekir | Esnek – “yolda” daha fazla kaynak eklenebilir | Çok esnek – kaynakların tek tek kontrolü |
| Ücret seviyesi | Ucuz | Orta | Esnek |
Bu tablodan bile, Hostinger tarafından sunulan üç hosting türü arasındaki farkın oldukça fazla olduğunu düşünüyorum, ancak aşağıda biraz daha ayrıntılı açıklamalar da yapacağız.
Ayrıntılara girmeden önce, önemli bir kavramı anlamalıyız: sunucu. Basitçe söylemek gerekirse, bu, web sitelerini depolayan ve çevrimiçi ziyaretçilerinize sunan özel bir bilgisayardır:
Hosting, 7/24/365 çevrimiçi kalmak ve web site adresinizi, tarayıcısına yazan herkese göstermek için optimize edilmiş güçlü bilgisayarlardan oluşan bir koleksiyondur.
Yani sunucular aslında herhangi bir hosting hizmetinin ana bileşenidir ve müşterinin gereksinimlerine ve bütçesine bağlı olarak farklı şekillerde kullanılabilirler. Bu da üç hosting türünün öneminin ortaya çıktığı yerdir:
-
Web hosting, yeni başlayan ve minimum harcamayla çevrimiçi projelerini test etmek isteyenler için temel bir versiyondur. Buna “paylaşılan” denir çünkü her sunucu, çeşitli kullanıcının yüzlerce hatta binlerce web sitesini içerir.
Bu, tek bir sunucunun kaynaklarının birçok site tarafından aynı anda kullanılması anlamına gelir – orta düzeyde trafiğe sahip web siteleri için bu iyidir, ancak daha büyük web sitelerinin performansını büyük ölçüde etkileyebilir.
Olumlu tarafı ise, paylaşımlı hosting hizmetinin kullanımının çok kolay ve ucuz olmasıdır. Bu, çevrimiçi dünyaya yeni başlayan bireyler ve küçük işletmeler için idealdir.
-
Kurumsal hosting daha gelişmiş bir tür olup, orta veya yüksek günlük trafiğe (günde binlerce kullanıcı ve daha fazlası) sahip daha büyük web siteleri için uygundur.
Hostinger’ın kurumsal hosting hizmeti, bulut teknolojileri denen şeyi kullanır; bilgi işlem kaynaklarınız belirli bir fiziksel sunucuya bağlı olmak yerine, birden fazla makineye yayılır, bu da daha iyi bir kararlılık ve dayanıklılık sağlar.
Bu ayrıca, hosting kaynaklarınızın diğer tüm web sitelerinden yalıtıldığı anlamına gelir; bu da web hosting ile karşılaştırıldığında genel olarak daha yüksek performans sağlar.
Tüm bu avantajlar elbette ki bir maliyetle geliyor – kurumsal hosting maliyeti, en ucuz planla (“Başlangıç” ayda 97.29 TL) bile, en pahalı paylaşımlı planın iki katına mal oluyor (“Business” ayda 13.50 TL). Bu arada, ikincisinin ismi bence oldukça kafa karıştırıcı – ama şimdi ne bekleyeceğimizi biliyoruz :)
-
VPS hosting, Hostinger tarafından sunulan en esnek ve en az kullanıcı dostu hosting türüdür. Bu, “Virtual Private Server (Özel Sanal Sunucu)” anlamına gelir, çünkü bu durumda tek bir fiziksel sunucu, birbiriyle hiçbir şekilde kesişmeyen birkaç bireysel ortamı çalıştırır. Kendi sunucunuza sahip olmak gibi bir şeydir, tabi “sanal” bir makine olmasını bir yana bırakırsak.
Bu kurulum maksimum esneklik sağlar – sanal sunucunuzla istediğiniz her şeyi yapabilirsiniz, çünkü tüm sistem üzerinde yönetici seviyesinde kontrolünüz vardır.
VPS hosting planı ile kolay bir kontrol paneli elde edemeyeceğinizi fark edinceye kadar bu insana eğlenceli gibi geliyor. Başka bir deyişle, sanal sunucunuzun her bir parçasını kurmak, size bırakılmıştır.
Bu tür bir hosting, tam olarak ne yaptığını (yani, programcılar ve web geliştiricileri) tam olarak bilen profesyoneller için aşırı yararlı ve geri kalan herkes için işe yaramaz olmasının sebebi budur.
Her bir hosting türünün belirli özellikleri göz önüne alındığında, muhtemelen web hosting türünü seçmelisiniz diyerek makul bir öneride bulunabilirim. Niye mi? Çünkü büyük bir işi veya bir web geliştirme şirketini temsil ediyor olsaydınız, önceki bölümlerde bahsettiğim her şeyi zaten biliyor olurdunuz.
Bu durum bir yana, temel hosting’e ihtiyacınız olduğunu varsayalım ve üç
Hostinger web hosting planından hangisinin sizin için en makul seçenek olduğunu görelim.

Hostinger’ın ucuz web hosting sayfasında üç teklif görebilirsiniz: Tekil plan, ayda 2.20 TL, Premium plan, ayda 9.00 TL ve Business (İşletme) planı, ayda 13.50 TL. Bunların özel promosyonlar olduğunu anlamanın önemli olduğunu düşünüyorum:
- 48 aylık bir paket sipariş ederseniz, bu fiyatları değerlendirebilirsiniz, daha kısa dönemlerin ücretleri biraz daha yüksek oluyor (Bence, 12 aylık bir paket, gerçekten bir web sitesine ihtiyacınız olup olmadığını anlamak ve online projenizi test etmek için yeter de artar).
- Bu fiyatlar, sipariş ettiğiniz paketin süresi boyunca geçerlidir, bundan sonra hosting hizmeti normal bir oranda uzatılır.
Açık olmak için söylüyorum – bunların ikisi de hosting sağlayıcıların yaygın uygulamalarıdır, yani Hostinger’in bu konuda gizlisi saklısı yok.
Web hosting planlarının tümü, optimize edilmiş yazılım ve donanım dahil olmak üzere, kolay bir başlangıç için gerekli olan her şeyle donatılmıştır, bu yüzden yalnızca farklılıklara odaklanacağız:
| Tekil | Premium | Business | |
|---|---|---|---|
| Alan adı sayısı | 1 | ∞ | ∞ |
| Email hesapları | 1 | ∞ | ∞ |
| Ücretsiz SSL dahil mi? | – | – | Evet |
| Yedekler | – | her hafta | her gün |
| İşleme gücü | 1x | 2x | 4x |
| Ücretsiz alan adı? | – | Evet | Evet |
Tekil planın çok az sayıda özelliğe ve hesaplama gücüne sahip olması, yalnızca en küçük web siteleri için yeterli olurken, Business (İşletme) planı, Premium planın iki katı fiyatına rağmen Premium plana göre çok az ek avantaj sağlar.
Diğer bir deyişle, Premium plan özellikler açısından en dengeli olanıdır, en önemlisi de dahil bir alan adı içeren en ucuz plandır.
Ayrıca, otomatik yedeklemeler sunan için en ucuz plandır – ve web sitenize ilk kez bir şey olduğunda bu özelliğin ne kadar faydalı olduğunu anlayacaksınız :)
Sonuç olarak, çoğu birey ve küçük-orta ölçekli kuruluşlar için Premium Web Hosting planı en uygun seçimdir. İncelememizin son bölümünde, bu planda %15 ek indirim için özel bir promosyon kodu sunacağım, yani gözünüz burada olsun!
Hostinger kullanma sonucu izlenimlerimiz
Bu inceleme için Hostinger’dan Premium hosting planını satın aldık ve kapsamlı bir şekilde test ettik. Şimdi, deneyimlerimizi bu rehberin okuyucuları ile paylaşıyoruz.
Siparişinizi tamamladığınızda, hosting yöneticisi paneline erişebilirsiniz. Bu, hosting hesabınızı yöneteceğiniz yerdir:
Hostinger, şirketin iç geliştiricileri tarafından oluşturulan özel bir yönetici paneli sunuyor. Biz bunu, cPanel veya Plesk gibi yaygın olarak kullanılan alternatifler ile karşılaştırıldığında, oldukça kullanıcı dostu ve anlaması kolay bulduk.
İhtiyacınız olan her şey resimlerle temsil edilir ve hizmetleri daha hızlı bulmanıza yardımcı olmak için düzgün bir şekilde gruplara ayrılır. İstediğiniz öğelere daha kolay erişmek için üstteki arama çubuğunu da kullanabilirsiniz.
Hosting ile bir alan adı satın alırsanız (aşağıda size ücretsiz olarak nasıl elde edeceğinizi göstereceğim), kısa bir süre sonra otomatik olarak etkinleştirilecek ve web sitenizi oluşturmaya başlayabileceksiniz.
Bunun için, WordPress gibi bir içerik yönetim sistemi kurmak için Auto Installer (Otomatik yükleyiciyi) kullanabilir veya Hostinger’in sürükle ve bırak web sitesi kurucusunu kullanabilirsiniz. Her iki seçeneğe de, hosting yönetici panelinin Web Sitesi bölümünden erişilebilir.
Sürükle-bırak kurucusunu (ki Zyro olarak adlandırılıyor) denedikten sonra, uğraşmanıza değmeyeceği sonucuna varabiliriz: şablonlar modaları geçmiş gibi görünüyor ve bazen bunları kullanırken karışıklık oluyor, örneğin etkinleştirildikten sonra hemen aldığım sonuç şuydu:
Bunun yerine, yukarıda belirtilen Otomatik Yükleyici özelliğini kullanarak WordPress (WP olarak da adlandırılır) yüklemenizi öneririz. İlk web siteniz için WP’yi seçmenizi önermemizin bazı sebepleri şunlardır:
- WordPress dünyanın en popüler web sitesi motorudur, bu yüzden internetin her yanında, kullanabileceğiniz ücretsiz dersler, kılavuzlar ve ipuçları vardır!
- Binlerce şablonu resmi kataloglarından ücretsiz olarak edinebilirsiniz (örneğin Bento’yu deneyin, çok işlevlidir ve kişiselleştirmesi kolaydır).
- Ayrıca, sosyal paylaşım butonları ve iletişim formlarından, sürükle ve bırak düzen oluşturucularına, aklınıza gelebilecek neredeyse tüm işlevsellikleri web sitenize eklemenize olanak sağlayan binlerce ücretsiz WordPress uzantısı da vardır.
Ürün dışında, herhangi bir teklifin çok önemli bir parçası da aldığınız müşteri desteğidir. Hostinger’ın bu alanda nasıl bir performans sergilediğine bakalım:
Hostinger müşteri desteği
Hostinger ekibinden, hosting yönetim panelinin sağ alt köşesinde bulunan sohbet yoluyla günün her saatinde, 7/24 yardım isteyebilirsiniz.
Destek kalitesini test etmek için onlara canlı sohbet yoluyla sorular sorduk: tepki süreleri gerçekten hızlıydı (genellikle sadece birkaç saniye) ve Hostinger temsilcisi her zaman arkadaş canlısı, kibar ve yardımseverdi. Hatta bazen cevapları yazmak için beklerken ruh halinizi düzeltmek için kedi resimleri bile kullanıyorlar :)
Canlı sohbetten ayrı olarak, tüm Hostinger ürünleri ve hizmetleri hakkında yararlı makaleler içeren ücretsiz bir kütüphaneleri var. Hosting yönetim panelinin üst menüsünde bulunan “Yardım” bağlantısına tıklayarak bulabilirsiniz. Bu ayrıca, en sık sorulan soruların bir listesini de içerir. Sorununuzun çözümünün orada olma ihtimali çok yüksektir.
Genel olarak, Hostinger destek kalitesi söz konusu olduğunda beklentilerimizi aşmayı başardı – özellikle hosting hizmetlerinin çok ucuz olduğu göz önüne alındığında. Daha yüksek fiyatlara sahip rakip şirketlerde bile daha kötüsünü görmüşlüğümüz vardır.
Hostinger’in iyi ve kötü tarafları
Hostinger’in ürünlerini, hizmetlerini ve müşteri desteğini incelediğimize göre – Şimdi olumlu ve olumsuz tarafları özetleyelim. Mümkün olduğunca objektif olmaya çalışacağız:
- Fiyatının karşılığını çok iyi veriyor: hosting paketleri için çok rekabetçi fiyatları var – Hostinger’ın belirttiği gibi, “pazarlama için değil, hosting için ödeme yapıyorsunuz”
- Her türlü müşteri için esnek teklifler – bireylerden ve küçük işletmelerden (web hosting), büyük şirketlere (kurumsal hosting) ve profesyonel programcılara (VPS hosting) kadar
- %99,9 kesintisiz çalışma garantisi – özünde, Hostinger, web sitenizi her zaman çevrimiçi olarak kullanılabileceğinize dair söz veriyor. Testlerimize göre bu, ayda en fazla 44 dakika kesinti anlamına geliyor, ki bu da uygulamada 0 dakikaya yakın.
- En az 12 aylık bir paket seçerseniz, hosting satın alımınızla ücretsiz bir alan adı alabilirsiniz.
- Hostinger ekibinin özellikle şirket müşterileri için geliştirdiği, kullanımı kolay, benzersiz hosting yöneticisi paneli
- Hosting yönetim panelinden Otomatik Yükleyici özelliğini kullanarak birkaç tıklamayla WordPress yükleyebilirsiniz.
- Hostinger’in ürünlerini kullanma konusunda eğitim kaynakları içeren büyük bir kütüphane; tüm müşteriler ücretsiz olarak kullanabiliyor.
- Sorunlarınızı çözmek için her zaman hazır, güler yüzlü, hızlı ve yardımsever bir ekipten üst düzey destek
- Bir şablondan diğerine geçiş yaparken, güncel olmayan şablon tasarımları ve zaman zaman oluşan hatalarla vasat bir web sitesi kurucusu. Bunun yerine WordPress kullanmanızı öneririz.
- Telefonla destek alma imkanı yok – bunun yerine canlı sohbet, e-posta veya iletişim formunu kullanmanız gerekecek
Bu incelemeyi bir sonuç ve bir karar ile bitirmeden önce (Hostinger kullanmalı mısınız?), Hostinger satın alımınızdan %15 indirim almanız için adım adım bir kılavuz, sizin için aşağıda:
Bonus: Hostinger promosyon kodu -%15
Özel %15 indirimli kupon kodumuzu kullanarak kar etmenin yolunu size göstermek için çok heyecanlıyız. Hostinger satın alırken, iyi bir indirim almak için aşağıdaki basit adımları takip edebilirsiniz.
Daha önce 12 aylık Premium web hosting planının çoğu durum için en uygun seçenek olduğu sonucuna vardığımızdan, bunu rehberimiz için bir örnek olarak kullanacağız.
- Aşağıdaki butona tıklayarak Hostinger resmi web sitesinde, web hosting sayfasına gidin (otomatik olarak yeni bir pencerede açılır):
- Premium Web Hosting (yani ortadaki seçenek) altında, büyük kırmızı “Şimdi başlayın” butonuna tıklayın. Bu sizi yapılandırma sayfasına götürecektir.
- 12 aylık paketi seçmek için tıklayın (bu size ücretsiz bir alan adı veren en ucuz plandır, dolayısıyla 3 aylık planı seçmeye değmez).
- Aşağıdaki alan adı bölümünde, istediğiniz alan adını girin. Uygun olanı bulmadan önce birkaç kez denemeniz gerekebilir.
- İsteğe bağlı olsa da, “SSL sertifikası” onay kutusunu işaretlemenizi de kesinlikle öneririz. Bu, çok maliyetli değildir, ancak web sitenizi daha güvenli ve daha güvenilir hale getirir. SSL’niz varsa, web siteniz, tarayıcınızın adres çubuğunda yeşil bir güvenlik kilidi de gösterecektir.
-
Bu sayfadaki diğer şeyler zaruri değildir – elbette bunları da dahil edebilirsiniz, ancak onlar olmadan gayet iyi çalışabilirsiniz. Bu noktada yapılandırma sayfanız şöyle görünmeli:
![]()
-
Şimdi sayfanın sağ tarafına bakın ve “Kupon kodunuz var mı?” Yazılı açık gri metni bulun. Sipariş toplamının hemen üstünde olmalı. Yanındaki bağlantıya tıkladığınızda, yerine yeni bir alan gelecektir. Aşağıdaki kodu buraya girin:
SAVE15
-
Kodu girdikten sonra sağdaki artı simgesine tıklayın (Renk mora döner). Kupon kodunun başarıyla uygulandığını belirten bir mesaj göreceksiniz ve siparişinizde yeni bir indirim görünecektir:
![]()
- Tebrikler! Nihai fiyatı daha da çekici hale getirerek, Hostinger alımınızdan %15 daha tasarruf ettiniz.


Kararımız ve kullanıcı incelemeleri
Hostinger’ı tüm olası açılardan inceledikten ve bir süredir hizmetlerini kullandıktan sonra, güvenmeye değer bir hosting şirketi olduğu sonucuna varabiliriz: parasının karşılığını verişi, basitliği, kullanım kolaylığı ve yardımsever desteği, web sitenizi başarılı bir şekilde kurmanız ve yönetmeniz için ihtiyacınız olan her şeyi sağlar.
Ayrıca, özel promosyon kodumuzu kullanarak Hostinger siparişinizde %15 daha fazla tasarruf sağlayacağınızı da gösterdik. Hostinger’ın oldukça ucuz olduğu düşünüldüğünde çok fazla değil, ama yine de iyi bir bonus, değil mi?
Bağlantı açıklaması: Bu incelemede yer alan bazı bağlantıların, ilişkili bağlantılar olduğunu söylemenin dürüstlüğe katkısına inanıyoruz. Bu, biri bu linkleri kullanarak bir Hostinger planını satın aldığında küçük bir komisyon aldığımız anlamına geliyor. Elbette bu, Hostinger teklifinizde aldığınız fiyatı etkilemez.
Hostinger kullanmayı planlıyorsunuz, ancak hala karar veremiyor ya da hangisini tercih edeceğinizden emin değil misiniz? Yoksa zaten Hostinger kullanıyorsunuz ve deneyiminizi paylaşmak mı istiyorsunuz? Her halükarda, aşağıda bulunan yorumlar bölümünde tartışmaya katılın, birbirimize yardımcı olalım!
↧
↧
Harnessing The Power of Machine Learning in Digital Marketing – The Ultimate Toolkit
Machine learning is a fairly young technology but it’s already being applied to various fields of marketing in ways that might change the industry for good. With digital marketing, in particular, it is possible to provide better personalization and automate certain manual tasks such as moderation with the help of AI-driven solutions – which, in turn, tends to lead to higher returns on investment compared to traditional tools.
And yes, we’ve compiled an entire collection of solutions that already actively use machine learning to give you a competitive edge.
Curious to know more? Before you can use this exciting new tech to your advantage, it is worthwhile taking a moment to understand what machine learning is and how it can help.
Understanding Key Concepts
Almost. Well, not at all, quite frankly. To begin with, here are some broad definitions of key terms related to machine learning to keep in mind:
- Artificial intelligence (AI) is a sweeping definition for any computer software that mimics the role of human intelligence in decision making
- Machine Learning (ML) is a set of technologies that make it possible for computers to solve problems autonomously based on prior inferences from data
- Deep Learning is the sub-field which uses neural networks to replicate the learning functions of the human brain
In a nutshell, Machine Learning is one of the leading methods to achieve automation in knowledge-intensive fields because it can learn and improve as it consumes more information. Deep Learning is a special type of machine learning algorithms that uses neural networks with a lot of hidden layers to achieve top-notch performance that even sometimes rivals humans.
Is Somebody Already Using All of That in Marketing?
A machine learning approach to digital marketing is not a complete replacement for all your traditional marketing to date. However, it can help you in the following critical areas:
- Decrease advertising costs by taking on some of the tasks that were prior only manageable by humans
- Get better insights by finding hidden trends and correlations in datasets of previously unmanageable sizes
- Reach customers based on purchase intent by predicting their future moves based on existing behavioural data
- Improve prospecting through computer-generated recommendations and “you might also like” lists
ML can enable computers to perform tasks that even humans find challenging. It therefore finds a plethora of applications in advertising and marketing, where it can efficiently and optimally target the right customers and reveal to them the right content so they can easily find what they’re looking for. Moreover, it provides a great facility for humans to make data-driven decisions. And that can be a huge advantage in the modern arena:
Impact of Machine Learning on Marketing
According to Forbes, machine learning is already revolutionizing the marketing landscape, with 84% of marketing organizations beginning to implement or expand their use of AI in 2018.
These efforts can be quite profitable for business, as Capgemini reports that 83% of businesses in the marketing industry use Artificial Intelligence and Machine Learning in 2018, and that among those who do, 75% see a 10% boost in profits. If your organization has been asking how machine learning works for marketing, the data should be quite encouraging. Capgemini and others buttress this view with additional statistical insights, including the following:
- 3 out of every 4 organizations that make use of AI and machine learning in their operations see an increase in sales by more than 10%.
- Among business executives, 57% see customer relations and support as the biggest area for growth brought about by the use of AI and machine learning.
How Does Artificial Intelligence Work in Advertising?
One area of digital marketing that is applying the new technologies of machine learning is in digital advertising. You can work with professionals knowledgeable in the latest AI tools and trends to implement your programmatic advertising.
Programmatic advertising is the automated buying of digital ad space using computer algorithms. In the past, media buying was a mostly manual process. It required countless hours of bidding and sorting through media inventory to find the best advertising opportunities. Now, not only have software been created to automate ad buying..
Artificial Intelligence is now being employed to add value to programmatic advertising, such as by finding the optimal matching between buyers and sellers, as well as by finding the most optimal target audience for various products.
According to data from the Digital Marketing Institute, programmatic advertising has been growing very rapidly in the last five years and now amounts to $40 billion annually. This growth is projected to continue in the next couple of years.
Below we show you the specific machine learning tools that you can use today to augment your digital marketing efforts. The tools are categorized by the area of digital marketing they focus on, from personalized marketing to predictive marketing and content curation.
More Personalized Marketing
Social media marketing and content marketing are industries where digital marketers can make use of AI to improve their output by producing more effective and customer-targeted materials. For this purpose, a number of tools may be used to aid in employing AI.
The first category of tools you can use is those that have to do with personalized advertising. Instead of having a one-size-fits-all marketing campaign that attempts to appeal to as many customers as possible, personalized marketing adds value by creating customized marketing strategies for each individual target customer. Some tools for digital marketers that are worth taking a look at are the following:
- Acquisio – Enhance your digital marketing strategy by using ML to optimize cost efficiency and increase relevant customer views.
- Emarsys – Employ artificial intelligence marketing that allows machines to make decisions for you and personalizes ad campaigns for each individual customer.
- Rocco.ai – An AI-powered marketing assistant that learns the inner workings of your business and recommends the best actions to take for your marketing campaign to take flight.
Social Media Automation
It used to be the case that social media marketing took a lot of time, leaving digital marketers with far less time to devote to other channels. A slew of tools using machine learning to varying degrees has now made social media automation viable for most uses.
For example, tools like MeetEdgar can perform most of the activities of a human social media manager, such as following accounts and sharing content and employs machine learning to automatically create share-worthy posts that showcase your products and/or services on social media. The stand-out tools to consider in this area include:
- Buffer – Automate postings to Twitter, Facebook, Pinterest, and other social media platforms. The app uses AI to optimize accessibility and more.
- Hootsuite – Social media management tool that eliminates some of the grunt work. The app uses machine learning for smart moderation of social media profiles.
- MeetEdgar – Grow your social media following with automated posts. The app uses AI to write posts automatically.
Content Curation..
Machine intelligence tools can help your curation efforts by showing you automatically the best pieces to curate and share to your social channels. Here are some of the best content curation tools to use:
- Curata – Uses an intelligent learning engine to create lists of suggested content for you to curate based on your interests. The app makes use of machine learning in its source code.
- Stackla – Utilizes machine learning to personalize curated content and offer effective recommendations.
- Vestorly – Uses an AI-guided engine for content curation that improves consumer engagement and increases marketing efficiency.
..And Content Creation
With ML tools, you can easily come up with content ideas that will reflect well on your brand. Here are the tools to explore:
- Frase.io – Uses natural language processing to help with content creation by learning the style of a writer and giving a brief summary of various articles
- Quill – A product of Narrative Science, this tool analyzes your data and communicates the analyzed information to your intended audience
- Phrasee applies AI to help you generate optimized emails to market to your list. The app uses AI in its features that produce human-sounding copy.
Predictive Analysis
Predictive analytics and propensity modeling tools are now enabling marketers to predict customers’ next moves. This is happening across the entire marketing stack, with tools for each marketing channel you use today.
Artificial intelligence tools can better predict when a buyer is ready to order a replacement product for an old item, for example. They can also predict which messaging will get that buyer to make a purchase, and which is likely to flop. These tools use a variety of data sources, from search data to demographic and previous purchase data. Some of the predictive marketing tools to utilize for your own campaigns include:
- Persado – A tool that performs a similar function to Phrasee, helping marketers find the most effective marketing language for their needs. The enterprise edition of the tool uses machine learning to produce the optimal brand copy.
- IBM Predictive Analytics – An extensive platform with cutting edge machine learning algorithms and toolsets for predicting your customers’ actions. The platform uses machine learning to analyze marketing and other data streams.
- Adobe Analytics – A machine learning tool that extracts insights from data to provide you with the best marketing opportunities based on what your customers need the most.
How Do I Know If ML Pays Off?
After deciding to implement AI solutions into your business operations or even making a targeted hire, you should also be able to measure whether AI or machine learning are improving your digital marketing ROI. Measuring ROI (return on investment) is a core concern for many marketers, especially when it comes to new technology.
- The best way for a digital marketing team to get ROI from machine learning or AI is to first identify a particular channel where you can deploy the technology – for example, you could look at email marketing or display advertising as a channel where you can improve your current execution by applying AI.
- The next step is to then look for an IT professional who is experienced in using AI tools to help you apply AI to your marketing. If you are a small company, you can buy an off-the-shelf package that has everything you need.
- You should then be able to measure the improvement in output of that specific channel in which you have chosen to implement AI, and the corresponding cost efficiency it has introduced. For example, you may notice that an improved AI-powered email marketing campaign has led to an increase in relevant clicks to your products and services, and a corresponding improvement in your sales.
- By comparing this increase in revenue to the investment you have made on your AI implementation, you can measure your ROI. Note, however, that while the ROI might not be very significant during the first couple of months, it’s bound to become more substantial as its usage matures, so you should measure your ROI over the next couple of years.
There’s a vast collection of tools that you can use for each of these different areas of your business operations, and it is expected that using machine learning and its derivatives will help you remain competitive in an industry which moves so fast that keeping up with the latest technology is not just an advantage – it is the prime imperative for survival.
↧
Cum să faci un site web de la zero: ghid fără „prostii” pentru începători
S-o luăm cu începutul
Câteva concepții greșite – deconspirate!
Pasul 1 din 4: Ia-ți un domeniu și o găzduire web
Pasul 2 din 4: Instalează WordPress
Pasul 3 din 4: Configurează WordPress
Pasul 4 din 4: Adaugă teme și plugin-uri
Sfaturi utile, desigur
Ai întrebări? Întreabă-ne!
Câteva concepții greșite – deconspirate!
Pasul 1 din 4: Ia-ți un domeniu și o găzduire web
Pasul 2 din 4: Instalează WordPress
Pasul 3 din 4: Configurează WordPress
Pasul 4 din 4: Adaugă teme și plugin-uri
Sfaturi utile, desigur
Ai întrebări? Întreabă-ne!
Bun, deci te-ai hotărât că ai nevoie să creezi un website. În primul rând, felicitări! Acest lucru înseamnă că faci ceva de care lumea trebuie să afle. Iar prin lume mă refer la jumătate din planetă, bineînțeles, cât despre restul, aceia nu au încă o conexiune la internet (deci, fii recunoscător că tu ai deja acest lucru!).
În orice caz, acest ghid te va purta prin întregul proces de construire a unui website într-o manieră clară, concisă și, cel mai important, fără abureli, vei avea propria pagina web nou-nouță gata în mai puțin de o jumătate de oră. Ca să nu mai spun că vei economisi peste 200 de dolari în acest timp, concentrându-te doar pe ceea ce e cu adevărat important și folosind codul nostru promoțional.

Da, abia așteptăm să-i dăm bătaie, dar îți sugerez să parcurgi câteva lucruri înainte (nu-ți face griji, nu va dura mai mult de 5 minute). Cu toate acestea, dacă deja tremuri de dorință să îți construiești un website și vrei SĂ ÎNCEPI CHIAR ACUM, derulează pagina în jos și treci peste câteva paragrafe folosind acest link în pagină.
S-o luăm cu începutul
În primul rând, să clarificăm unele lucruri: deși acest ghid, în definitiv, este complet gratuit (dăh!), nu implică crearea unui website gratuit. Bine, din punct de vedere tehnic, este posibil să creezi unul fără să cheltui un ban, dar pentru asta va trebui să recurgi la o metodă de găzduire gratuită (care de obicei e foarte nasoală) sau un plan de abonament gratuit pentru un site builder (constructor de site) precum Weebly (care îți va afișa reclamele și brandul lor pe website, bleah). Cel mai important motiv contra, până la urmă, este că nu poți obține un nume de domeniu gratuit în cazul acesta, ci folosind pe al altcuiva, de exemplu „site-ulmeu.weebly.com”, pur și simplu nu îi va motiva pe vizitatorii tăi să te ia în serios.
În al doilea rând, pentru aceia care mă vor întreba „cine ești tu să îmi spui cum se face treaba?!”, iată o scurtă prezentare generală (bară) laudă de sine prost mascată: Numele meu e Andrii Shekhirev și sunt fondatorul Satori Webmaster Academy (adică acest site). Pe lângă conceperea website-urilor pentru propriile proiecte și pentru alte persoane din anul 2007, sunt un Autor de Elită pe ThemeForest, cel mai mare website de pe piață de templates (teme) din lume; produsele mele au ajutat mai mult de 2.000 de persoane să își construiască propriul lor website (și nu, nu am să le fac reclamă aici).
De-a lungul anilor am testat zeci de modalități de a concepe website-uri, precum și o mulțime de constructori de site, furnizori de găzduire web și sisteme de administrare a conținutului. Prezentul ghid reprezintă esențialul din tot ce am învățat și sunt fericit să le împărtășesc cu voi astăzi.
Ptiu! Bine că am trecut peste asta. Acum, în ultimul rând, m-am gândit că ar fi de bun simț din partea mea să îți spun că acest ghid conține câteva link-uri de afilitat, asta înseamnă că eu voi primi un comision fix de la respectivul furnizor dacă tu, de exemplu, cumperi un plan de găzduire prin intermediul link-ului din acest articol.
Frumusețea în toată povestea aceasta e că: acest aranjament nu are un impact asupra prețului pe care îl vei plăti, deoarece furnizorul ne plătește din banii lor, pentru ei e un fel de redirecționare a cheltuielilor de publicitate. Deci da, dacă îți place acest ghid, i-a în considerare achiziția unei găzduiri web prin intermediul link-urilor noastre. Lasă să mai plătească și o corporație multinațională, muhahaha!
… Ehm, bun. Să revenim la ale noastre. Un ultim lucru înainte de a începe (încă puțină răbdare!), iată câteva dintre cele mai răspândite mituri despre construirea unui website personal. Risipirea lor de timpuriu își va oferi o imagine mai clară asupra modului în care stă treaba.
Câteva concepții greșite – Deconspirate!
Mitul „numero uno”: trebuie să te pricepi la coduri pentru a crea un website. Sigur că da. DACĂ ÎNCĂ TRĂIEȘTI ÎN ANUL 1994! Serios acum, așa cum era de așteptat, tehnologia a avansat destul de mult de începuturile Web-ului, iar majoritatea proceselor de construire a unui site sunt de multă vreme automatizate. Inclusiv scrierea codului respectiv. Trebuie doar să alegi cele mai potrivite instrumente și să ții cont de câteva aspecte (de care se va ocupa acest ghid).
Mitul numărul doi: construirea propriului website te va consta mii de lei. Doar dacă o să vrei să-l externalizezi complet către o agenție, care cel mai probabil va parcurge aceeași pași ca cei descriși în acest ghid (și care să îți trimită o factură grasă și generoasă pentru asta).
Mitul numărul trei: crearea unui website necesită o groază de timp. Ei bine, câteodată așa este, în special atunci când ești începător și înveți de la zero. Dar dacă ești practic și te concentrezi pe ceea ce trebuie, poți să ai o pagină gata și activă în MAI PUȚIN DE O JUMĂTATE DE ORĂ. Iar întregul scop al acestui ghid este să te ajute să faci exact asta, așa că, hai să-i dăm drumul!
Pasul 1 din 4: Ia-ți un domeniu și o găzduire web
Primul lucru de care ai nevoie este un loc unde să „locuiască” website-ul tău. În termeni tehnici, acest loc se numește web hosting (găzduire web), în esență este un computer specializat, mereu activ care stochează fișierele website-ului tău și le oferă oricui tastează adresa website-ului și apasă Enter.
Că tot veni vorba, trebuie, de asemenea, să îți rezervi adresa propriu-zisă (cum ar fi exemplu.ro), care se numește nume de domeniu. Din fericire, le poți face pe amândouă dintr-un foc, deoarece mulți furnizori de găzduire web oferă și domenii la pachet.
Există mii de astfel de companii în lume, mici și mari, dar nu are niciun sens să le alegi pe cele mici; alege-le pe cele stabile, de încredere care au o reputație. Tu vrei ca website-ul tău să fie accesibil non-stop, 7 zile pe săptămână, 365 de zile pe an, și nici măcar nu am să încep să vorbesc despre tărăgăneala cu mutarea la un furnizor nou dacă cel din prezent iese din afaceri. E obositor, crede-mă.
Dintre toți furnizorii de găzduire web pe care i-am încercat și testat de-a lungul anilor, cel mai de încredere și ușor de folosit este în continuare Hostinger – are o activitate de peste 15 ani, are peste 30+ milioane de clienți în întreaga lume și este ușor de folosit pentru începători. Iar momentan oferă niște reduceri interesante atât pentru găzduire, cât și pentru domenii, despre care vom vorbi imediat.
Bine, acum suntem gata să începem. Fă clic pe butonul de mai jos pentru a vizita pagina de ofertă Hostinger cu reduceri speciale pentru găzduire. Apropo, îți mai amintești de pachetul găzduite + domeniu despre care vorbeam mai devreme? Hostinger oferă în prezent înregistrarea domeniului GRATUIT pentru fiecare plan de găzduire, care te ajută să economisești 12 dolari în plus (costul normal pentru un domeniu .com):
Obține -15% pe Hostinger + domeniu gratuit
Pe pagina respectivă ți se vor oferi la alegere 3 planuri; dacă ai nevoie de mai multe website-uri deodată, alege Premium, deoarece include deja tot ceea ce ai nevoie pentru a începe.
După ce adaugi planul în coșul de cumpărături, trebuie să faci câteva alegeri pentru a-ți personaliza comanda: în primul rând, alege pentru câte luni dorești să plătești în avans. Deși poți alege un ciclu de plată de 4 ani pe loc, 12 luni sunt mai mult decât suficiente pentru a-ți testa eforturile online ȘI să obții o reducere de 15%.
Dacă te hotărăști să îți păstrezi website-ul după un an (ceea ce și sperăm că vei face), nu va trebui să mai faci nimic, deoarece există implementat un mecanism de prelungire automat (doar ține cont de faptul că următoarea perioadă de facturare va fi tarifată la prețul normal).
Sub opțiunile ciclului de facturare, vei vedea trei opționale pe care le poți adăuga la comanda ta. Hai să aruncăm o privire asupra lor să vedem dacă avem nevoie de ele în acest moment:
În primul rând, există opțiunea de certificare SSL: este un stratul de criptare suplimentar care face traficul website-ului tău sigur și, mai ales pentru vizitatorii tăi, afișează un lacăt verde de asigurare cu un ecuson de „Siguranță” în bara de adrese a browser-ului. Pe lângă acest lucru, Google Chrome a început să afișeze un ecuson clar „Nu e securizat” pentru website-urile fără SSL începând cu iulie 2018, permițându-ne să înțelegem, fără echivoc, că pur și simplu nu agreează website-urile nesigure:

Deci, deși website-ul tău va putea funcționa fără SSL, te sfătuiesc să-l achiziționezi imediat (mai ales din cauza faptului că migrarea de la un website fără SSL la unul cu SSL este o pacoste).
În al doilea rând, există opțiunile de protecție Backup și Cloudflare. Le poți lăsa nebifate cu inima împăcată, deoarece nu sunt esențiale în crearea unui website. Mai mult, în ultima parte a acestui ghid, îți voi arăta cum să obții backup-uri și protecție pentru noul tău website absolut gratuit!
După opționale vei vedea o secțiune care îți permite să îți alegi un domeniu gratuit, reține că există un număr limitat de zone de domeniu disponibile cu această oferă, deci, dacă vrei un alt domeniu (de exemplu, o extensie .ro), îl poți cumpăra ulterior din panoul de administrare Hostinger.
Să sintetizăm, iată cum va arăta pagina de comandă Hostinger cu toate setările recomandate mai sus:

Ultima etapă a comenzii noastre de găzduire web! Sunt emoționat în secret, deoarece e un moment din acela de genul „stai așa, devine și mai interesant”: folosind codul nostru promoțional, poți să mai scapi de alți 15% din prețul final. Fă clic pe link-ul „Ai un cod promoțional?” de deasupra secțiunii „Total”, în partea dreaptă a paginii de comandă (mda, Hostinger l-a făcut greu de găsit :) apoi lipește această combinație în câmpul respectiv și apasă Apply (Aplică):
SAVE15
ACUM ești gata să finalizezi comanda, apasă pe butonul mare verde „Checkout”, introdu datele tale de facturare și finalizează comanda. Ceva îmi spune că ai mai făcut cumpărături online înainte, așa că voi sări peste partea asta, dacă nu te superi.
Gata? Haide să facem socoteala: tocmai ai economisit 65.22 de EUR pentru găzduire, precum și 4.59 + 8.79 = 13.38 EUR din caracteristici neesențiale pe care le poți adăuga ulterior gratuit. Și dacă nu era destul, în jur de 8 EUR au fost, de asemenea, economisiți „achiziționând” un domeniu gratuit. Asta înseamnă o economie de 86 EUR. Bine, bine. Știi ce e și mai bine? Implementarea acestui ghid nu te va costa un leu!
Apropo, am terminat cu pasul 1, probabil cel mai complicat pas din proces, acum e un moment bun să te dezmorțești și să-ți aduci o cafea. Te voi aștepta aici (pentru că sunt ditamai textul pe o pagină).
..
..
Te-ai dezmorțit? Acum să trecem la pasul 2.
Pasul 2 din 4: Instalează WordPress
Avem un domeniu de găzduire drăguț și confortabil pentru viitorul nostru website, așa că nimic nu ne împiedică să instalăm website-ul propriu-zis. Haide să facem asta, bine?
În cazul în care te întrebi „ce naiba e WordPress”, iată un mic interludiu: WordPress sau WP este ceea ce se numește un sistem de administrare a conținutului, practic este o bucată de software care te ajută să rulezi întregul website, de la designul și conținutul lui, la setări și structură.
De ce să alegi WordPress? E destul de simplu, deoarece este motorul de website preferat al internetului, găzduind aproape o treime din website-urile din lume (și asta înseamnă multe website-uri). Îl poți folosi și modifica gratuit, se poate extinde ușor cu mii de plugin-uri, și se mândrește cu o comunitate extinsă de utilizatori care au tendința de a se susține unii pe alții. Ghiduri, tutoriale și sfaturi despre utilizarea WP sunt disponibile pe tot internetul, iar majoritatea dintre acestea sunt gratuite.

Chiar pare o soluție logică pentru un proprietar de website începător, așa că vom rămâne la WordPress pe tot parcursul ghidului nostru. În plus, am câteva sfaturi suplimentare despre securitate și performanță după ce terminăm această configurare în 4 pași.
Bun, să revenim la oile noastre. După autentificarea în noul tău cont Hostinger, vei vedea o listă cu produsele tale. Fă clic pe butonul „Manage” (Administrare) din secțiunea „Hosting” (Găzduire).
Vei fi redirecționat către panoul tău de control, acesta este un loc important pe care, cu siguranță, îl vei vizita de foarte multe ori în viitor. Dar acum haide să găsim „Auto Installer” sub „Website” (pictograma ar trebui să fie un monitor de calculator cu o lumină galbenă) și să apăsăm pe el.
Auto Installer-ul este o interfață ușor de folosit pentru adăugarea unui sistem de administrare a conținutului pe website-ul tău. Fă clic pe opțiunea WordPress pentru a începe procesul (ar trebui să arate ca un „W” alb într-un cerc gri, la fel ca ochiul lui Pacman care înghite lumea din poza de mai sus).
Există trei pași simpli:
- La primul pas, vei fi rugat să alegi numele de domeniu unde vrei să fie instalat noul tău website WordPress, poți alege rădăcina de domeniu implicită sau poți alege un director (de exemplu,
domain.ro/blog), dacă vrei WordPress doar pentru blogul tău. - Apoi, trebuie să creezi un cont de administrator pentru website-ul tău, introdu un nume de utilizator și o parolă, precum și o adresă de e-mail pentru cazurile în care trebuie să restabilești accesul pe website-ul tău. Ah, și pentru numele lui Dumnezeu, nu alege cuvinte precum „admin” și „12345”, gândește-te la ceva un pic mai greu de ghicit! Deoarece WP e atât de popular, există o mulțime de hackeri care dau târcoale site-urilor WordPress din cauza datelor de acces prea simple.
- Pentru al treilea pas, vei fi rugat să alegi limba website-ului tău pentru panoul de administrare, precum și titlul site-ului (nu e chiar atât de important, vei putea să-l schimbi mai târziu), apoi apasă pe butonul mare verde „Install”…
… și așteaptă ca zânele bune să instaleze WordPress-ul pentru tine. Când au terminat, vei vedea un tabel cu informații despre noul tău website, apasă pe butonul negru „WP Admin” pentru a vizita panoul de administrare WordPress:

Simți? Parfumul unui website proaspăt dimineața! Îmi place sentimentul de a începe ceva nou.
Aproape că am terminat, dar mai sunt câteva lucruri pe care poate că ai vrea să le ajustezi chiar acum, deoarece experiența mi-a arătat că nu toate setările WP implicite sunt cele mai optime alegeri.
Pasul 3 din 4: Configurează WordPress
Înainte de a începe adăugarea conținutului pe noul tău website, haide să facem un tur rapid al sistemului, în timp ce adăugăm câteva îmbunătățiri pentru viitor.
În partea stângă a panoului de control WP vei vedea meniul administratorului pe un fundal gri închis. Nu toate caracteristicile sunt importante în mod egal acolo, iar tu vei folosi doar câteva dintre ele cel mai des. Le vei putea învăța pe restul pe măsură ce avansezi.
Cele mai des folosite secțiuni sunt Postări și Pagini, unde poți crea conținut nou, la fel și Comentarii, de unde poți administra discuțiile din postările tale, în cazul în care te decizi să activezi această caracteristică.
Diferența dintre o pagină și o postare este aceea că prima este pentru conținut static care nu ar trebui să se schimbe mult de-a lungul timpului, precum pagina „Despre noi”; pe de altă parte, postările sunt pentru conținut pe care tu îl adaugi în mod regulat, precum știri și postări de blog. Mai există și un concept special denumit blog page (pagină de blog) în WordPress, care este o pagină generată automat și care afișează toate postările tale. Ne vom întoarce la asta mai târziu. Momentan, să trecem mai departe!
O altă secțiune importantă în meniul de administrator WP este Aspect, unde poți instala tema vizuală pentru website-ul tău (Aspect → Teme). O să fie de ajutor să adaugi meniuri de navigare (Aspect → Meniuri), precum și widget-uri (Aspect → Widgets), blocuri mici care îndeplinesc funcții specifice precum afișarea unei liste de categorii sau o bară de căutare, de obicei în bara laterală. Secțiunea Aspect conține și Personalizare (Customizer), care este utilizat intens de multe teme moderne care să îți permită, ei bine, să îți personalizezi lucrurile pe website, precum culori și fonturi.

Și mai există și secțiunea Module (ekstensii) unde vei putea instala și configura diferite extensii care vor adăuga mai multe caracteristici precum securitate, butoane sociale, formulare de contact etc., etc.
Uau, cred că acesta a fost cel mai rapid tur WP din lume! Pentru a finaliza instalarea noastră, haide să ajustăm câteva setări în secțiunea Setări din partea de jos a meniului de administrare:
Setări → Generale: îți amintești când am zis că poți edita „Titlu sit” și „Slogan” ulterior? De aici poți face asta. De asemenea, asigură-te că opțiunile „Membri”, „Fus orar”, „Format dată”, „Format oră” și „Săptămâna începe” sunt setate după preferințele tale.
Setări → Afișare: reține această secțiune momentan; de aici vei putea să setezi pagina principală a website-ului, să afișezi postările de blog sau o pagină statică (de îndată ce te decizi pe care le vrei). Dacă nu configurezi pagina de postări de blog ca pagină principală, vei putea alege un alt loc pentru asta, trebuie să creezi o pagină nouă goală în secțiunea Pagini menționată anterior. Apoi vino înapoi aici și folosește-o ca pagină secundară pentru postări de blog, acea pagină va începe să afișeze automat postările tale pe măsură ce salvezi modificările.
Setări → Discuții: dacă ești dispus să permiți oamenilor să comenteze la postările tale de blog/ buletine de știri de pe website, asigură-te că bifezi căsuța „Permite vizitatorilor să publice comentarii la articole noi”, precum și „ Activează comentariile imbricate” (astfel ca oamenii să poată să răspundă unii la comentariile altora) și „Comentariul trebuie aprobat manual” (altfel vei primi MULT SPAM). Orice ai face, debifează opțiunea „Permite notificări ale legăturii din alte bloguri”, e făcut să permită mult spam. În sfârșit, aruncă o privire asupra secțiunii „Trimite-mi email când” și asigură-te că opțiunile sunt setate în funcție de preferințele tale.
Setări → Legături permanente: e recomandat să alegi opțiunea Nume articol, deoarece generează cele mai prietenoase URL-uri pentru pagina și postările tale (nu sunt foarte sigur de ce există alte opțiuni în această subsecțiune, ca să fiu sincer).
În principiu, asta e tot! Acum poți să te joci cu noul tău website și să începi să adaugi conținut. Mai există încă un pas, cu toate astea, care e opțional, dar esențial:
Pasul 4 din 4: Adaugă teme și plugin-uri
În principiu, poți lăsa imaginea vizuală a website-ului tău așa cum este și să te concentrezi doar pe conținut. Cu toate acestea, nu numai că site-ul tău va arăta foarte generic, dar, de fapt, va arăta exact ca un catralion de alte website-uri prea „leneșe” să schimbe tema implicită.
În plus, există multe teme WP disponibile gratuit care oferă mult mai multe modalități de a individualiza și personaliza, permițându-i oricărui website să aibă o imagine unică.
Iată un plugin șmecher: Am să îți sugerez să încerci tema noastră WP multifuncțională numită Bento (poți vedea afinitatea noastră pentru Japonia aici la Satori :)

Tema îți permite să personalizezi culoarea și aspectul pentru practic orice element de pe pagina ta, să creezi grile pentru telefoane mobile pentru orice pagină, precum și o grămadă de alte lucruri folositoare listate aici pe pagina oficială:
Trebuie să adăugăm faptul că Bento este bine documentat (lucru care nu este un dat în lumea WordPress) și are forumuri de asistență dedicate unde oferim răspunsuri la toate întrebările cu privire la temă.
/ finalul auto-promovării flagrante /
Cât despre module, există peste 50.000+ diferite gratuite disponibile în orice moment, care adaugă diferite funcții noi website-ului tău, de la traduceri și ferestre pop-up, la forumuri și comunități (și nu, noi nu construim plugin-uri, deci, nu te aștepta să vezi un link către o extensie „Sushi” sau „Kamikaze”).
În schimb, am să listez doar o parte dintre cele mai folosite și de încredere module pe care aproape orice proprietar de website ar trebui să le aibă în vedere, în funcție de experiența mea, a recenziilor altor persoane, precum și a statisticilor privind obiectivele. Toate sunt gratuite, bineînțeles:
- Akismet pentru filtrarea automată a comentariilor de spamuri. Acesta este un adevărat colac de salvare! Sau cel puțin salvează timp, deoarece se descotorosește perfect de toate mesajele de intrare care conțin link-uri de spam sau cuvinte spam. Akismet folosește un fel de woodoo ciudat de învățare automată a unor algoritmi pentru a deveni tot mai eficient.
- All in One SEO pentru optimizarea motoarelor de căutare. Acesta este probabil unul dintre cele mai bune plugin-uri WP pentru setarea corespunzătoare a metadatelor de pe website-ul tău, astfel încât conținutul tău să nu arate nasol la căutările în Google. Lui Google îi place mult atenția la detalii, de fapt, foarte mult.
- Google Analytics Dashboard pentru centralizarea vizitatorilor. Vei avea nevoie și de un cont Google Analytics, bineînțeles, pe care îl poți deschide gratuit pe website-ul lor oficial.
- Contact Form 7 pentru a le permite vizitatorilor tăi să îți trimită mesaje. Pentru a primii un e-mail de fiecare dată când cineva lasă un mesaj pe website-ul tău trebuie, de asemenea, să instalezi un plugin pentru căsuța poștală precum WP Mail SMTP.
Ei bine da, oficial am terminat. Bucură-te de site-ul tău nou-nouț! În cazul în care te mai interesează câteva sfaturi și bune practici, continuă să citești ultima parte a acestui ghid denumită sugestiv:
Sfaturi utile (opțional)
Nu mi-am uitat promisiunea de mai devreme cu privire la oferirea unor metode gratuite pentru îmbunătățirea securității website-ului și a backup-urilor, așa că iată-le.
Pontul #1: Asigurarea siguranței website-ului tău. În timp ce website-ul tău este încă tânăr și inocent, poate că ai vrea să te concentrezi asupra altor lucruri deoarece nimeni nu prea vrea să îl hăckuiască încă. Cu toate acestea, există câteva lucruri foarte simple care nu durează mult, dar care vor reduce șansele ca tu să devii ținta unui atac de succes cu un factor de 10.
În primul rând, recomandările evidente (pe care 99% dintre utilizatori nu le urmează): nu folosi numele de utilizator „admin” pentru panoul de administrator WP, folosește oricare alt cuvânt. Doar acest lucru va face website-ul tău WordPress de o mie de ori mai greu de spart. Și folosește o parolă puternică, cu litere mari, numere, simboluri și chestii de genul acesta. Pentru și mai multă securitate, folosește o autentificare cu doi factori (un cod suplimentar generat de telefonul tău mobil în timpul autentificării).
Un alt obicei evident pe care mulți îl ignoră este actualizarea WordPress-ului, precum și a plugin-urilor și temelor. Am acoperit deja acest lucru în Pasul 2 („Instalare WordPress”), dar e logic să acorzi atenție tuturor notificărilor din contul de administrator WP.
Pentru aceia dintre voi care vreți să fiți și mai siguri, vă pot recomanda modul Wordfence, are o mulțime de opțiuni de protecție suplimentară care îi va ajuta până și pe cei mai paranoici webmasteri să doarmă mai bine noaptea.
Pontul #2: Backup-uri automate simple. Pentru că nu vrei să îți petreci timpul făcând acest lucru manual tot timpul. Ai lucruri mai bune de făcut, de exemplu să creezi conținut nou pentru website-ul tău! Am un sigur cuvânt: UpdraftPlus. E gratuit, e foarte simplu de instalat, și poți alege să îți stochezi backup-urile într-o grămadă de locuri, de la propriul tău server (deși nu e recomandabil), la stocare în cloud.
Eu personal folosesc opțiunea Updraft din Google Drive, care a fost și mai simplificată pentru instalare după ce au introdus propria lor integrare. PS: varianta gratuită are tot ce ai nevoie pentru un website normal, nu am încercat niciodată versiunea Pro chiar dacă am gestionat mai multe proiecte online de complexitate diferite.
Pontul #3: Structurează-ți website-ul. Odată ce domeniul, găzduirea și WordPress-ul au fost instalate, este timpul să te gândești la modul în care îți vei organiza conținutul pe website. Așa cum am menționat mai sus, există două tipuri de conținut pe care le suportă WP: postări de tip știri (conținut regulat) care poate fi afișat pe o pagină de postări de blog, precum și pagini (conținut static) care sunt folosite pentru a afișa informații care nu se schimbă prea des. Înainte de a crea paginile și postările, e de la sine înțeles să schițezi întreaga structură pe o diagramă tip arbore pe o foaie de hârtie, amintindu-ți să bifezi elementele care vor apărea în meniul/-rile de navigare ale site-ului.
Mai mult, în funcție de scopul website-ului tău, s-ar putea să ai nevoie să folosești tipuri de conținut diferite, în majoritatea cazurile poți face acest lucru folosind plugin-uri WP gratuite. De exemplu, dacă ești fotograf sau designer Easy Photography Portfolio îți va permite să creezi o secțiune separată cu fotografii pe care să le etalezi în galerii elegante. Dacă intenționezi să vinzi chestii pe website-ul tău, WooCommerce va crea tipul de conținut pentru „produs” automat pentru tine. Răsfoiește directorul de plugin-uri, există o probabilitate de 100% ca ceea ce ai nevoie să fi fost deja conceput și să fie disponibil gratuit.
În încheiere / Întrebări și răspunsuri
Evrica! Tocmai am învățat cum să creăm un website, să economisim peste 200 de dolari în timpul procesului și poate chiar ne-am distrat puțin… puțin de tot?… Bine, poate că a fost mai multă muncă decât distracție, dar cred că a meritat din plin.
Dacă ți-a plăcut acest ghid, ce ai zice dacă l-ai distribui pe social media (dap, știu, nimeni nu mai face asta, și totuși, a trebuit să o zic) și poate chiar să le zici prietenilor tăi începători de el? Bine, fie, merge și pe Twitter :/
Mai ești acolo? Sunt puțin surprins ca să fie sincer. Ei bine, ce să mai zic… dacă ai orice fel de întrebări cu privire la lucrurile despre care am discutat în ghid, scrie-mi în secțiunea de comentarii de mai jos, o verific periodic, pe bune. Și dacă vrei să adaugi ceva ghidului sau să „arunci” cu critici la adresa mea, păstrează-le pentru tine!! Glumeam, bineînțeles că sunt bine venite etc., etc.
Fii curios, încearcă să ajungi la stele și mult noroc în orice intenționezi să faci din website-ul tău! Baftă!
↧
Hostinger: oare este ‘aproape gratis’ mai bine decât ‘gratis’? + cupon de 15% reducere
Știu situația: îți dorești propriul site web, dar exista ATÂT DE MULTE opțiuni de webhosting încât decizia pare imposibilă: pe care să-l aleg?!
Dacă citești asta probabil ai auzit deja de Hostinger, o companie și domeniu web care oferă prețuri considerabil mai mici decât concurența. În această prezentare detaliată, ne vom uita cu lupa la compania Hostinger și vom răspunde următoarelor întrebări:
- Dai întâietate lui Hostinger sau concurenței?
- Care din planurile lor de găzduire este cel mai potrivit?
- De creatorul de site ce spui – merită încercat?
- Ai putea obține cont Hostinger într-un mod mai convenabil?
În primul rând, vom examina pe scurt povestea și trecutul companiei pentru a înțelege dacă este una de încredere. Vom prezenta apoi mai multe detalii despre serviciile oferite, iar la final vom încheia cu un verdict și vom răspunde la întrebările formulate mai sus.
A! și la sfârșitul acestei recenzii voi dezvălui un cod promoțional exclusiv care îți va permite să economisești 15% din comanda ta Hostinger, pe lângă toate reducerile și ofertele speciale de pe site-ul lor. Fain!
Povestea lui Hostinger
Servicii degăzduire- cum aleg?
Folosind Hostinger: impresiile noastre
Hostinger relații cu clienții
Pro si contra Honstinger
BONUS: cod promotional de 15% reducere
Verdictul nostru și părerile utilizatorilor
Servicii degăzduire- cum aleg?
Folosind Hostinger: impresiile noastre
Hostinger relații cu clienții
Pro si contra Honstinger
BONUS: cod promotional de 15% reducere
Verdictul nostru și părerile utilizatorilor
Povestea Hostinger
Ca să îți faci o idee exact cât de mare este Hostinger, hai să ne uitam la cifre: compania are în prezent aproape 30 de milioane de clienți nu numai în SUA, Marea Britanie, India și Indonezia, dar și în alte 170 de țări (ceea ce înseamnă în aproape toate țările din lume!)
Și nu da semne că s-ar opri aici: conform datelor, Hostinger se extinde la o rată de 1 client la fiecare 5 secunde.
Totuși, după cum te poți aștepta, Hostinger nu a fost întotdeauna gigantul internațional de azi. În 2004, compania a început modest sub numele de “Hosting Media”, în Lituania, o țară mică dar cu o dezvoltare rapidă, situată în nord-estul Uniunii Europene.
Fondatorii companiei Hostinger nu au vrut să fie ca alții și să creeze doar un alt serviciu de găzduire- au bazat noua companie pe o idee inovatoare:
Oamenii nu vor să plătească pentru serviciile noastre de marketing, ci doar pentru găzduire, care ar trebui sa fie simplă, de încredere, și cât mai ieftină posibil.
Chiar și după multi ani, acest principiu rămâne baza după care Hostinger se ghidează: cea de a oferi servicii de înaltă calitate pentru un preț aproape inexistent.
Cu toate acestea, te-ai putea întreba cum reușește Hostinger să fie atât de competitiv. Concret, cum face să mențină prețurile scăzute, dar și să păstreze o calitate înaltă a serviciilor? Voi explica asta imediat, dar mai întâi hai să ne uităm la produs în sine:
Care pachet de găzduire este potrivit pentru tine?
Există câteva tipuri diferite de găzduire pe site-ul oficial al companiei Hostinger, fiecare având multiple planuri de tarifare. Acest lucru face alegerea dificila, având în vedere că există, de asemenea, diverse servicii suplimentare iar unele sunt incluse gratuit, în funcție de pachet.
Deci, să ne apucam de treabă și să încercăm să înțelegem care sunt componentele esențiale ale găzduirii web – asta ne va ajuta să limităm opțiunile pentru a ajunge la concluzia finală.
Vom examina fiecare din cele 3 tipuri de găzduire web oferite de Hostinger, dar mai întâi, uită-te la acest tabel. Acesta sintetizează diferențele cele mai importante dintre tipurile de găzduire web și prezintă cele mai frecvente utilizări:
| Găzduire web partajată | Găzduire web Business | Găzduire VPS | |
|---|---|---|---|
| Ușurinta de utilizare | Ușor | Ușor/Mediu | Mediu/Dificil |
| Pentru cine? | Persoane fizice și firme mici | Firme medii si mari | Dezvoltator web si programatori |
| Nivel de control | Caracteristici standard | Caracteristici extinse | Complet |
| Performanță | Suficientă pentru siteuri mici și medii | Performanță înaltă pentru siteuri mai mari și proiecte online | De la medie la înaltă, în funcție de plan |
| Posibilitate de dezvoltare | Rigid: trebuie să alegi un alt plan de gțăzduire | Flexibil: poți adăuga mai multe resurse din mers | Foarte flexibil: control amănunțit asupra resurselor |
| Preț | Ieftin | Median | Flexibil |
Cred că diferențele dintre cele 3 tipuri de găzduire web oferite de Hostinger sunt destul de evidente în acest tabel, dar vom oferi mai multe explicații, mai jos.
Totuși, înainte să intrăm în detalii, trebuie să înțelegem un concept cheie: serverul. Acesta este pur și simplu un calculator specializat care stochează siteuri web și le afișează online vizitatorilor.
Orice găzduire web este o colecție de servere, calculatoare puternice, care sunt optimizate a rămâne conectate la rețea 24 de ore din 24, 7 zile din 7, 365 zile pe an, și să afișeze siteul tău oricui care îi introduce adresa în browser.
Deci, serverele sunt, la baza, principala componentă a oricărui serviciu de găzduire și pot fi utilizate în fel și chip, în funcție de cerințele și bugetul clientului. Aici intră cele trei tipuri de găzduire:
-
Găzduirea partajată este o versiune de bază pentru începători sau oricine dorește să-și testeze proiectele online cu cheltuieli minime. Se numește ”partajată”, deoarece fiecare server deține sute sau chiar mii de site-uri web de la diverși clienți.
Asta înseamnă că resursele unui singur server sunt utilizate simultan de multe site-uri – suficient pentru site-urile web cu trafic moderat, dar care poate afecta drastic performanța site-urilor mai mari.
Aspectul pozitiv este că serviciul de găzduire partajată este foarte ieftin și ușor de utilizat. Acest lucru îl face ideal pentru persoane fizice și firme mici, care sunt la început de drum în universul online.
-
Găzduirea business (cloud) este un serviciu mai avansat, potrivit pentru site-uri mai mari, care se așteaptă să aibă un trafic zilnic mediu sau mare (de câteva mii de utilizatori zilnici sau chiar mai mult).
Serviciul de găzduire business oferit de Hostinger folosește tehnologiile Cloud – resursele computerului tău nu sunt conectate unui anumit server fizic. Acestea sunt răspândite pe mai multe aparate, ceea ce garantează o stabilitate și rezistență mai bune.
Asta înseamnă și că resursele tale de găzduire web sunt separate de toate celelalte site-uri, aspect ce duce la o performanță generală mai bună când compari cu serviciul de găzduire partajat.
Bineînțeles că toate aceste beneficii costă – serviciul de găzduire business este considerabil mai scump, pachetul cel mai ieftin (“Startup” la 13.75 EUR pe lună) fiind de două ori mai mult decât cel mai scump pachet de servicii partajate de găzduire (“Business” la 2.89 EUR pe lună). Apropo, mi se pare că denumirea e cam neclară – dar măcar acum știm la ce să ne așteptam. :)
-
Găzduirea VPS este pachetul cea mai flexibil, dar și cel mai puțin ușor de utilizat din cele oferite de Hostinger. Este vorba de “Virtual Private Server” (server privat virtual), care este un singur server fizic ce rulează mai multe medii individuale ce nu interacționează de loc unele cu altele. Este ca și cum ai avea propriul tău server, numai că este o așa-zisă mașină “virtuală”.
Configurarea asta oferă flexibilitate maximă: poți face aproape tot ce vrei cu serverul virtual deoarece ai control la nivel de administrator pe întregul sistem.
Toate astea par distractive până când îți dai seama că nu primești un panou de control ușor de folosit în pachetul de găzduire VPS. Deci, trebuie să configurezi tu fiecare parte a serverului virtual.
De asta pachetul VPS este în același timp extrem de util profesioniștilor (programatorilor și dezvoltatorilor web) dar complet inutil pentru oricine altcineva.
Având în vedere caracteristicile fiecărui tip de găzduire, cred că, probabil, ar trebui să alegi pachetul partajat. De ce? Pentru că dacă ai avea o afacere mare sau o companie de dezvoltare web, ai ști deja tot ce am menționat în secțiunile anterioare.
Lăsând asta la o parte, hai sa ne imaginam ca ai avea nevoie de găzduire de baza, și hai sa vedem care dintre cele trei planuri partajate oferite de Hostinger, este cea mai bună alegere.

Pe pagina Hostinger de găzduire partajată poți vedea trei oferte: pachetul unic, cu un preț de la 0,80 EUR pe lună, pachetul Premium, la prețul de 1.69 EUR pe lună și planul Business, la 2.89 EUR pe lună. Cred că este important să înțelegem că acestea sunt promoții speciale:
- Poți obține aceste prețuri dacă comanzi un pachet pe o durata de 48 de luni, pe perioade mai mici costând ceva mai mult (după părerea mea, un pachet pe 12 luni oferă de obicei, suficient timp de decizie dacă ai într-adevăr nevoie de un site web și sa-ți testezi proiectul online).
- Aceste prețuri sunt valabile pe durata pachetului comandat, apoi serviciul de găzduire va fi prelungit la un tarif normal.
Ca să clarific, aceste practici sunt comune în rândul furnizorilor de găzduire, deci Hostinger nu ascunde nimic în privința asta.
Toate cele 3 pachetele includ tot ce ai nevoie pentru un început ușor, software și hardware optimizat, deci ne vom concentra doar asupra diferențelor.
| Single | Premium | Business | |
|---|---|---|---|
| Numar de domenii | 1 | ∞ | ∞ |
| Conturi email | 1 | ∞ | ∞ |
| SSL gratuit inclus? | – | – | yes |
| Copii de rezervă | – | săptămânale | zilnice |
| Putere de procesare | 1x | 2x | 4x |
| Domeniu gratis? | – | da | da |
Pachetul Single are prea puține de oferit și o putere de calcul suficientă doar pentru cele mai mici site-uri web, în timp ce pachetul Business adaugă foarte puține beneficii comparativ cu Premium, și este și de două ori mai scump.
Pe scurt, pachetul Premium este cel mai echilibrat din punct de vedere al ofertei, și este și cel mai ieftin pachet cu un domeniu gratuit inclus.
În plus, este cel mai ieftin pachet care oferă copii de rezervă automate – și sigur vei simți cât de utilă este funcția asta prima oara când ceva nu merge bine nu site-ul tău :).
În concluzie, pentru majoritatea persoanelor fizice și firmelor mici și mijlocii, pachetul Premium Partajat de la Hostinger este alegerea cea mai potrivită. În ultima parte a analizei noastre îți voi oferi un cod promoțional exclusiv pentru o reducere suplimentară de 15% pentru acest pachet, asa că stai pe fază!
Impresiile noastre după ce am utilizat Hostinger
În scopul acestei expuneri am achiziționat și testat pachetul de găzduire Premium al Hostinger, iar acum vom detalia experiența noastră cu cititorii acestui ghid.
Când finalizezi comanda, vei avea acces la panoul de administrare – acesta este locul unde îți vei putea administra contul de găzduire web.

Hostinger oferă un panou de administrare personalizat, creat de dezvoltatorii web ai companiei. Ni s-a părut destul de ușor de utilizat și înțeles, în comparație cu alternativele utilizate pe scară largă, cum ar fi cPanel sau Plesk.
Elementele de care ai nevoie sunt reprezentate prin casete cu imagini, organizate în grupuri care te ajută să găsești mai repede diversele servicii. De asemenea, poți utiliza bara de căutare din partea de sus pentru a avea acces mai ușor la ceea ce vrei.
Dacă achiziționezi și un domeniu împreună cu găzduirea web (mai jos îți voi arăta cum să îl obții gratuit), acesta va fi activat automat după o scurtă perioadă de timp și apoi vei putea începe crearea siteului.
Ca să faci asta, poți utiliza programul de instalare automată ca să configurezi un sistem de gestionare al conținutului, cum ar fi WordPress – sau poți folosi constructorul de site web drag & drop oferit de Hostinger. Ambele opțiuni pot fi accesate din secțiunea Website a panoului administrativ de hosting.
După ce am testat constructorul drag-and-drop (pe care ei l-au numit Zyro), concluzionez că nu merită sa-ți pierzi timpul cu el: șabloanele arată învechit, și uneori, devin aiurea când le folosești. Spre exemplu mie mi-a apărut asta după ce am activat:

Îți recomandam să instalezi WordPress (denumit și WP) în schimb, utilizând funcția de instalare automată menționată mai sus. Iată câteva motive pentru care ar trebui să alegi WP pentru primul tău site web:
- WordPress este cea mai populară platformă de siteuri din lume, deci poți găsi oriunde pe Internet tone de tutoriale gratuite, ghiduri și sfaturi despre cum să-l folosești !
- Poți obține mii de șabloane gratis din catalogul lor oficial (încearcă, de exemplu, Bento – este multifuncțional și ușor de personalizat).
- Există, de asemenea, mii de extensii gratuite pentru WordPress, care îți permit să adaugi aproape orice funcționalitate pe care ți-o poți imagina site-ului tău, de la butoanele de distribuire pe media de socializare online, la formulare de contact, și la constructori de tip drag-and-drop.
În afară de produsul în sine, un alt aspect foarte important al oricărei oferte este serviciul de relații cu clienții pe care îl oferă. Hai să vedem cât de bine s-a descurcat Hostinger aici:
Serviciul relații cu clienții oferit de Hostinger
Poți cere ajutor de la echipa Hostinger în orice moment al zilei, 24 de ore din 24, prin intermediul chat-ului care se află în coltul din dreapta jos al panoului de administrare al găzduirii.
Pentru a testa calitatea serviciului, le-am pus întrebări pe chat-ul live: timpul de răspuns a fost foarte scurt (de obicei doar câteva secunde), iar reprezentantul Hostinger a fost întotdeauna prietenos, amabil și de încredere. Uneori folosesc și poze cu pisici ca să te relaxezi în timp ce aștepți răspunsul lor. :)
În afară de chat live, au și o bibliotecă gratuită cu articole utile despre toate produsele și serviciile Hostinger. Poți să o găsești făcând clic pe linkul “Ajutor” din meniul de sus al panoului administrativ al găzduirii. În plus, biblioteca conține și o listă cu întrebările cele mai frecvente – ai șanse mari să-ți poți rezolva problema acolo.
În general, Hostinger a reușit să depășească așteptările noastre în ceea ce privește calitatea serviciului cu clienții, mai ales că găzduirea oferită de ei este foarte accesibilă financiar. La companiile concurente, cu prețuri mai mari, am avut o experiență mult mai nasoală.
Argumente pro si contra Hostinger
Acum că am analizat produsele și serviciile companiei Hostinger, inclusiv cel de relații cu clienții, putem să rezumăm aspectele pozitive și negative. Vom încerca să fim cât mai obiectivi:
- Raportul calitate-preț: prețuri foarte competitive pentru toate pachetele de găzduire; cum zice Hostinger: “plătești doar pentru găzduire, nu și pentru marketing”.
- Oferte flexibile pentru orice tip de client: de la persoane fizice și firme mici (găzduire Partajată) la firme mari (găzduire Business) și programatori profesioniști (găzduire VPS).
- Uptime garantat 99,9%: adică Hostinger promite că site-ul tău va fi online tot timpul. Cifra înseamnă un maxim de 44 minute de downtime pe lună, timp care conform testelor noastre este aproape inexistent.
- Poți obține un nume de domeniu gratuit dacă alegi un pachet pe cel puțin 12 luni pentru găzduire.
- Un panou administrativ de găzduire unic și ușor de folosit, creat de echipa Hostinger special pentru clienții companiei.
- Ai posibilitatea să instalezi WordPress în doar câteva clicuri folosind funcția de Instalare Automată din panoul administrativ de găzduire.
- O bibliotecă plină cu resurse educaționale despre cum să utilizezi produsele companiei Hostinger, disponibilă gratuit pentru toți clienții.
- Suport de top de la o echipă amabilă, rapidă și care este gata să te ajute zi și noapte, cu problemele pe care le ai.
- Un constructor de site mediocru cu șabloane învechite și câteva erori ocazionale atunci când treci de la un șablon la altul. Îți recomandăm să folosești WordPress.
- Nu ai posibilitatea să accesezi serviciul de relații cu clienți prin telefon: este necesar să utilizezi funcția de chat live, email-ul sau formularul de contact
Înainte sa finalizăm această expunere cu o concluzie și un verdict (ar trebui să utilizezi Hostinger?), uite un ghid pas cu pas pentru un plus de 15% reducere la achiziția ta Hostinger –
Bonus: cod promotional Hostinger -15%
Suntem foarte entuziasmați să îți arătăm cum să economisești și mai multi bani utilizând codul nostru exclusiv de 15% reducere. Urmează pașii următori pentru a obține o reducere suplimentară și binevenită la achiziția ta Hostinger.
Deoarece am concluzionat mai devreme că pachetul Partajat Premium pe 12 luni este alegerea cea mai rezonabilă în majoritatea cazurilor, îl vom folosi ca exemplu în acest ghid.
- Accesează pagina de găzduire partajată pe site-ul oficial Hostinger apăsând pe butonul de mai jos (se va deschide automat într-o fereastră nouă):
- Sub secțiunea găzduire partajată Premium (adică opțiunea din mijloc), apasă pe “Începe”, butonul mare și rosu. Făcând asta vei ajunge la pagina de configurare.
- Dă clic pe pachetul pe 12 luni (acesta este cel mai ieftin pachet care îți oferă un nume de domeniu gratuit, deci nu merită să cumperi pachetul pe 3 luni).
- În secțiunea de domeniu care se află mai jos, introdu numele domeniului pe care îl dorești. S-ar putea să trebuiască să încerci de mai multe ori pană găsești unul disponibil.
- Deși este opțional, îți recomandăm să bifezi și caseta de selectare “Certificat SSL” – nu costă prea mult, și îți va face site-ul mai sigur și mai credibil. În plus dacă ai certificatul SSL, site-ul tău va afișa un lacăt verde în bara de adresă a browserului.
-
Toate celelalte lucruri de pe pagina asta nu sunt necesare; bineînțeles le poți include, dar siteul va fi ok și fără. Acum cam așa ar trebui să arate pagina ta de configurare:
![]()
-
Acum, uită-te în partea dreaptă a paginii pentru a găsi întrebarea “Ai un cod promoțional?” scrisă în gri deschis. Ar trebui să se afle deasupra sumei totale a comenzii. Când apeși pe linkul de lângă ea, va apărea o casetă nouă și goală. Introdu aici codul următor:
SAVE15
- După introducerea codului, apasă pe semnul plus din dreapta (ar trebui să își schimbe culoarea în violet). Vei vedea un mesaj confirmând aplicarea cu succes al codului din cupon, iar în comanda ta va apărea o nouă reducere.
- Felicitări! Tocmai ai economisit 15% în plus la achiziția ta Hostinger, făcând prețul final și mai atractiv.

Verdictul nostru și părerile utilizatorilor
După ce am examinat compania Hostinger din toate unghiurile posibile și după ce am folosit serviciile sale câtva timp, am tras concluzia că este o companie de găzduire de încredere: are un raport bun calitate-preț, este simplu și ușor de utilizat, și are un serviciu bun de relații cu clienții. Aceste componente sunt tot ce ai nevoie pentru a-ți crea și gestiona cu succes site-ul.
De asemenea, ți-am arătat mai sus cum poți economisi 15% în plus la comanda ta Hostinger, folosind codul nostru promoțional și exclusiv. Având în vedere că Hostinger oferă deja servicii destul de ieftine, reducerea nu pare prea mare dar cred că este un bonus binevenit, nu?
Despre afiliere: credem că este cinstit să îți spunem că unele link-uri din această prezentare sunt afiliate, ceea ce înseamnă că primim un mic comision de fiecare dată când cineva achiziționează un pachet Hostinger prin ele. Bineînțeles, acest lucru nu afectează prețul pe care îl obții cu oferta ta Hostinger.
Ai vrea să utilizezi serviciile companiei Hostinger, dar încă nu ești încă sigur sau nu știi ce pachet să alegi? Poate utilizezi deja Hostinger și vrei să ne spui despre experiența ta? În orice caz, intră în discuție mai jos, în secțiunea de comentarii, și hai să ne ajutăm reciproc!
↧
How to Create a Blog: Become a Blogger in 30 Minutes and Maybe Even Earn Some Money
Free or Almost Free?
Step 1: Choosing Domain and Hosting
Step 2: Installing a Blog Engine
Step 3: Configuring Your Blog
Step 4: Adding a Theme and Plugins
Some Useful Tips
Making Money With Your Blog
Step 1: Choosing Domain and Hosting
Step 2: Installing a Blog Engine
Step 3: Configuring Your Blog
Step 4: Adding a Theme and Plugins
Some Useful Tips
Making Money With Your Blog
If you’re reading this, you’ve realized that you have something to say to the world. Or, maybe, your boss has. In any case, what you need is a place to regularly post witty text and other content like images or videos. A place entirely under your control, unlike those faceless, constraining Instagram feeds or Facebook pages, am I right? In other words – a weblog!
(Knock-knock, 1997! We are the cooler generation, we use phones that don’t fit into our pockets and shorter versions of words these days! Let’s stick to “blog” from now on, alright?)
Soo yes, the next logical question you type into the search engine becomes: how to start a blog? Well, you can close your search results page now, you’ve come to the right place.
..Go on, close it. Good.
In this detailed yet relaxed guide we will go through all the steps required to make your own blog (there are just 4 of them, in fact). In the end, I will provide tips on how to secure, grow – and monetize your new site. As a result, you will:
- learn to create websites without a single line of code
- save tons of money and days of your precious time
- reach anyone in the world with your awesome content
- befriend a unicorn (alright, maybe not literally)
Before we dive in, there is an important question that should be answered right away in order to better understand what we’re dealing with. However, if you’re eager to start RIGHT NOW, just skip the next two sections or use this in-text link to scroll directly to Step 1.
Free or Almost Free?
While you can certainly start a blog for free using one of the existing “mass blogging” services, or even social networks like Twitter, it is worth remembering that there are several important drawbacks to any approach that involves free blog services:
- Your blog will look like thousands of other blogs because personalization is typically not the strongest side of such platforms. Templates tend to be either non-existent or so outdated/shoddy you’d wish they were non-existent.
- Your blog will display somebody else’s ads: you won’t see any of those ad revenues, however – the platform needs to run computers which host your blog, so they will keep the money to themselves.
- You will work under technical limitations, such as the available space to store your blog’s files, number of visitors per month, and the size of files you upload.
- Your web address will be a subdomain of the blogging platform, like blog.platform.com – instead of a far more serious-looking blog.com
This is not to say that a completely free blog is necessarily a bad idea – in fact, if you’re okay with the things listed above – you should probably choose this path. However, if you’re serious about your blog and are able to spend half an hour on making it look professional and trustworthy, read on.
To understand why having your own website cannot be completely free (or, equivalently, why any “completely free” blogging service will necessarily want to earn money from your blog via ads or some other hidden fees), we need to understand what a website is and how it works:
Any website (for example a blog) is a collection of files which are recognized by a certain unique identifier – its web address, i.e. the text you input into your browser’s address bar to visit a certain website.
Those files need to be accessible 24/7 in order for your website to be truly online – which means they should be stored on a computer that is always on and always plugged into the Internet. Such specialized computer is called a server, and a company which offers servers is called a hosting provider.
The most popular form of web address is a domain name – a human-readable string of text which provides some information about the website it points to. For example, domain name dogs.com is (probably) about dogs and targets US or international visitors.
Here’s a revelation (I hope not): operating both a domain name and a hosting service always costs money. Here’s why –
- In order to become a domain registrar, a company needs to meet a lot of criteria – technical, financial, legal – and pay annual fees (for example, $4000 per year to ICANN for international domains),
- In order to provide hosting services, a company needs to buy and maintain a bunch of powerful computers in a safe location, which implies a slew of expenditures. These are both fixed costs (the equipment) and recurring ones (salaries, rent, etc).
This means that anyone who claims to offer you a domain name and a hosting free of charge are either hardcore philanthropists with very deep pockets – or are planning to earn money off your blog in some other way later on (ads!). Your guess?
Alright, I suppose by now you understand what I’m getting at – no self-respecting blogger will tolerate ads and technical limitations connected to a “free blog”; in other words:
If you want your blog to look professional and plan to grow it in the future (and earn money from it), some expenses are inevitable.
Here’s the good news, though: by taking a smart approach and focusing only on the most essential items, we can bring down the cost of setting up a blog to an absolute minimum. This is exactly the goal of this guide.
Oh, yes, and don’t forget an exclusive coupon code!
..We will get to that in a minute. Let’s start with the first essential step (and the only one which will cost you any money):
Step 1 of 4: Choosing a Domain Name and a Hosting Provider
Alright, down to business! First, we will need a place for our blog to live and a unique address for Internet users to find it. Fortunately, we can do both in one go, as most large hosting providers tend to offer domain name registration as an additional service.
Of all the companies we’ve worked with over the last 10 years, the one particularly worth recommending is Hostinger: with 30+ million users around the world and a focus on simplicity, it’s a logical choice for beginner bloggers.
Hostinger currently offers some intriguing discounts on its “hosting + domain” packages, but we will go even further and save even more money by using our exclusive promo code.
We’re now ready to begin: click on the button below to visit the official Hostinger page with discounted prices. In addition to that, it is also possible to get a FREE domain name with certain offers, which we will discuss in a second.
Get 15% off Hostinger + free domain name ›
On the page, you will see three hosting plans: unless you need several blogs at once, go with the Premium option. The Single plan has bandwidth limitations and does not allow applying the free domain offer and our exclusive coupon code, which in total makes it a less attractive alternative.
After you choose the hosting plan you will get taken to a checkout page where you will need to make several choices regarding your order. Let’s go through each of them quickly:
- First, you’ll have a choice of several time periods for your initial order (your hosting account will be auto-prolonged after that to avoid losing your blog – unless you cancel manually, of course). The most sensible value to pick here is one year (12 months), which will both entitle you to all the discounts AND give you enough time to test your blog idea and see if it’s working.
- After that, you will see several checkboxes, the first being the SSL certificate. That’s a security measure that prevents your visitor’s data from being exposed on the network, and it gives you a nice trustworthy green padlock sign in the address bar (like the one on this page). SSL has become a universal standard for safe websites around the world, and can even positively affect your search rankings in Google. I recommend activating the SSL option because you’ll need it in any case – and Hostinger provides it for a low flat fee instead of an annual payment like almost all other sources.
- Next up is the backup add-on, which I recommend turning off because you will be able to replicate it for free later on (I will show you how).
- The final checkbox – Cloudflare – can also be left unchecked: while it’s a “nice to have” feature for any website, you won’t need it for the first 1-2 years until your blog gets really large amounts of visitor traffic.
- Finally, there’s the free domain offer which we mentioned earlier: just input your desired name and choose the domain zone from the drop-down list and hit the search button. TIP: if your first choice has already been taken, try using other domain zones or altering your name, for example by rephrasing or adding more words.
To recap, here is how the order page should look like when you’re done with all of the settings described above:

Now we’re almost ready – “almost” because there’s still the discount code I keep telling you about :) In order to get an additional 15% discount on your (already discounted) order, click on the grey link right after the taxes line in the order summary on the right side of the page. A new input field will appear, where you can copy and paste the code below:
SAVE15
NOW you are ready to click the big green checkout button and proceed to the payment. I won’t walk you through that one – you know how the online shopping works, you’ve done that before.
Let’s sum up: we just got our hosting and domain from a top provider, for the lowest possible price. No big deal. Wait, actually – a really rather big deal!
You are now free to build and monetize your own blog, and nobody will display any ads or limit your design choices. Your blog will look professional and trustworthy on its very own domain with a friendly green SSL icon.
And yes, we are officially done with the first step of our guide (to remind you, the only one that involves paying for things!). Let’s continue:
Step 2 of 4: Installing a Blog Management System
Some of you reading this title might have thought “well, it’s probably going to be WordPress”.. Of course it’s going to be WordPress! With a simple yet powerful interface, enormous number of online help, as well as vast choice of free extensions and visual themes WP is undisputedly the number one choice for anyone starting a blog.
In theory, since you already have your own domain and hosting set up, you are not dependent on any particular content management system. You can choose Drupal or Joomla, for instance, as an alternative to WordPress – they’re also free and have many strong points.
However, I’ll be sticking to WP in this guide, as it is by far the easiest one to learn for beginners – based on my experience of working with each of them at some point.
..Alright, enough chit-chat, time to roll up our sleeves again. Log in to the Hostinger account we’ve created in the previous step (you will see a list of products) and click the button to manage your hosting.
This will bring you to your hosting administration panel – the central hub for managing your hosting and domain settings. The panel also contains software which will help us quickly install the blog engine of our choice. To launch the auto-installer, click on the icon that looks like a computer screen with a yellow lightning – it should be located in the “Website” section:

Once inside the auto-installer interface, click on the WordPress logo (the “W”) or type “wordpress” into the search field if you don’t see it right away.
The application will guide you through three easy steps:
- First, you will need to choose the default address of your new WordPress install – just choose your domain, that’s what we got it for, remember? This will be your blog’s home page.
- Second, you will be asked to input the username and password for the blog’s administrator account, as well as an email address for cases when you need to restore access. Use your real email and, for the love of Buddha, don’t set obvious things like “admin” and “12345” as your username and password! I know you’re better than that. There are tons of hackers around just waiting for new blogs with simple passwords, don’t let it be yours.
- Third, you will be able to set the language of your new blog’s admin panel as well as its title. Don’t spend too much time here, as you will be able to change any of this very easily later on, from the WordPress admin panel. When you’re ready, click on the friendly green “Install” button..
..and watch as the magical fairies work hard to install WordPress for you. When they finish their work, you will be shown a table with relevant information and links for your new blog:

You can click on the black “WP Admin” button to open your WordPress admin panel. Alternatively, you can add “/wp-admin” at the end of your website’s domain name (for example, domain.com/wp-admin) in your browser’s address bar to enter the admin panel at any time.
That wasn’t too hard, was it? You now have a fully functional blog management system ready for your awesome content. Before you start writing, however, it is worth taking a quick tour around WordPress and adjusting some settings right away:
Step 3 of 4: Configuring Your New Blog
When you visit the WordPress administration panel you will see a black menu on the left side of the screen – it contains everything you need to manage your blog. Not all menu sections are equally useful for beginners, so we will be going only through the most important ones:

The first two sections we will discuss are Posts and Pages, which are both used for creating the most basic forms of content in the WordPress core. What’s the difference, you might ask?
Pages are for content that doesn’t tend to change much over time, like a “Contact Us” page, while posts are envisaged for periodic entries, like news, updates, or (yes, you guessed it) blog posts.
WordPress automatically aggregates your posts into a single timeline which is confusingly called the blog posts page. Technically, though, it’s more of an archive – not a static page but a collection of posts, usually displayed in a reverse-chronological order (in other words, what people normally envisage when they think about a “blog”).
To really bring home the difference between posts and pages in WordPress, here’s a little table highlighting some of the important distinguishing points:
| Posts | Pages |
|---|---|
| Together comprise the blog archive | Stand-alone content linked via site menu |
| Published on a specific date | Static content |
| Typically has an author | Author is not important |
| Usually allows commenting | Comments are usually disabled |
| Tend to have uniform layout | Layout of each page tends to be unique |
| Used for periodic, time-sensitive content like blog posts, news, and opinions | Used for time-independent content such as “about”, “contact”, etc |
Next up in the WP admin menu is the Comments section, which is quite self-explanatory: it contains all comments which visitors leave on your blog posts. It also lets you moderate them – to edit, approve, remove or mark as spam any new or old comment.
The following two admin menu sections highlighted in the picture above – Appearance and Plugins – deal with the visual and functional aspects of the website, respectively. We will talk more about those two in the next step of our guide, when we choose the blog’s template as well as install some useful extensions.
Finally, there’s the Settings section, which (surprise!) contains all the high-level settings that affect your entire blog. There are four sub-sections here that are worth visiting right away and making sure all options are set according to your preferences. Here are some quick tips:
Settings → General: this sub-section collects the most basic settings, like your blog’s language and time format, as well as the site title field we skipped over in the final step of the auto-installer earlier in this guide.
Settings → Reading: here you can control how your blog is displayed and how many items it should show per page. This group of settings is an important one, as it determines whether your website’s front page will display the blog (i.e. the posts archive) or a static page (for example, information about yourself and an intro to the blog).
Settings → Discussion: while this sub-section might look frustratingly complicated, most options here are good as defaults. The only item which I definitely recommend revising is the “Before a comment appears” checkbox: make sure the “Comment must be manually approved” is active, because otherwise you will quickly start getting an unmanageable amount of comment spam.
Settings → Permalinks: nothing much here, just make sure the URL structure is set to anything other than the first option so that your visitors can use human-friendly addresses for your posts and pages, like blog.com/post-name instead of blog.com/?p=42. I personally usually go for the “post name” (the penultimate option) because it results in the cleanest URLs.
And that’s it for the WordPress introduction tour! You will no doubt find and adjust more settings as you go along, but what you’ve read above is the bare minimum that allows you to get started without scratching your head too much.
Step 4 of 4: Choosing a Theme and Installing Plugins
Remember I was all exultant about how WordPress offers tons of extensions and customization options? Here are some figures to back this up: there are to date more than 50,000 (that’s fifty. thousand.) free plugins in the official WP repository, as well as some 3000+ themes.
Just take a second for that to sink in. If you started testing one WordPress plugin per day, you still wouldn’t be finished after 135 years! And these are only the free ones from the wordpress.org repository – apart from that there are thousands of premium plugins out there on marketplaces like Envato.
Given the ludicrous number of options, people tend to encounter choice overload when it comes to looking for the right WP themes and plugins. That’s why we will only mention one (multi-functional) theme and just a couple of the most universally useful plugins. The rest will be up to you to explore!
While we’re on the subject, why not shamelessly promote my own creation :P the theme is called Bento (version 2.0 now available), and its main goal is to be as flexible as possible, accommodating any personal preferences of the owner of a particular blog.
The theme allows adjusting every imaginable parameter of your website, from the colors of each element to layouts that are automatically mobile-friendly. And it’s free and open-source! Here’s the official page (it’s on the same domain as this article):
Bento is a result of more than 10 years of working with WordPress and building premium templates for clients. It has clean, future-proof code, detailed documentation as well as five-star support on dedicated forums.
/ end of self-promotion /
Moving on to plugins, below I’ve collected the essential ones that can be helpful for the majority of beginner bloggers:
- Google Analytics Dashboard for keeping track of your blog’s visitors: where they come from, how long they stay and what they do while on your website.
- All in One SEO for making your blog even more attractive to search engines. The most important settings it lets you manage are the meta title and description for each page and post – which is exactly what Google uses for displaying its search results.
- Akismet for preventing comment spam: just install this baby and let it do it’s thing. Its algorithms are so good these days that you will hardly ever see a dodgy-looking comment anymore – they will all get quietly filtered out into the “Spam” folder.
- WooCommerce if you decide to start selling stuff on your website. It deserves its own guide so here we will just say it’s by far the most popular and extendable e-commerce plugin worldwide.
And now we are done for real! There is much to explore when it comes to the WordPress ecosystem, and you will no doubt make many exciting discoveries for yourself – but the toolkit provided in these four steps is really all you need to just start blogging.
Before we wrap things up, here are some follow-up recommendations based on collective experience. None of these is a must, strictly speaking, but all of them are essential for your website’s long-term well-being:
Step 4.5 of 4: Some Useful Tips
Remember back in Step 1 we skipped the paid backup and security features while buying a hosting account? Well, I do! And here’s where we are going to look at FREE alternatives that are at least just as good (probably even better):
Useful tip #1: automatic backups. You know how it usually works: until a website owner is forced to re-create their blog from scratch due to a malfunction or a hack, they rarely stop to think about backups.
Now that we’ve made it more obvious, I am sure you won’t wait for a disaster to happen – in this case all you need is one of free WordPress plugins that do automatic backups, for example UpdraftPlus. Its interface is quite intuitive, and it allows saving copies of your entire website on your server or in remote storage such as Google Drive (the latter is recommended because cloud storage is much more resilient than individual servers).
Useful tip #2: website security. While this is a vast topic all in itself, here I will just state two things that tend to be the reason behind some 80-90% of all website security breaches: software versions and the login procedure. The recommendations below cover both and will help you achieve maximum security with minimum effort.
To make sure your themes and plugins, as well as WordPress core itself, do not have any vulnerabilities that can be exploited by malicious agents, just make sure you are using the latest version of everything. As simple as that! You can check your admin panel for updates once a week (“Dashboard → Updates”) or set up automatic updates for everything if you feel you can handle some code – either way a fully up to date blog is a much more secure blog.
As for the login procedure, ensuring your username and password are complicated enough is the obvious first step. As an additional precaution, I recommend installing a two-factor authentication plugin such as this one – it will require an additional temporary code generated by your smartphone each time you login, which will make the entire idea of guessing your username and password quite meaningless for any hacker.
Making Money With Your Blog
People start blogs for various reasons, and earning income is just one of them – however, I’ve still decided to give it a separate chapter because a) it’s arguably the most difficult part and b) because it still potentially applies to every blogger.
In other words: even if monetization is not your priority, why not keep it in mind right from the start? After all who doesn’t like some extra cash? Especially passive income?
So in this part of the guide I will provide an overview of the most feasible ways of making money with your blog (all of which I’ve tried at some point, and some are still my major income sources):
Advertising: putting up image or text or video ads on your blog. This is probably the most “automatable” way of monetizing a blog – just insert a code snippet and watch your visitor traffic convert into cash. The catch? Ad conversions tend to be relatively low on the Internet: this means that you need a lot of incoming visitors for your ad earnings to amount to any sizeable sum each month. Some of the best platforms for bloggers who wish to start earning ad revenue are AdSense by Google and BuySellAds.
Affiliations: mentioning or even actively recommending certain third-party products on your blog, while earning commissions from each sale you refer via your tracking links. The key word in modern affiliate marketing is: quality. The more trustworthy and useful your blog, the more likely your readers are to follow your advice. There is a stand-alone guide on affiliation in our Webmaster Academy, so I will just refer you to it for in-depth information and tips.
E-commerce: aka selling stuff online. In some sense it is a more advanced version of affiliate marketing, because now you’re offering the goods and services directly on your website, instead of promoting somebody else’s. This means more things to worry about like inventory management, logistics, and taxation, but once you manage to get it going it can be a much more stable source of (recurring) income than any other method.
The Most Important Secret / Wrapping Up / Discussion
Half an hour ago you were just playing with the idea of starting a blog, and now here you are, a blog owner! This wasn’t that hard, was it? If you found this guide useful, I’ll go ahead and recommend sharing it on all your Google+ accounts as well as recommending it to anyone who wants to become a blogger. If you feel there’s something missing from the guide or you simply have a question, be sure to scroll down to the comments section and join the discussion.
Pardon? The important secret? Oh, that.. Well, nobody reads conclusion sections unless they have catchy titles like these.. But! I do have one universal piece of advice I would gladly give to my past self if I had the chance: creating an awesome blog takes time – not weeks, but months and months of work. Be patient and tenacious – the point when you want to stop is usually also the point when your efforts are most likely to bear fruit.
So keep reaching for the stars, and see you again on Satori Webmaster Blog!
↧
↧
Análise do Hostinger: será que “quase grátis” é melhor do que “grátis” para hospedagem? + cupom com 15% de desconto?
Eu conheço a situação: você quer ter seu próprio site, mas existem TANTAS opções de hospedagem por aí que parece impossível se decidir: qual delas escolher?!
Se você está lendo este texto, provavelmente já ouviu falar do Hostinger, um provedor de domínios e hospedagem que oferece preços consideravelmente mais baixos do que a maioria dos concorrentes. Nesta avaliação detalhada, nós colocaremos o Hostinger embaixo de uma lupa e responderemos às seguintes perguntas:
- Você deve escolher o Hostinger no lugar dos concorrentes?
- Qual dos planos de hospedagem é o melhor para você?
- E o criador de sites Hostinger – vale à pena experimentar?
- Dá pra conseguir Hostinger por um preço mais baixo?
Primeiro, nós vamos examinar rapidamente a história e os antecedentes da empresa para entender se eles são confiáveis; depois disso, vamos dar mais detalhes sobre seus serviços; finalmente, vamos concluir com um veredicto e fornecer respostas para as perguntas que fizemos acima.
Ah, sim! E no final desta avaliação nós revelaremos um código promocional exclusivo que te permitirá economizar 15% no seu plano Hostinger, além de todos os descontos e ofertas especiais que você já pode encontrar no site. Ótimo!
A história do Hostinger
Serviços de hospedagem – como escolher?
Usando o Hostinger: nossas impressões
Atendimento ao cliente do Hostinger
Prós e contras do Hostinger
BÔNUS: código promocional -15%
Nosso veredicto e avaliações dos usuários
Serviços de hospedagem – como escolher?
Usando o Hostinger: nossas impressões
Atendimento ao cliente do Hostinger
Prós e contras do Hostinger
BÔNUS: código promocional -15%
Nosso veredicto e avaliações dos usuários
A História do Hostinger
Pra você ter uma ideia do tamanho do Hostinger, aqui vão alguns números: atualmente a empresa tem quase 30 milhões de clientes não apenas nos Estados Unidos, Reino Unido, Índia e Indonésia, mas também em +170 outros países (quase todos os países do mundo!).
E não parece que eles vão diminuir o ritmo – de acordo com os dados da empresa, o Hostinger continua expandindo a uma taxa de 1 cliente a cada 5 segundos.
No entanto, como era de se esperar, o Hostinger nem sempre foi o gigante internacional que é hoje. Ele começou em 2004 como o humilde “Hosting Media” na Lituânia, um país pequeno mas em rápida expansão que fica no nordeste da União Europeia.
Os fundadores do Hostinger não tinham a menor intenção de seguir o fluxo e criar só mais um serviço de hospedagem – eles basearam sua nova empresa em uma ideia inovadora:
As pessoas não querem pagar pelo nosso marketing, apenas pela hospedagem: simples, confiável e a mais barata possível.
Depois de muitos anos, este princípio continua sendo a base para os objetivos do Hostinger, ou seja, fornecer serviços de alta qualidade por um preço quase inexistente.
Mas como o Hostinger consegue alcançar essa competitividade? – você pode estar se perguntando. Em outras palavras, como ele consegue manter preços tão baixos enquanto mantém a qualidade alta? Eu vou explicar em breve – mas antes, vamos dar uma olhada no produto:
Qual Plano de Hospedagem é o Ideal para Você?
Existem diversos tipos diferentes de hospedagem no site oficial do Hostinger, cada um com diversos planos de preço. Por isso pode ser um desafio escolher só um, ainda mais quando se considera que há vários serviços e recursos adicionais incluídos de graça dependendo do plano.
Vamos arregaçar as mangas e tentar entender os componentes essenciais de hospedagem – isso vai nos permitir restringir nossas escolher e chegar a uma conclusão final.
Nós vamos examinar cada um dos três tipos de serviço de hospedagem do Hostinger, mas antes, dê uma olhada nesta pequena tabela. Ela resume as principais diferenças entre os tipos de hospedagem e fornece os casos mais comuns de uso:
| Hospedagem compartilhado | Hospedagem business | Hospedagem VPS | |
|---|---|---|---|
| Facilidade de uso | Fácil | Fácil/média | Média/difícil |
| Para quem? | Indivíduos e pequenos negócios | Negócios médios e grandes | Desenvolvedores e programadores |
| Grau de controle | Recursões padrão | Recursos estendidos | Controle total |
| Desempenho | Suficiente para sites pequenos e médios | Desempenho alto para sites e projetos online maiores | Médio a alto dependendo do plano |
| Espaço para crescimento | Rígido – é necessário fazer upgrade para outro plano de hospedagem | Flexível – pode adicionar mais recursos durante a operação. | Muito flexível – controle granular sobre os recursos |
| Nível de preço | Barato | Médio | Flexível |
Eu acho que com essa tabela já dá pra ver que a diferença entre os três tipos de hospedagem oferecidos pelo Hostinger é bem clara, mas nós também vamos dar explicações um pouco mais detalhadas abaixo.
Mas antes de entrarmos em detalhes, precisamos entender um conceito chave: o servidor. Colocando de forma simples, o servidor é um computador especializado que armazena sites e os exibe para seus visitantes online:
Qualquer hospedagem é uma coleção de servidores, computadores poderosos que são otimizados para permanecer online 24 horas por dia, 365 dias por ano, e exibir seu site para qualquer um que digitar seu endereço no browser.
Então, servidores são essencialmente o componente principal de qualquer serviço de hospedagem e eles podem ser utilizados de maneiras diferentes dependendo dos requerimentos e orçamento do cliente. É aqui que entram os três tipos de hospedagem:
-
A hospedagem de sites compartilhado é uma versão básica para aqueles que estão apenas começando ou querem testar seus projetos online com o mínimo de gasto. Ela também pode ser chamada de “compartilhada” porque cada servidor abriga centenas ou até milhares de sites de vários clientes.
Isso implica que os recursos de um único servidor são utilizados simultaneamente por vários sites – isso é bom para sites que têm tráfico moderado, mas pode afetar drasticamente o desempenho de sites maiores.
Vendo pelo lado positivo, a hospedagem de sites compartilhada é extremamente barata e muito fácil de usar. Isso faz com que ela seja ideal para indivíduos e pequenas empresas que estão apenas começando a traçar seu caminho no mundo online.
-
A hospedagem Cloud (Business) é mais avançada, adequada para sites maiores nos quais se espera um tráfico diário médio ou alto (milhares de usuários por dia ou mais).
A hospedagem business do Hostinger usa a chamada tecnologia de nuvem – seus recursos de computação não estão ligados a um servidor físico específico, estão espalhados por diversas máquinas, o que garante melhor estabilidade e resiliência.
Isso também significa que, neste caso, seus recursos de hospedagem estão isolados de todos os outros sites, o que de forma geral leva a um desempenho mais alto em comparação à hospedagem compartilhada.
Todos estes benefícios têm um custo, é claro – a hospedagem business é consideravelmente mais cara, com o plano mais barato (“Startup” a R$64,25 por mês) custando substancialmente mais que o plano compartilhado mais caro (“Business” a R$9,09 por mês). Aliás, na minha opinião, o nome deste último plano é bem confuso – mas agora nós sabemos o que esperar. :)
-
A hospedagem VPS é o tipo de hospedagem mais flexível e menos acessível oferecido pelo Hostinger. VPS é a sigla para “Virtual Private Server”, que em português significa “Servidor Virtual Privado”. Neste caso um único servidor físico opera diversos ambientes individuais que não interceptam uns com outros de forma alguma. É como ter seu próprio servidor, só que é uma chamada máquina “virtual”.
Este setup permite o máximo de flexibilidade – você pode fazer quase tudo o que quiser com seu servidor virtual, porque você tem um controle em nível de administrador sobre o sistema todo.
Pode parecer divertido, até você perceber que, com um plano de hospedagem VPS, não vai ter acesso um painel de controle conveniente. Em outras palavras, cabe a você configurar cada parte do seu servidor virtual.
É por isso que esse tipo de hospedagem é ao mesmo tempo muito útil para profissionais que sabem exatamente o que estão fazendo (p. ex. programadores e desenvolvedores web) e praticamente inútil para todas as outras pessoas.
Considerando os recursos específicos de cada tipo de hospedagem, é razoável sugerir que, para você, talvez seja melhor escolher o tipo compartilhado. Por quê? Porque se você estivesse representando um grande negócio ou uma empresa de desenvolvimento web, você já saberia tudo que eu mencionei nas seções anteriores.
Este caso a parte, vamos presumir que você precise da hospedagem básica – e ver qual dos três planos de hospedagem compartilhado do Hostinger é a escolha mais razoável.

Na página de hospedagem compartilhado do Hostinger, você pode ver três opções: o plano Single, que custa R$3,12 por mês; o plano Premium, que custa R$4,90 por mês; e o plano Business, que custa R$9,09 por mês. Eu acredito que seja importante entender que estas são promoções especiais:
- Você consegue estes preços se assinar um pacote de 48 meses, períodos menores custam um pouco mais (na minha opinião, um pacote de 12 meses costuma ser mais que o suficiente para entender se você realmente precisa de um site e testar seu projeto online).
- Estes preços são válidos pela duração do pacote que você assinar; depois disso, sua hospedagem será prolongada pela taxa normal.
Só para deixar claro: ambas estas práticas são comuns entre os provedores de hospedagem, então o Hostinger não está fazendo nada de errado neste sentido.
Todos os três planos compartilhados são equipados com tudo que é necessário para um começo fácil, incluindo software e hardware otimizados, então vamos focar apenas nas diferenças:
| Single | Premium | Business | |
|---|---|---|---|
| Domínios | 1 | ∞ | ∞ |
| Contas de e-mail | 1 | ∞ | ∞ |
| SSL grátis? | – | – | sim |
| Backups | – | semanalmente | diariamente |
| Poder, memória | 1x | 2x | 4x |
| Domínio grátis? | – | sim | sim |
O plano Single possui pouquíssimos recursos e um poder de processamento que é apenas o suficiente para um site bem pequeno, enquanto o plano Business adiciona muito poucos benefícios em comparação com o plano Premium e ainda por cima é quase duas vezes mais caro.
Em outras palavras, o plano Premium é o mais balanceado em termos de recursos; mais importante, ele é o plano mais barato com domínio grátis incluído.
Além do mais, este é o plano mais barato que oferece backups automáticos – e você certamente vai perceber a utilidade deste recurso na primeira vez que algo acontecer com seu site. :)
Concluindo: para a maioria dos indivíduos e organizações pequenas/médias o plano de Hospedagem de Sites Premium do Hostinger é a escolha mais razoável. Na última parte da nossa avaliação, eu vou fornecer um código promocional exclusivo para você ganhar mais 15% de desconto neste plano, fique ligado!
Nossas Impressões ao Usar o Hostinger
Para o propósito desta avaliação, nós compramos o plano de hospedagem de sites Premium do Hostinger e o testamos exaustivamente. Agora, estamos compartilhando nossas experiências com os leitores deste guia.
Quando você completa seu pedido, você ganha acesso ao painel do administrador – este é o lugar aonde você vai gerenciar sua conta de hospedagem:

O Hostinger oferece um painel de administrador customizado, criado pelos desenvolvedores internos da empresa. Nós achamos que ele é bastante acessível e fácil de entender em comparação com alternativas amplamente utilizadas como cPanel ou Plesk.
Tudo que você precisa está representado por quadradinhos com fotos e organizado cuidadosamente em grupos para te ajudar a encontrar os serviços mais rapidamente. Você também pode utilizar a barra de pesquisa no topo para acessar os itens desejados mais facilmente.
Se você comprar um domínio com sua hospedagem (abaixo eu vou mostrar como conseguir isso de graça), ele será automaticamente ativado depois de um tempinho e você poderá começar a criar seu site.
Para isso, você pode usar o Instalador Automático (Auto Installer) para configurar um sistema de gerenciamento de conteúdo como o WordPress ou usar o criador de sites do tipo arraste e solte do próprio Hostinger. Ambas as opções podem ser acessadas na seção Website no painel do administrador.
Depois de experimentar o criador arraste e solte (que eles chamam de Zyro), nós concluímos que ele não vale o seu tempo: os templates são antiquados e às vezes se embaralham quando você os utiliza. Por exemplo, foi isso que eu consegui logo depois da ativação:

Ao invés disso, nós recomendamos instalar o WordPress (também chamado de WP) utilizando o recurso Instalador Automático mencionado acima. Aqui vão apenas alguns dos motivos para escolher o WP para o seu primeiro site:
- O WordPress é a ferramenta de sites mais popular do mundo, então na Internet tem um monte de tutoriais, guias e dicas grátis de como usá-lo!
- Você tem acesso grátis a milhares de templates do catálogo oficial do WP (experimente o Bento, por exemplo – é multifuncional e fácil de personalizar).
- Há também milhares de extensões grátis para WordPress, o que te permite adicionar quase qualquer função imaginável ao seu site, de botões para compartilhamento em redes sociais e formulários de contato a criadores de layout arraste e solte.
Além do produto em si, outra parte muito importante de qualquer oferta é o atendimento ao cliente que você recebe. Vamos dar uma olhada no desempenho do Hostinger nessa área:
Atendimento ao Cliente
Você pode pedir ajuda para a equipe do Hostinger a qualquer hora do dia, em qualquer dia da semana, pelo chat que fica localizado no canto inferior direito do painel do administrador.
Para testar a qualidade do atendimento, nós fizemos perguntas pelo chat ao vivo: o tempo de resposta foi super rápido (em geral, apenas alguns segundos) e o representante do Hostinger foi sempre amigável, educado e prestativo. Às vezes eles até usam fotos de gatinhos para melhorar seu humor enquanto você espera que eles digitem uma resposta. :)
Além do chat ao vivo, há também uma biblioteca grátis com artigos úteis sobre todos os produtos e serviços do Hostinger. Você pode encontrá-la clicando no link “Ajuda” no topo do menu do painel do administrador. Ela também contém uma lista das perguntas mais frequentes – há uma boa chance da sua questão já ter sido resolvida lá.
No geral, o Hostinger conseguiu exceder nossas expectativas quando o assunto é a qualidade do atendimento – especialmente considerando que a hospedagem é muito barata. Nós já vimos muito pior, inclusive de empresas concorrentes com preços mais altos.
Prós e Contras do Hostinger
Agora que nós examinamos os produtos e serviços do Hostinger, assim como o atendimento ao cliente, vamos resumir os lados positivos e negativos. Tentaremos ser o mais objetivos possível:
- Ótimo custo benefício: preços muito competitivos para todos os pacotes de hospedagem – como o Hostinger diz, “você só paga pela hospedagem, não pelo marketing”
- Opções flexíveis para todos os tipos de cliente – de indivíduos e pequenos negócios (hospedagem de sites) a grandes empresas (hospedagem business) e programadores profissionais (hospedagem VPS)
- Garantia de 99,9% de uptime – basicamente, o Hostinger promete que o seu site estará disponível online o tempo todo. Essa porcentagem significa um máximo de 44 minutos de downtime por mês, o que na prática é quase 0 minutos de downtime de acordo com nossos testes
- Você pode ganhar um nome de domínio grátis com a sua compra se escolher um pacote de no mínimo 12 meses
- Fácil de usar; painel do administrador exclusivo desenvolvido pela equipe do Hostinger especificamente para os clientes da empresa
- Você pode instalar o WordPress em apenas alguns cliques utilizando o recurso do Instalador Automático no painel do administrador
- Ampla biblioteca de recursos educacionais sobre como usar os produtos Hostinger, disponível de graça para todos os clientes
- Atendimento de primeira com uma equipe amigável, rápida e prestativa que está sempre à disposição para resolver seus problemas 24 horas por dia
- Criador de sites medíocre com designs de templates antiquados e erros ocasionais ao trocar de um template para o outro. Ao invés disso, recomendamos utilizar o WordPress
- Não é possível receber atendimento por telefone – você tem que usar o chat ao vivo, e-mail ou formulário de contato
Antes de terminarmos esta avaliação com uma conclusão e um veredicto (você deve usar o Hostinger?), aqui vai um guia passo a passo para ganhar mais 15% de desconto na sua compra Hostinger:
Bônus: Código Promocional Hostinger -15%
Estamos ansiosos para te mostrar como economizar ainda mais usando nosso cupom exclusivo com 15% de desconto. Siga os passos abaixo para pagar ainda menos na sua compra com o Hostinger.
Como concluímos acima que o plano de Sites Premium de 12 meses é a escolha mais razoável na maioria dos casos, nós o utilizaremos como exemplo para o nosso guia.
- Clique no botão abaixo e vá para a página Hospedagem Ilimitada no site oficial do Hostinger (uma nova guia abrirá automaticamente):
- Em Hospedagem de Sites Premium (a opção do meio), clique no botão roxo escrito “Selecione”. Isso te levará à página de configurações.
- Clique para escolher o pacote de 12-meses (este é o plano mais barato que te dá um nome de domínio grátis, então não vale à pena escolher o plano de 3 meses).
- Na seção do domínio abaixo, coloque o nome de domínio que você quer. Talvez você tenha que tentar algumas vezes antes de encontrar um que esteja disponível.
- Apesar de ser opcional, nós também recomendamos que você marque o item “Certificado SSL” – não custa muito e tornará seu site mais seguro e confiável. Seu site também exibirá um cadeado verde de segurança na barra de pesquisa do browser se você tiver um SSL.
-
Os outros itens nesta página não são essenciais – é claro que você pode incluí-los, mas dá pra passar muito bem sem eles. A essa altura, sua página de configurações deve estar assim:
![]()
-
Agora olhe para o lado direito da página e encontre o texto cinza claro que diz “Possui um cupom de desconto?”. Ele deve estar localizado logo acima do preço total do pedido. Quando você clicar no link ao lado dele, um novo campo aparecerá em seu lugar. Digite o seguinte código:
SAVE15
- Depois de colocar o código, clique no ícone de mais (+) á direita (ele deve ficar roxo). Você verá uma mensagem dizendo que o código do cupom foi validado e um novo desconto aparecerá no seu pedido.
- Parabéns! Você acabou de economizar mais 15% na sua compra com o Hostinger, deixando o preço final ainda melhor.

Nosso Veredicto e Avaliações de Clientes
Depois de examinar o Hostinger sob todos os ângulos possíveis e usar seus serviços por algum tempo, nós podemos concluir que esta é uma empresa de hospedagem na qual vale à pena confiar: custo-benefício, simplicidade, facilidade de uso e atendimento prestativo é tudo que você precisa pra criar e administrar seu site de forma bem sucedida.
Nós também mostramos acima como economizar mais 15% no seu pedido com o Hostinger usando nosso código promocional exclusivo. Não é muito considerando que o Hostinger já é bastante barato – mas ainda assim é um bom bônus, não é mesmo?
Aviso de afiliação: nós acreditamos que é honesto te contar que alguns links nesta avaliação são links de afiliação, o que significa que nós ganhamos uma pequena comissão toda vez que alguém compra um plano Hostinger através deles. Isso, é claro, não afeta o preço que você consegue na sua oferta Hostinger.
Você está planejando usar o Hostinger, mas ainda não tem certeza se deve mesmo, ou qual plano escolher? Ou você já está usando o Hostinger e gostaria de compartilhar sua experiência? De qualquer forma, faça parte na discussão na seção de comentários abaixo. Vamos ajudar uns aos outros!
↧
Cara Membuat Blog: Menjadi Bloger dalam 30 Menit dan Kemungkinan Menghasilkan Uang
Gratis atau Hampir Gratis?
Langkah 1: Memilih Domain and Hosting
Langkah 2: Menginstal Blog Engine
Langkah 3: Mengonfigurasi Blog
Langkah 4: Menambah Tema dan Plugin
Beberapa Kiat Bermanfaat
Menghasilkan Uang dengan Blog
Langkah 1: Memilih Domain and Hosting
Langkah 2: Menginstal Blog Engine
Langkah 3: Mengonfigurasi Blog
Langkah 4: Menambah Tema dan Plugin
Beberapa Kiat Bermanfaat
Menghasilkan Uang dengan Blog
Jika Anda membaca tulisan ini, pasti ada sesuatu yang ingin Anda sampaikan pada dunia. Atau, mungkin si bos yang mau. Apa pun itu, Anda membutuhkan tempat untuk memublikasikan teks dan konten lain seperti gambar atau video secara rutin. Tempat yang bisa Anda kendalikan sepenuhnya, tidak seperti halaman Facebook atau Instagram yang terbatas dan tidak berkarakter, benar? Dengan kata lain, Anda butuh weblog!
(Halo, 1997! Kami generasi yang lebih keren, sekarang kami menggunakan ponsel yang tidak muat lagi di saku dan kata-kata yang kami pakai juga lebih singkat! Mulai sekarang, “blog” saja, oke?)
Jadiii, ya, pertanyaannya kemudian adalah: cara membuat blog? Nah, Anda bisa menutup halaman pencarian karena di sini ada jawabannya.
..Ayo, tutup saja. Bagus.
Dalam panduan mendetail namun santai ini kita akan membahas semua langkah yang diperlukan untuk membuat blog (cuma 4 langkah, sebenarnya). Di akhir, saya akan menyediakan kiat untuk mengamankan, mengembangkan, dan menghasilkan uang dari blog. Sebagai hasilnya, Anda akan:
- belajar membuat situs web tanpa satu kode pun
- menghemat banyak uang dan waktu yang berharga
- menyapa semua orang di dunia dengan konten luar biasa
- berteman dengan unicorn (oke, tidak secara harfiah)
Sebelum mulai, ada pertanyaan penting yang harus segera dijawab agar Anda lebih paham. Akan tetapi, jika Anda tidak sabar untuk mulai SEKARANG JUGA, lewati saja dua bagian berikut atau gunakan tautan dalam teks ini untuk langsung ke Langkah 1.
Gratis atau Hampir Gratis?
Walaupun Anda bisa membuat blog gratis dengan menggunakan salah satu layanan “blog massal”, atau bahkan jaringan sosial seperti Twitter, perlu diingat bahwa ada beberapa kekurangan pada semua pendekatan yang melibatkan layanan blog gratis:
- Tampilan blog Anda sama seperti ribuan blog lain karena personalisasi jelas bukan kelebihan platform seperti itu. Templat cenderung tidak berkembang atau ketinggalan zaman sehingga mungkin lebih baik tidak ada sama sekali.
- Blog Anda akan menampilkan iklan orang. Akan tetapi, Anda tidak akan melihat pemasukan iklan tersebut. Platform harus mengoperasikan komputer yang memfasilitasi blog Anda. Jadi, uangnya mereka simpan sendiri.
- Anda harus menerima batasan teknis, seperti ruang yang tersedia untuk menyimpan berkas blog, jumlah pengunjung per bulan, dan ukuran berkas yang diunggah.
- Alamat web Anda merupakan subdomain platform blog yang digunakan, seperti
blog.platform.com, bukan namablog.comyang terkesan jauh lebih serius.
Bukan berarti blog gratis itu ide buruk, bahkan, jika Anda tidak masalah dengan kekurangan yang kami sebut di atas, sebaiknya gunakan pilihan itu. Akan tetapi, jika Anda serius dan bisa mencurahkan setengah jam untuk membuat blog yang tampak profesional dan kredibel, teruslah membaca.
Untuk memahami kenapa membuat situs tidak bisa sepenuhnya gratis (atau, dalam pengertian yang sama, mengapa layanan blog yang “gratis sepenuhnya” bermaksud menghasilkan uang dari blog Anda melalui iklan atau biaya tersembunyi lainnya), kita harus mengetahui pengertian situs web dan bagaimana cara kerjanya:
Semua situs web (misalnya, blog) adalah kumpulan berkas yang dikenali dengan identitas unik—alamatnya. Yaitu, teks yang kita masukkan ke bilah alamat peramban untuk mengunjungi situs tertentu.
Berkas tersebut harus bisa diakses 24/7 supaya situs benar-benar online. Artinya, berkas harus disimpan di komputer yang selalu menyala dan tersambung ke internet. Komputer khusus itu disebut server, dan perusahaan yang menyediakan server disebut penyedia hosting.
Bentuk alamat web paling populer adalah nama domain, yaitu rangkaian teks yang bisa dibaca dan menyediakan informasi tentang situs yang bersangkutan. Misalnya, nama domain anjing.id (mungkin) merupakan situs tentang anjing dan menargetkan pengunjung dari Amerika atau internasional.
Sebenarnya (saya sih berharap tidak begitu), mengoperasikan nama domain dan layanan hosting selalu butuh uang. Ini alasannya:
- Untuk menjadi pencatat domain, perusahaan harus memenuhi banyak kriteria—teknis, finansial, legal—dan membayar biaya tahunan (misalnya, $4000 per tahun ke ICANN untuk domain internasional),
- Untuk menyediakan layanan hosting, perusahaan harus membeli dan memelihara banyak komputer andal di lokasi aman, yang mengimplikasikan pengeluaran dalam jumlah besar, terdiri dari biaya tetap (peralatan) dan berulang (gaji, sewa, dsb.).
Artinya, semua pihak yang mengklaim bisa menawarkan nama domain dan hosting bebas biaya, kalau bukan dermawan murah hati berkantong tebal, pasti berencana menghasilkan uang dari blog penggunanya dengan cara lain (iklan). Menurut Anda?
Baik, saya rasa sekarang Anda sudah paham. Bloger yang menghargai dirinya sendiri tidak akan menoleransi iklan dan batasan teknis yang merupakan paket “blog gratis”, dengan kata lain:
Jika Anda ingin blog yang terkesan profesional dan berencana mengembangkannya (juga menghasilkan uang dari sana), mau tidak mau Anda harus mengeluarkan uang.
Ini berita baiknya. Dengan mengambil pendekatan cerdas dan hanya berfokus pada hal-hal yang paling esensial, kami dapat mengurangi biaya pembuatan blog sampai seminimal mungkin. Itulah tujuan panduan ini.
Oh ya, dan jangan lupa ada kode kupon eksklusif!
…Kita akan membahasnya sebentar lagi. Ayo mulai dengan langkah esensial pertama (dan satu-satunya yang memerlukan uang):
Langkah 1 dari 4: Memilih Nama Domain dan Penyedia Hosting
Baik, langsung saja! Pertama, kita membutuhkan tempat sebagai wadah blog dan alamat unik yang bisa ditemukan pengguna internet. Untungnya, keduanya bisa dilakukan sekali jalan karena kebanyakan penyedia hosting besar menawarkan pendaftaran nama domain sebagai layanan tambahan.
Dari semua perusahaan yang sudah bekerja dengan kami selama lebih dari 10 tahun, satu yang paling kami rekomendasikan adalah Hostinger. Dengan 30+ juta pengguna di seluruh dunia dan fokus pada kesederhanaan, ini adalah pilihan logis untuk bloger pemula.
Hostinger saat ini menawarkan beberapa diskon menarik dalam paket “hosting + domain”, tetapi akan kita gali lebih dalam dan hemat lebih banyak dengan menggunakan kode promo eksklusif kami.
Sekarang kita siap untuk mulai. Klik tombol di bawah untuk mengunjungi halaman Hostinger resmi dengan harga diskon. Selain itu, Anda juga bisa mendapat nama domain GRATIS dengan penawaran tertentu, yang akan kita diskusikan sebentar lagi.
Dapatkan diskon 15% Hostinger + nama domain gratis »
Di halaman tersebut, Anda akan melihat tiga paket hosting. Jika Anda tidak membutuhkan beberapa blog sekaligus, pilih opsi Premium. Paket Single memiliki batasan bandwidth dan tidak memungkinkan pengajuan domain gratis dan kode kupon eksklusif dari kami, yang akhirnya menjadikan alternatif ini tidak menarik
Setelah memilih paket, Anda akan dibawa ke halaman “checkout” untuk memilih beberapa hal yang terkait dengan order. Ayo kita tinjau satu per satu:
- Pertama, Anda harus memilih periode waktu untuk order awal ini (akun hosting akan otomatis diperpanjang supaya blog tidak hilang, kecuali Anda membatalkannya secara manual). Paket yang paling menguntungkan adalah satu tahun (12 bulan), yang memberi diskon DAN menyediakan waktu yang cukup untuk menguji ide blog Anda dan apakah hasilnya sesuai yang diharapkan.
- Setelah itu, Anda akan melihat beberapa kotak centang, yang pertama adalah sertifikat SSL. Ini adalah tindakan keamanan supaya data pengunjung tidak terekspos di jaringan, dan memberi ikon gembok hijau tanda tepercaya di bilah alamat (seperti yang ada di halaman ini). SSL telah menjadi standar universal untuk situs aman di seluruh dunia, dan dapat memengaruhi peringkat pencarian di Google. Saya sarankan Anda mengaktifkan opsi SSL karena itu dibutuhkan, dan Hostinger menyediakannya dengan harga tetap yang rendah, bukan biaya tahunan seperti hampir semua penyedia lain.
- Selanjutnya adalah pengaya “backup” yang saya sarankan dilewatkan saja karena Anda dapat membuat pencadangan gratis nanti (akan saya tunjukkan caranya).
- Kotak centang terakhir, Cloudflare, juga dapat diabaikan. Walaupun fitur ini “bagus dimiliki”, Anda tidak membutuhkannya dalam 1–2 tahun pertama sampai blog mendapat lalu lintas pengunjung yang tinggi.
- Terakhir, ada penawaran domain gratis yang tadi saya sebutkan. Anda hanya perlu memasukkan nama yang diinginkan dan memilih zona domain dari daftar tarik-turun dan menekan tombol cari. TIP: jika pilihan pertama sudah ada yang punya, cobalah zona domain lain atau ubah nama Anda, misalnya dengan kata-kata lain atau menambah kata baru.
Sebagai rekap, beginilah penampakan halaman order ketika Anda selesai memilih opsi seperti di atas:

Sekarang kita hampir siap, “hampir” karena masih ada kode diskon yang dari tadi saya bilang :) Untuk mendapatkan diskon tambahan 15% pada order (yang sudah didiskon), klik tautan abu-abu tepat setelah baris pajak dalam daftar order di kanan halaman. Setelah diklik, akan muncul bidang baru, kemudian salin dan rekatkan kode di bawah ini:
SAVE15
SEKARANG Anda siap mengeklik tombol “checkout sekarang” yang besar berwarna hijau di sana dan lanjut ke pembayaran. Saya tidak akan menjelaskan bagian ini, Anda pasti sudah tahu cara belanja di internet.
Kesimpulannya: kita mendapat hosting dan domain dari penyedia top, dengan harga serendah mungkin. Ah, biasa saja. Tidak, itu luar biasa!
Nah, Anda siap membuat dan menghasilkan uang dari blog, dan tidak ada pihak mana pun yang akan menayangkan iklan atau membatasi pilihan desain. Blog Anda akan tampak profesional dan memiliki nama domain sendiri dengan ikon hijau SSL yang aman.
Dan ya, secara resmi langkah pertama sudah selesai (sekadar mengingatkan, satu-satunya yang melibatkan pembayaran!). Ayo lanjutkan:
Langkah 2 dari 4: Menginstal Blog Engine
Beberapa dari Anda yang membaca judul ini mungkin berpikir, “paling-paling WordPress”. Tentu saja WordPress! Dengan antarmuka sederhana namun bisa diandalkan, banyaknya bantuan yang tersebar di internet, juga ribuan pilihan ekstensi gratis dan tema visual, WP jelas merupakan pilihan nomor satu untuk semua orang yang ingin mengeblog.
Secara teori, karena domain dan hosting sudah diatur, Anda tidak bergantung pada sistem manajemen konten tertentu. Sebagai alternatif WordPress, Anda bisa memilih Drupal atau Joomla, misalnya, yang juga gratis dan memiliki banyak kelebihan.
Akan tetapi, saya akan menggunakan WP dalam panduan ini, karena sampai sekarang platform ini tetap yang paling mudah dipelajari oleh pemula, berdasarkan pengalaman saya bekerja dengan mereka.
…Baik, cukup mengobrolnya, sekarang kita lanjutkan. Silakan masuk ke akun Hostinger yang sudah dibuat dalam langkah sebelumnya (Anda akan melihat daftar produk) dan klik tombol untuk mengelola hosting.
Anda akan dibawa ke panel administrasi hosting, sentra untuk mengelola pengaturan hosting dan domain. Panel ini juga menyediakan perangkat lunak yang akan membantu kita menginstal blog engine pilihan dengan cepat. Untuk menyalakan auto-installer, klik ikon yang tampak seperti layar komputer dengan lampu kuning. Letaknya di bagian “Website”:

Begitu masuk di antarmuka auto-installer, klik logo WordPress (“W”) atau tik “wordpress” dalam bidang pencarian jika Anda tidak langsung melihatnya.
Aplikasi ini akan memandu Anda melalui tiga langkah sederhana:
- Pertama, Anda harus memilih alamat WordPress yang akan diinstal. Pilih saja domain, itulah fungsinya, ingat? Ini akan menjadi halaman beranda blog.
- Kedua, Anda akan diminta memasukkan nama pengguna dan kata sandi untuk akun administrator blog, juga alamat surel jika nanti perlu memulihkan akses. Gunakan surel asli dan demi Tuhan, jangan memilih “admin” dan “12345” sebagai nama pengguna dan kata sandi! Saya tahu Anda lebih kreatif dari itu. Ada banyak peretas yang menunggu blog baru dengan kata sandi sederhana, jangan sampai Anda jadi korbannya.
- Ketiga, Anda dapat menetapkan bahasa panel admin blog dan namanya. Jangan habiskan banyak waktu di sini karena Anda dapat dengan mudah mengubahnya nanti dari panel admin WordPress. Kalaus sudah siap, klik tombol hijau “Install”…
…dan lihat peri ajaib bekerja menginstal WordPress. Setelah mereka selesai, Anda akan melihat tabel berisi informasi relevan dan tautan untuk blog yang baru dibuat:

Anda dapat mengeklik tombol hitam “WP Admin” untuk membuka panel admin WordPress. Atau, tambahkan “/wp-admin” di akhir nama domain situs (misalnya, domain.id/wp-admin) dalam bilah alamat peramban untuk masuk ke panel admin kapan saja.
Tidak terlalu sulit, ‘kan? Setelah langkah ini selesai, Anda akan punya sistem manajemen blog fungsional yang siap untuk konten Anda yang tentu luar biasa. Akan tetapi, sebelum mulai menulis, sebaiknya luangkan waktu untuk tur WordPress dan menyesuaikan beberapa pengaturan:
Langkah 3 dari 4: Mengonfigurasi Blog
Ketika masuk ke panel administrasi WordPress, Anda akan melihat menu hitam di sisi kiri layar. Semua yang dibutuhkan untuk mengelola blog ada di sana. Tidak semua menu berguna untuk pemula. Jadi, kita hanya akan membahas yang paling penting:

Dua bagian pertama yang akan kita bahas adalah Pos dan Halaman, yang digunakan untuk membuat konten paling dasar di WordPress core. Mungkin Anda bertanya, apa bedanya?
Pages untuk konten yang cenderung tidak berubah dalam waktu lama, seperti halaman “Hubungi Kami”, sementara posts ditujukan untuk entri periodik, seperti berita, pembaruan, atau (ya, Anda benar) pos blog.
WordPress otomatis mengumpulkan pos dalam satu lini masa yang juga dinamakan halaman pos blog. Namun, secara teknis ini lebih seperti arsip, bukan halaman statis, melainkan kumpulan pos yang biasanya ditampilkan dalam urutan kronologis terbalik (dengan kata lain, apa yang dibayangkan orang ketika memikirkan “blog”).
Untuk memperjelas perbedaan antara posts dan pages di WordPress, berikut tabel yang menyoroti beberapa perbedaan paling penting:
| Pos | Halaman |
|---|---|
| Bersama-sama membentuk arsip blog | Konten berdiri sendiri yang ditautkan via menu situs |
| Dipublikasikan pada tanggal spesifik | Konten statis |
| Biasanya menampilkan penulis | Penulis tidak penting |
| Biasanya mengizinkan komentar | Komentar biasanya ditutup |
| Cenderung memiliki tata letak seragam | Tata letak tiap halaman cenderung unik. |
| Digunakan untuk konten periodik sesuai waktu tertentu, seperti pos blog, berita, dan opini | Digunakan untuk konten yang tidak terikat waktu, seperti “tentang”, “kontak”, dsb. |
Selanjutnya di menu admin WP ada bagian Komentar yang sudah jelas. Bagian ini memuat semua komentar pengunjung di pos blog. Anda juga dapat melakukan moderasi di sini, seperti mengedit, menyetujui, menghapus, atau menandai komentar baru atau lama sebagai spam.
Dua bagian menu admin berikutnya yang ditandai dalam gambar di atas, Tampilan dan Plugin, masing-masing mengurusi aspek visual dan fungsional situs. Kita akan membahas itu dalam langkah berikutnya dalam panduan ini, ketika memilih templat serta menginstal beberapa ekstensi yang berguna.
Terakhir, ada bagian Pengaturan, yang (kejutan!) memuat semua pengaturan tingkat tinggi yang memengaruhi seluruh blog. Ada empat sub-bagian yang sebaiknya langsung dicek, dan pastikan semua opsi diatur sesuai preferensi Anda. Berikut kiat-kiatnya:
Pengaturan → Umum: sub-bagian ini memuat pengaturan paling dasar, seperti bahasa blog dan format waktu, juga bidang judul yang kita lompati di langkah auto-installer tadi.
Pengaturan → Bacaan: di sini Anda dapat mengontrol displai blog dan berapa banyak pos yang ditampilkan per halaman. Kelompok pengaturan ini sangat penting karena menentukan apakah halaman depan situs akan menampilkan blog (yaitu arsip pos) atau halaman statis (misalnya, informasi tentang diri Anda dan perkenalan blog).
Pengaturan → Diskusi: walaupun sub-bagian ini mungkin tampak sangat rumit, kebanyakan opsi bawaan di sini sudah bagus. Satu-satunya yang saya sarankan untuk direvisi adalah kotak centang “Sebelum sebuah komentar muncul”. Pastikan “Komentar harus disetujui secara manual” (komentar harus disetujui secara manual) diaktifkan, kalau tidak, Anda akan mendapat komentar spam yang tak terhitung banyaknya.
Pengaturan → Permalink: tidak banyak yang ada di sini, tetapi pastikan struktur URL diatur dengan apa pun selain opsi pertama supaya pengunjung dapat menggunakan alamat yang layak baca untuk pos dan halaman, seperti blog.id/nama-pos, bukan blog.id/?p=42. Saya pribadi biasanya menggunakan “nama pos” karena URL jadi terlihat rapi.
Sekian tur pengenalan WordPress! Anda pasti akan melakukan penyesuaian lain sambil jalan, tetapi yang dibahas di atas merupakan informasi minimal yang memungkinkan Anda mulai tanpa terlalu kebingungan.
Langkah 4 dari 4: Memilih Tema dan Menginstal Plugin
Ingat waktu saya bilang WordPress menawarkan banyak ekstensi dan opsi kustomisasi? Berikut angka pendukungnya: saat ini ada lebih dari 50.000 (ya, lima puluh ribu) plugin gratis di repositori WP resmi, juga 3.000+ tema.
Mari kita cerna. Jika Anda mencoba satu plugin WordPress per hari, Anda tetap tidak akan selesai setelah 135 tahun! Dan itu baru dari repositori wordpress.org saja, belum lagi ribuan plugin premium di tempat seperti Envato.
Dengan banyaknya opsi tersebut, orang cenderung bingung memilih tema dan plugin WP yang tepat. Oleh karena itulah saya hanya membahas satu tema (multifungsi) dan beberapa plugin yang paling berguna secara universal. Yang lain silakan coba sendiri!
Mumpung membahas tema, sepertinya ini kesempatan untuk tanpa malu-malu mempromosikan kreasi saya sendiri :P. Tema yang saya buat bernama Bento (versi 2.0 sudah tersedia), dan tujuan utamanya adalah menjadi tema fleksibel, yang mengakomodasi preferensi pribadi pemilik blog yang bersangkutan.

Tema ini memungkinkan penyesuaian semua parameter situs yang bisa dibayangkan, dari warna tiap elemen hingga tata letak yang otomatis ramah untuk peranti bergerak. Selain itu, Bento juga gratis dan bersumber terbuka! Ini halaman resminya (dengan domain yang sama seperti artikel ini):
Bento adalah hasil dari 10 tahun bekerja dengan WordPress dan membuat templat premium untuk klien. Tema ini memiliki kode bersih dan future-proof, dokumentasi mendetail, serta dukungan bintang lima di forum khusus.
/ akhir dari promosi diri /
Lanjut ke plugin, di bawah ini saya sudah mengumpulkan plugin esensial yang dapat membantu mayoritas bloger pemula:
- Google Analytics Dashboard untuk melacak pengunjung blog, seperti asal mereka, berapa lama mereka di blog Anda, dan apa yang mereka lakukan.
- All in One SEO untuk membuat blog makin menarik di mesin pencari. Pengaturan paling penting adalah mengelola judul dan deskripsi meta tiap halaman dan pos, yang digunakan oleh Google untuk menampilkan hasil pencarian.
- Akismet untuk mencegah komentar spam, cukup diinstal dan biarkan plugin ini bekerja sendiri. Algoritmenya sangat bagus sehingga Anda tidak akan melihat komentar sampah lagi, semuanya diam-diam akan difilter dan dimasukkan ke dalam folder “spam” .
- WooCommerce jika Anda memutuskan untuk berjualan di situs. Yang satu ini perlu dibahas dalam panduan sendiri. Jadi, saya hanya akan mengatakan bahwa ini plugin e-commerce yang bisa dikembangkan dan paling populer di seluruh dunia.
Sekarang sudah benar-benar selesai! Banyak sekali yang bisa dieksplorasi dalam ekosistem WordPress, dan Anda pasti akan menemukan banyak hal menarik, tetapi alat yang dibahas dalam empat langkah ini yang betul-betul dibutuhkan untuk mulai mengeblog.
Sebelum ditutup, saya juga menyediakan beberapa rekomendasi lanjutan berdasarkan pengalaman kolektif. Tidak ada yang wajib memang, tetapi semuanya penting untuk kebaikan dan kelangsungan situs Anda:
Langkah 41/2 dari 4: Beberapa Kiat Bermanfaat
Apa Anda ingat di Langkah 1 ketika membeli akun hosting kita melewatkan pencadangan berbayar dan fitur keamanan? Saya ingat! Dan di sini kita akan membahas alternatif GRATIS yang sama baiknya (mungkin bahkan lebih bagus) :
Kiat #1: pencadangan otomatis. Anda tahu cara kerjanya. Pemilik situs jarang memikirkan pencadangan sampai mereka dipaksa membuat ulang blog dari awal karena malfungsi atau diretas.
Nah, karena sudah jelas, saya yakin Anda tidak akan menunggu bencana terjadi. Dalam hal ini, Anda membutuhkan salah satu plugin WordPress gratis yang melakukan pencadangan otomatis, misalnya UpdraftPlus. Antarmukanya cukup intuitif, dan memungkinkan Anda menyimpan kopi seluruh situs di server Anda atau penyimpanan awan seperti Google Drive (pilihan kedua lebih dianjurkan karena penyimpanan awan jauh lebih andal daripada server individual).
Kiat #2: keamanan situs. Walaupun topik ini sangat luas, di sini saya hanya akan menyatakan dua hal yang cenderung menjadi alasan di balik 80–90% pelanggaran keamanan situs: versi perangkat lunak dan prosedur log masuk. Rekomendasi di bawah ini meliputi keduanya dan akan membantu Anda memiliki keamanan maksimal dengan upaya minimal.
Untuk memastikan tema dan plugin serta WordPress itu sendiri tidak memiliki titik rawan yang dapat dimanfaatkan agen bermaksud buruk, pastikan Anda menggunakan versi terbaru apa pun itu. Sederhana! Anda dapat mengecek pembaruan di panel admin seminggu sekali (“Dasbor → Pembaruan”) atau mengatur pembaruan otomatis untuk semuanya jika merasa Anda bisa menangani kode. Apa pun caranya, blog yang selalu diperbarui adalah blog yang jauh lebih aman.
Sementara untuk prosedur log masuk, langkah pertama yang sudah sangat jelas adalah memastikan nama pengguna dan kata sandi cukup rumit. Sebagai pencegahan tambahan, saya menyarankan Anda menginstal plugin autentikasi dua faktor seperti ini, yang meminta kode tambahan sementara yang dihasilkan oleh ponsel tiap kali Anda masuk. Jadi, ide untuk menebak nama pengguna dan kata sandi tidak ada gunanya bagi peretas.
Menghasilkan Uang dengan Blog
Ada berbagai alasan orang ingin mengeblog, dan salah satunya adalah menghasilkan uang. Akan tetapi, saya memutuskan untuk membahasnya di bab terpisah karena a) ini bagian paling sulit dan b) karena kemungkinan masih menarik bagi semua bloger.
Dengan kata lain, walaupun monetisasi bukan prioritas, kenapa tidak mempertimbangkannya dari awal? Lagi pula, siapa yang tidak mau uang tambahan? Apalagi pemasukan pasif?
Jadi, dalam bagian ini, saya menyediakan ringkasan cara yang paling bisa diterapkan untuk menghasilkan uang dengan blog (semuanya pernah saya coba, dan beberapa masih jadi sumber pendapatan utama):
Iklan: memasang iklan gambar, teks, atau video di blog Anda. Ini mungkin cara paling “otomatis” untuk monetisasi blog. Cukup masukkan sedikit kode dan lihat bagaimana lalu lintas pengunjung terkonversi menjadi uang. Kekurangannya? Konversi iklan relatif rendah di internet. Artinya, Anda membutuhkan banyak pengunjung supaya pendapatan dari iklan mencapai jumlah yang lumayan besar tiap bulannya. Beberapa platform terbaik untuk bloger yang ingin mendapat pemasukan dari iklan adalah AdSense dari Google dan BuySellAds.
Afiliasi: menyebutkan atau bahkan jelas-jelas merekomendasikan produk pihak ketiga di blog Anda, dan mendapat komisi dari tiap penjualan via tautan yang Anda sediakan. Kunci dalam pemasaran afiliasi modern adalah kualitas. Makin tepercaya dan bermanfaat blog Anda, makin besar kemungkinan pembaca mengikuti saran Anda. Ada panduan tersendiri tentang afiliasi di Webmaster Academy kami. Jadi, saya hanya akan merujuk Anda ke sana untuk mencari kiat dan informasi yang lebih mendalam.
E-commerce: alias menjual barang di internet. Untuk beberapa alasan, ini adalah versi pemasaran afiliasi tingkat lanjut karena sekarang Anda menawarkan barang dan jasa secara langsung di situs, bukan mempromosikan produk orang lain. Artinya, Anda perlu memikirkan beberapa hal seperti manajemen inventori, logistik, dan pajak, tetapi setelah bisa mengatasinya, pilihan ini bisa jadi sumber penghasilan yang jauh lebih stabil (dan terus menerus) daripada metode lain.
Rahasia Terpenting + Diskusi
Setengah jam yang lalu Anda hanya membayangkan punya blog, dan sekarang Anda sudah jadi pemilik blog! Tidak sulit, ‘kan? Jika Anda merasa terbantu dengan panduan ini, saya sarankan Anda membagikannya di akun Google+ dan merekomendasikan pada siapa saja yang ingin jadi bloger. Apabila sepertinya ada sesuatu yang kurang dalam panduan ini atau ada pertanyaan, silakan menggulir ke bawah sampai menemukan bagian komentar, dan bergabung dengan diskusi.
Bagaimana? Rahasia penting? Oh, itu… Begini, tidak ada yang mau membaca bagian kesimpulan tanpa judul menarik seperti itu. Tapi! Memang ada saran universal yang ingin sekali saya berikan pada diri saya di masa lalu seandainya saja bisa: membuat blog itu butuh waktu, bukan beberapa minggu, tetapi berbulan-bulan. Sabar, dan tekun. Titik ketika Anda ingin berhenti biasanya titik ketika upaya Anda akan membuahkan hasil.
Jadi, teruslah menggapai langit, dan sampai ketemu lagi di Satori Webmaster Blog!
↧
Ionos (1&1) Review: Is the Largest European Hosting Provider Worth Your Money?
The Story of 1&1 Ionos
Which Hosting Plan to Choose?
Our Impressions of Ionos
Pros and Cons of Ionos
Expert Verdict + Discussion
Which Hosting Plan to Choose?
Our Impressions of Ionos
Pros and Cons of Ionos
Expert Verdict + Discussion
Ionos? No, that’s not some remote Greek island – it’s the new name of 1&1 (also spelled 1and1), one of the biggest hosting providers in the world. As the company celebrates its 30th birthday with a /slightly/ funky rebranding, we will take our time to thoroughly examine 1&1 Ionos from a customer’s perspective and answer the following question:
Should you choose Ionos to host your websites, domains, and other online assets – or are there better alternatives?
Apart from that, by the end of this review you will get a clearer picture of 1&1’s product range, allowing you to make a better choice if you do decide to become their client. In other words, you will learn..
- What is the best hosting plan for new Ionos clients?
- Which extras are worth using and which aren’t?
- Are there any hidden fees you should know about?
- How good is 1&1 support and personal consultants?
We will also solve some of the “mysteries” which might have left you puzzled after exploring the Ionos website. For example, what’s the difference between “WordPress Hosting” and a simple “Web Hosting” where you can also install WordPress.
One more thing before we dive in: we think it’s fair to let you know that some of the links (not necessarily to Ionos) in this article are affiliate links, meaning that we might get a commission if a person clicks on such link and makes a purchase. However, the good news is that –
– a) this does not increase the price you pay at Ionos or elsewhere (in fact, thanks to partnerships we can offer better deals to our visitors), and b) we value our long-term reputation more than short-term gains and do not recommend something sub-par just for the sake of earning an additional penny.
Alright, now that that’s been clarified, let’s take a short trip in a time machine to understand the origins and background of 1&1 Ionos –
From Ads to Hosting: The 30-Year Journey of 1&1
With more than three decades under its belt, Ionos can be considered a true mastodon of the online services industry. Let’s admit it: even just surviving for that long in such a rapidly changing market is an achievement in itself, let alone growing into one of the largest global players.
From its humble beginnings in 1988 as an online ad seller called 1&1 EDV Marketing, the company has made many strategic switches over the years, eventually expanding on the international arena and focusing almost entirely on web hosting services.
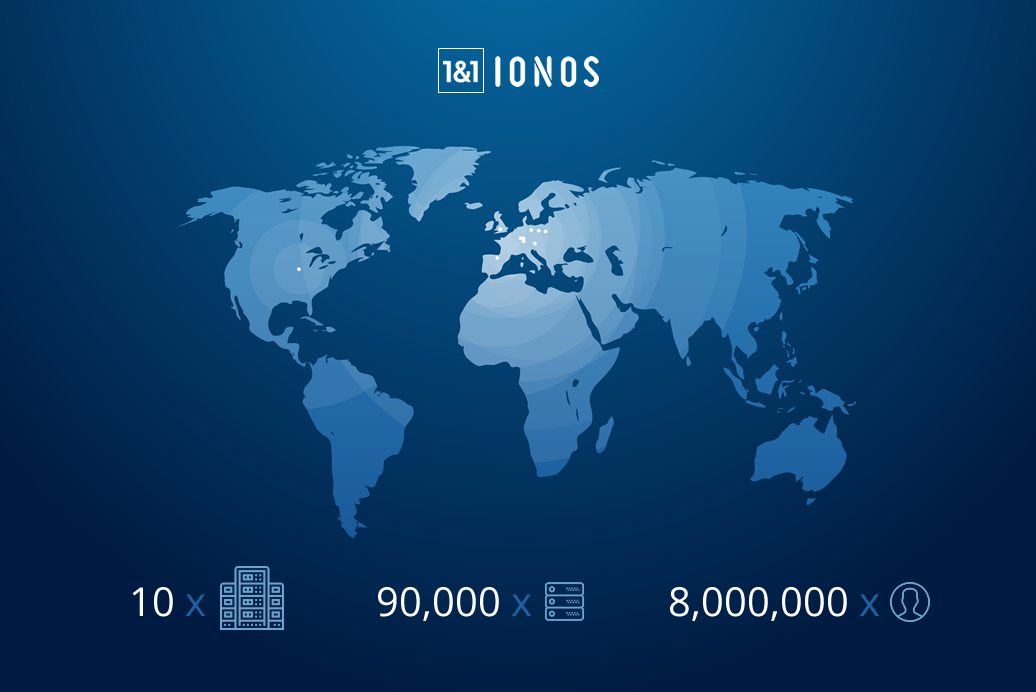
Just by briefly examining the official website, one can make a good guess about the origins of the company: true to its German roots, 1&1 Ionos pays a great deal of attention to transparency, privacy, and quality. There are hardly any footnotes or extra-fine print – all details are made clear right where you’d expect to see that information.
The sheer range of available services might get overwhelming, though: there’s web hosting, cloud hosting, dedicated hosting, “online starter kits”, website builders, HiDrive storage, Kubernetes as a service.. Say what?!
In order to not go into stupor over this abundance of options, let’s take a step back and agree on the major user categories we’re interested in: a private person, a small/medium business, and a developer/freelancer. In the next chapters of this guide we will discuss which Ionos services are most suitable for each of these use cases.
You might have noticed we didn’t mention large businesses among our user groups, and that’s intentional – if you are a big, established enterprise, you probably know what you want or can afford to hire expensive consultants to tell you what you want. In any case, discussing this segment is unlikely to add value to this humble review :)
Choosing a Hosting Plan at Ionos, Based on Your Needs
If you’re making a website for yourself (your uncle, your friend, etc) or for your moderately sized business, there are basically two product ranges for you at 1&1 Ionos: the standard shared hosting (they call it simply “Web Hosting”) as well as WordPress Hosting.
This division might seem a bit artificial, because it’s also quite easy to install WordPress (below also WP) on their shared hosting – there’s even an automated system for doing just that included with any Web Hosting package.
To help you (and ourselves) figure this out, we have put together a table of the most important differences between the Web Hosting and WordPress Hosting product lines at Ionos:
| Web Hosting | WordPress Hosting | |
|---|---|---|
| File storage | HDD (slower) | SSD (faster) |
| Number of websites | No restrictions | Limited per account |
| Automatic WP updates | Need to set up yourself | Included |
| WP auto-installer | Basic | Advanced |
| Pricing after the 12-month promo period | Slightly less expensive | Slightly more expensive |
It’s worth stressing that these are the only real differences we could identify. In other words, we did not include any features that are mentioned as advantages on their WP hosting promo page but which are actually also available for Web Hosting packages.
Can you set up automatic updates on your own? Of course. Do you really need an advanced auto-installer which adds extra plugins and themes right away? Probably not. There’s one thing in the WordPress Hosting packages that you do want, though!
SSD (Solid State Drive) is a relatively new type of storage which works like a flash memory stick rather than a rotating aluminium disk used in the traditional hard drives (HDD). Thanks to its design SSD is way, way faster than HDD, and this difference matters quite a lot for your website speed.
To be clear – there’s no particular advantage to using SSD specifically with WordPress, as Ionos’ website might lead to believe – but it does help to make your website faster, regardless of which content management system you are using.
To sum up, if you need one or two websites and have already considered using WP, go for the WordPress Hosting, choosing the package according to how many websites you need. The speed advantage of SSD is worth it.
If you’re planning to use another site engine or if you need to spin up dozens of WP websites on a single hosting account, the Web Hosting packages might be a better alternative.
What about their website builder, you might ask – seems easier than learning to use a content management system – just choose a template and replace the text with your own, right?
While it does offer a somewhat faster way to a completed website, there are a couple of things that make it less attractive if you think about it:
- If you go with WordPress, your choice will be much, much wider in just about every aspect. While the number of available templates (over 400) in the Ionos Site Builder is quite impressive, most of them look dated in terms of both design and features, at least in comparison to most of the modern WordPress themes (even the free ones like Bento, we’re not even talking about hyper-advanced paid themes like Avada).
- On the same note, the choice of features and extras in the Site Builder is incomparable with the 50,000+ plugins available for WP. And those are only the free ones! Since developing website builders is not the main focus of Ionos (and probably never will be), this product is just unable to compete with specialized platforms like WordPress or even Wix in terms of power and flexibility.
- If you’re using Ionos Site Builder, you are bound to that platform for as long as your website exists – migrating to another content management system later on, even the open-source ones. This means that if Ionos decides to change something later on or increase prices, you won’t have any alternatives other than completely re-creating your website from scratch somewhere else.
Unlike other providers like e.g. Hostinger, Ionos does not allow you to actually try the website builder before you pay for it, so you’ll have to just trust me on this one: it’s not worth your time. Taking into account the above arguments, I don’t see why anyone would choose the Ionos proprietary site builder over a full-fledged WordPress.
Alright, alright. What about the Website Starter Kit? Well, it’s essentially a simplified version of the website builder which tries to make additional upsells along the way. After what I’ve stated in the previous paragraph it would be inconsistent to recommend this one.
This was a long explainer, I agree. And it’s still not over, because we promised to also look at Ionos products for more advanced users! So go stretch, grab a coffee maybe, and come back for the second part. Or, if you’ve seen everything you need already, you can use this in-text link to scroll down to the next section which summarizes the pros and cons of 1&1 Ionos.
..
..
If websites and web applications is what you do for a living (i.e. you’re a freelancer, a developer, an online entrepreneur, etc) – you might need something more powerful and customizable than simple shared hosting. Which means you have the following Ionos offers to choose from:
- Virtual Private Server (VPS), or vServer, offering dedicated resources and root-level access so that you can configure each detail exactly as you need. Here’s where all the advantages of Ionos as an international giant really shine: solid infrastructure and built-in security, 100% SSD storage, as well as 24/7 personalized support make for a fairly attractive package. As an added bonus, you can choose between European, UK, and US data centers for optimal performance.
- Cloud Hosting comes in various flavours at Ionos, which can be rather confusing until you realize that the Cloud Hosting offers are exactly the same as IONOS Cloud, plus free domains on top. In any case, the specs look good until you start comparing the offers with companies which actually specialize on cloud hosting: very similar plans cost significantly less at Digital Ocean, which has more data centers and arguably more features for professional users.
- Dedicated Servers, suitable for the most demanding projects, is another example of a product which uses the competitive advantages and the sheer scale of Ionos to the fullest extent. If you’re sure you need dedicated hardware, there’s no reason not to choose one of Ionos’ packages (also, if you’re not sure, then probably you don’t; a VPS might be a more suitable solution).
By the way, if you’re still a bit confused about the differences between shared, VPS, cloud, and dedicated – or just want to refresh your memory, there’s a summary table in our in-depth guide on choosing hosting in the Satori Webmaster Academy.
Let’s summarize what we’ve discussed above: if you just need a more powerful and flexible hosting, go for Ionos vServer, they have very decent offers which fully take advantage of the state-of-the-art infrastructure and international scale.
To reiterate – the other hosting types are usually worth considering only if you know that you specifically need cloud or dedicated.
Regarding the first one, I’d recommend going with the industry leader rather than Ionos, because cloud hosting is Digital Ocean’s flagship product and they clearly invest more time and money into continuously improving it. For the same reason, they are able to offer superior cloud quality for lower prices.
As for dedicated hosting, Ionos is a perfectly fine choice, considering their focus on hardware quality and security.
Alright, the logic behind their product range seems clearer now. In the next chapter we will share our overall impressions from using 1&1 Ionos, before wrapping up with pros and cons as well as the final verdict.
Our Impressions Of Ionos
Apart from features and specs, customer support is a vital part of any hosting offer. Regardless of your proficiency level, you will have questions sooner or later, be it silly rookie mistakes or something not working fine on their end.
From what we’ve seen, Ionos does take support seriously, judging by their move towards the concept of a personal consultant – a company representative who acts as your primary point of contact with the hosting, and knows your situation in more detail than a random support officer.
The personal consultant thing works like this: once you register an account at Ionos, you are able to “activate” this feature from your hosting admin panel. Once you click the activation button, you will see the name and the direct phone number of your direct contact at Ionos.
One might think that a company with several million clients is just physically unable to pull this off, but let’s do a quick calculation:
Ionos claims to have over 8 million clients and 7000 employees in total. Even if just half of them work in the client support function, and assuming each client makes 3 support requests per year, every year, we arrive at an estimate of 25 support requests per specialist per day, or 3 per hour – quite manageable.
Having said that, of course it’s still not possible to ensure you’ll always be talking to your manager when you contact Ionos (not even mentioning that servers can also misbehave in the evening or at night, for example) – but it’s a nice touch and a laudable attempt nevertheless – especially in an industry which mostly looks the opposite way when it comes to support (i.e. trying to get rid of human interaction as much as possible).
On the other hand, there’s no live chat option at Ionos like e.g. at GoDaddy, which is a pity because being able to write in real time, to a real person, can sometimes be a real time-saver. We feel like a chat (or a hybrid chat-email system) would be a welcome addition to Ionos’ already strong support offer, even if you won’t be chatting with your personal consultant most of the time.
Apart from tete-a-tete support, Ionos has made sure that as many standard questions as possible are covered by its written guides. In fact, they took it so seriously that they’ve created three separate environments for that: the Community, which is a collection of general hosting-related articles, the Startup Guide specifically for new businesses, as well as the Digital Guide which covers a wider range of topics from promoting your website to digital laws and regulations.

Are those really useful? Absolutely. Why did Ionos need three separate knowledge bases instead of a single massive archive of useful materials? Beats me.
Since it’s not the first time we’re observing something like that (remember the multitude of re-packaged site builders and cloud hosting?), maybe it’s just what Ionos likes to do – puffing up like an alpha-male pigeon to look big and serious.
While it’s a perfectly reasonable compulsion for a multinational company with millions of clients (and most other large hosting providers do that too, of course), I still feel like in this day and age, focussing on being lean and easy to use is even cooler. Just a personal opinion.
But I digress!
You might have noticed that Ionos even has a mobile app which allows managing your hosting account from any Android or iOS device:
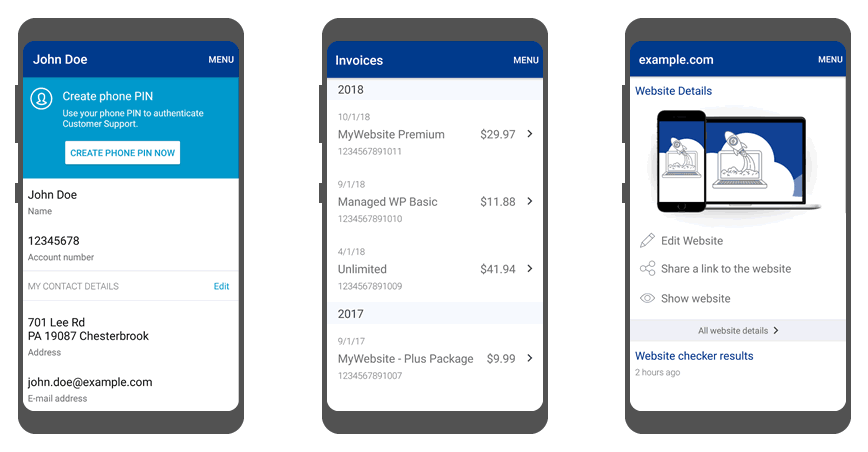
And it’s a pretty decent app, by any standard – you can use it to check if everything’s alright with your server, ask for support, view invoices, change your account details, and even get automated advice for improving your website.
With that being said, it still doesn’t feel like a very essential component – I mean, if managing a website is not your primary occupation, you won’t be using the hosting admin panel too often in any form. If, on the other hand, most of your work revolves around websites, you are already online most of the time from your primary device.
Or maybe it’s just me being old-school, who knows. In any case – a hosting panel app is not something I would download on my phone, because I’m totally fine with the online hosting panel.
Pros and Cons of 1&1 Ionos
Alright, now that we’ve examined Ionos from various perspectives, it’s time to summarize its advantages and weaker points. We will not mention the obvious things and only focus on the real differences compared to other hosting providers:
- State-of-the-art hardware: over 90,000 powerful servers in 10 data centers in Europe and the US. Installed and managed by Ionos, no outsourcing.
- High security standards on both hardware and software levels. All EU data centers of 1&1 Ionos have ISO 27001:2013 certificates.
- Close to 100% availability for your website thanks to geographically redundant architecture, as well as high speeds thanks to 360 Gbit/s data center connectivity.
- Flexible scaling system for server performance: you can add more processing power or memory in a click and get billed by the day. If you afterwards feel that the extra resources are not needed anymore, downgrading is also surprisingly easy.
- Some of the best value for money WordPress hosting packages with fast SSD file storage you can get anywhere on the web right now.
- Each Ionos client gets a personal assistant to help with any questions and issues. While the quality of support can still be improved, this is definitely a positive approach for a large international hosting provider.
- SSL (Secure Socket Layer) certificate included with each hosting plan, allowing you to make your website safer for visitors by encrypting traffic. Sites with SSL use the https:// handle in front of their addresses and display a friendly green lock in the browser address bar.
- A built-in CDN (Content Delivery Network) with some hosting plans: your website automatically gets distributed between several data centers in different parts of the world, thus maximizing page load speed regardless of where your visitors are physically located.
- While their site builder looks more modern than other similar offers by hosting companies, it’s still far behind even the free content builders available for WordPress or other popular site engines.
- Ionos’ custom-built hosting control panel looks clean and works smoothly enough, but it’s still not cPanel or Plesk, so if you’ve already dealt with any of the popular hosting admins, you’ll need to get used to a completely new one.
- The process of creating a new account could be made smoother, especially the personal details form which consists mostly of free-form text fields like postal index and street address which only get validated after you try to submit the form.
- Live chat could arguably be a welcome addition to the support options, even if you wouldn’t be talking to your personal consultant most of the time.
- The product range seems bloated at the moment, with some near-identical offers re-packaged as different products, for example Website Builder vs Website Starter Kit, or Cloud Hosting vs Ionos Cloud.
Whew, that’s a lot to take in! So what’s the bottom line? Is the 30-year-old hosting provider still on top of its game – or is your money better spent elsewhere?
Our Verdict on Ionos + Discussion
As you might have noticed, we haven’t tried to evaluate 1&1 Ionos as a whole so far. And that’s a conscious choice: when a company gets as large as that, there will inevitably be some really strong products as well as some offers which are meant to just pluck holes in the product portfolio.
So we could, of course, say that Ionos is a respectable international hosting giant which top-notch infrastructure and support, and that it will probably keep offering reliable services for another 30 years (and probably 30 more)..
..but such superficial characteristic, albeit true, would not help you much in deciding whether to spend your actual money at Ionos or take it elsewhere. Because everyone is interested in solving their specific problem, hence the need to look deeper.
With that in mind, here are the main takeaways from the more detailed analysis above:
- If you want to build a relatively simple website (1-50 pages) for personal use or as a small/medium enterprise, their WordPress Hosting offer is the best solution, with its fast SSD storage and other optimizations that can mean higher load speed and therefore more satisfied visitors.
- If your work is tightly connected with websites and web apps (e.g. you’re a freelancer or a part of a developer team), go for one of Ionos VPS packages. These successfully leverage all the strong sides of this well-capitalized multinational hosting provider.
- The plethora of cloud services at Ionos seems more like a catching-up attempt on their part than a flagship product, so you might consider Digital Ocean hosting instead – at least for the time being, DO is way ahead in terms of both features and value for money.
Still perplexed? Not sure if one of Ionos products is a good fit with your project? You know what to do! Just scroll down to the comments section below and tell us what’s bothering you. Personal opinions and real-life experiences with Ionos are also very welcome, of course. Let’s discuss!
↧